Tuesday, March 31, 2015

Encountered problems

When I first investigated why the angle selector on my Stanley No 60 mitre box was not locking at the preset detents, I found out the the lever was installed upside down, the notch for the spring was toward the frame and the other side is rounded, no place for the spring to catch. Pushing in manually the pin works fine and she locks solid.

Looking at the parts breakdown it is obviously installed upside down

So I thought, no big deal, I just have to punch out two pins and reversed it

The first thing I noticed was that the pins were in fact made of a finish nail, hum so that was obviously replaced, and would explained why it was installed incorrectly.


But when I tried to just flip it and re-installed in the proper orientation, I had a big surprise!, It will not fit with the holes made in this piece...!!!

Proper orientation, the holes are offset 

As it was installed

As you can see, it has to go this way to catch the spring

Holding the pieces together you can see how the spring is suppose to catch on

There is no way the spring can stay on top of the lever when piece is reversed, but it is the only way it will fit since the holes are offset on one side.

Sooo.Tabar....Look like I gonna have to make a new piece. Merely drilling new offset holes, wont do, there would not be enough meat left in between. I am going to make a new piece. The good news is, it is an easy shape to duplicate, with only a hacksaw and a drill. The twist for the handle I can do in a metal vise.
What I find perplexing is that a close examination of the piece appears to shows it is genuine, it was obviously stamped from a sheet of metal, the twist is smooth and no sign of being homemade. Why on earth are the holes offset on the wrong side??? Was that box made on a Friday afternoon? :-)
I doubt it would have left the factory like that, so what gives??

What should have been an easy, quick repair job, is turning out to be a show stopper.
I am now on the look out for a suitable piece of metal, to make a new piece, and while I am metalworking, may as well make the missing catch also.
This simple job, just got relegated down the priority list, sigh.

Heres hoping that the Craftsman mitre box that I should see this weekend  has no major issues, other than the saw is obviously inserted from the back in the sellers picture :-)


Bob, left scratching is head and swearing in both of Canada's official language

Monday, March 30, 2015

And around the shop we go

I started with the bench wall, of course, but now I have to keep going around the shop, one wall at a time, until I get it all organized. And by the time I'm done, what did not found a place will have to go!

The remaining of the Electrical service entrance corner and the back wall got my attention.
It was first cleared of everything, then primed and painted. Now, the fun part begins!
I decided to switched the two tall cabinets in that corner.
Then I moved in the big Snap-On tool box, that makes it more closer to the bench, to be able to switch my tools in and out more easily of both the antique tool chest and the Snap-On one.


The small library cabinet was then moved in, clearing the top of it I finally found my shooting board. It was in front of me all that time while I was looking for it everywhere else...Clearing it allowed me to put the long wall cabinet on it, which was removed from the bench wall for the plane till. With that cabinet off the floor, I can now walk around the shop, bonus!

Trying to visualize how I am going to store some of my clamps, and which ones, in there.

If I put in my sharpening station in there the clamps would have to move somewhere else.
But that is about the only location suitable for this wall cabinet

I am going to need some place to setup my miter box permanently. 
Perhaps by my saw till? 

The flimsy lumber rack on the rafters has been removed, the vacuum hoses that were on it are now in the garage. The remainder of the stuff has been dispersed or turfed.

It was always in the way anyway.  With a few more storage options here and there, I think it will do.
That still leave me a tall cabinet to put somewhere else.  Will figure it out when I tackle the opposite wall of the bench. Not sure if I want to keep that build in bench in there. Maybe I'll start with a clean slate. Oh, that would give me the room for a bigger bench, wouldn't it? :-)
Yes, but I also want to have a dedicated sharpening corner. It will require power outlets and I may need access on three sides of that sharpening station.
And I am currently using that built in bench for wood storage under, that will required room somewhere else. There are two electrical outlets in front of it, which would require relocating them.

If you squint, you can just see that there is actually a bench under all of this. 
I'm afraid it has becomes more of a catch all for everything right now.

While I was taking some measurements I took note of the built-in benchtop. It appears to be made from 2x4, making it about 1-1/2 in thick. It measured 70x22 in. Hum, that is just about a 6 footer bench, so that would fit in there if I removed this built in contraption...

Once these two walls are done, the remainder wall and the storage area in the doors corner would be mostly for storage.

Will definitively have to remove most of the wood storage in there. It is taking up too much valuable space. I will keep some wood storage, but a lot less and better organized.

With only two walls already painted a light shade of gray, it really makes a huge difference in the general lighting. Once all the walls are done and I put more lights in, it will be much brighter still.

Bob, slowly coming out of the darkness.

Sunday, March 29, 2015

Miter boxes

For the last 20 some years, I have been making out with this vintage Stanley No 150 mitre box. It came with a Disston 16 in back saw.


It works OK, not great but OK, and have been trying to find a better box, like a Millers-Falls or Stanley 300 series. Problem always been, unless a local find (rare) the shipping can get ridiculous, and the prices on line are all over the places up to the sublimely ridiculous US$1279.99 for a No 60, really!? Oh, well I suppose, you get free shipping :-)

Pst... rare it is NOT!

The other day, I came across an unknown Craftsman miter box for really cheap on Kijiji (sort of a Canadian Craig list) it look promising, so I asked my son to pick it up for me, being close to where he live. I haven't seen it yet, he will bring it down on his next visit.

Obliviously the seller does not know how it work :-)

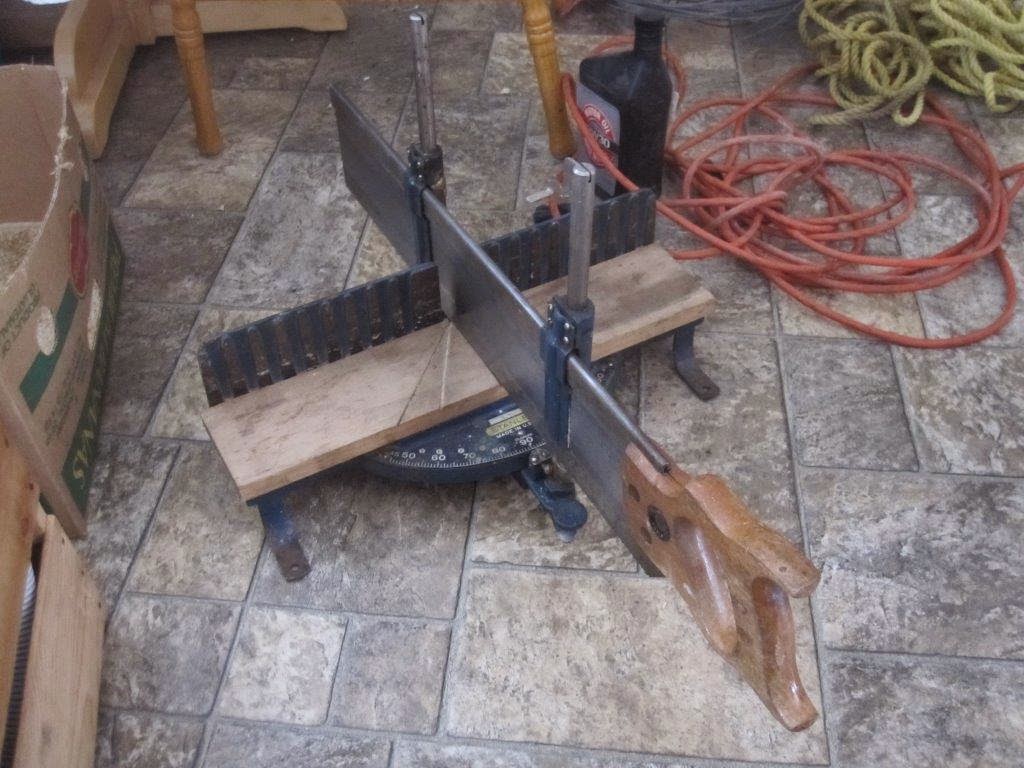
Then we go to a local auction, and in this lot box of junk, I spied a rather big mitre saw.
I bid on the lot and won, and was excited to find after that there was a Stanley mitre box under that junk.

The long mitre box saw was easy to spot 

What I found buried inside after I won my auction :-)

Turns out it is a Stanley No 60 mitre box with a 24x4 mitre saw.


The box has a replacement wood deck board, which I figured out is too thick, it hides the two tapered screws that help grab the wood piece to be cut to prevent slippage.

The board, obviously replaced, is fastened by Phillips screws, all other screws on the box are all common slot screws, I'm thinking, must be not the original screws on the board? One of the foot bracket (LH in pic) has one slot and one Phillips screw.

The rear post sliding bracket has been, somewhat poorly brass welded, to repair a breakage but besides its ugly look, it work fine. I may try to file the big glob of brass and repaint that part.

There is also some sort of poor repair at the bottom of the post and there is some play on that post, will have to see if I can fix that, otherwise the accuracy will be lost. Worse case scenario, I will make that post permanently fixed.

The carriage stop detents doesn't seems to lock. Looking at picture on line and mine, figured out that somehow, the locking lever is installed backward (upside down) preventing the detent catch to be tensioned by the spring, duh! Easy fix :-)

See how the catch and the spring are supposed to go?

The notch for the spring leaf is on the wrong side

The only missing part is the rear post holder catch, front one is present, and since they are exactly the same, I may use it to make a new one if I cannot locate one.

Front catch. 

Rear catch MIA. If anyone knows where I could find one, please let me know.
It is part MB200 in the breakdown part list illustration.

The saw, 24in X 4in manufactured especially for the Stanley works of Canada, is straight and still very sharp. Not much uses on it. Rust is minimal on the plate, and the handle fit my big paws perfectly. I may still make a nice newer handle for it, very low priority project for now.

Does not says who made it, but I suspect Disston Canada

Besides the blue color on the box, the handle shape 
is screaming late 60s, early 70s

All in all, well worth the small outlay of cash it costed me :-)

I will clean it up, tune it and put back into service. That now make mitre box no 3, so I think I should stop at that count...unless of course some Langdon box happens to come my way. If you happened to know of one in my neck of the wood for sale...

Bob, who is glad he found that 24 in saw before building his saw till.  Maybe I should leave room for a 26 or 28 in backsaw :-)


Saturday, March 28, 2015

Canadian Archaeology in the Maritime's provinces

With all the record snow falls this year we are heading for troubles.

The various strata of snow we got this year :-)

Our snow is really melting fast, causing lots of flooding worries every where. Looking at my shop back entrance I decided that I should probably do something to alleviate the weight on the roof and the pressure against the doors and subsequent flooding concerns.

And that is after some melted away!

Yes, I cleared the roof later, after a breather.

Inside the entrance portico the doors are holding, but I am worry about all the sudden melting water coming in, even with a drain at the bottom of my stairs before the door to the basement.

The back wall received its first coat of paint last nite, should be able to start put back together that corner of the shop starting Monday. Oh, and surprise, more snow this weekend...

Bob, the archaeologist back from a successful auction, didn't expect to find what I did :-)

Thursday, March 26, 2015

And we are off to the races...

I got an ambitious list of project I want to get thru, but I need to get on with some neglected tool maintenance. And may as well fix that back wall.

So I figured I should get the wall done before I start anything else and rearrange everything in that corner.

Took everything off the wall, dusted and vacuum the cobwebs, 1st coat, primer went on.

I now have a big mess on my hands, floor space wise, I will be busy cleaning up and reorganizing this wall for a while. Tomorrow first coat of paint, it will be probably next week before I resume my project plans and regular blogging.

Meanwhile I have a draft almost ready for tomorrow post.

Bob, covered in cobwebs and primer...Again!

Next batter up

Now that the plane till is completed (well, I am going to sand that ugly finish job on the spokeshave holders and redo them), time to move on to other things.

Next I need to finish up a few things on my bench. Put in a shelf under it and install a proper planing stop.  I just happened to have found this metal plane stop at my local old tool's enabler guy :-)
I'm going to install it into a big wooden planing stop  a la Schwarz

Old metal planing stop, will need its teeth reshaped

I also noticed there is a growing gap between the rear of my antique front vise and the bench top, would have to check this out.  And I sure wishes I could come across my shooting board, I thought I unpacked all the "garage" boxes, but still no sign of it??
All I found was my miter attachments for it?

Coming up next, there is the wall to my right.  Will clear everything, including cobwebs :-) and paint it also.

The only reasons all those vacuum hoses are hanging in there, is because they came out 
of a box that I empty in there. They should go to the garage.

And must do something with that cabinet I removed from the wall to put in my plane till, it's in the way.

Came in handy to stained the till's dividers, but it has to go


Tried my longest plane, a 30 in jointer, although a tad more steep, it rest securely, 
thanks to the added clearance from the French cleats

My next big project would be a proper dedicated sharpening station,
Oh so long overdue :-)

Bob, sharpening his pencil

Plane till officially done

Got my piano hinge, I splurged and got a brass plated one :-)


Spokeshave tray is now hinged and I tried my hold up arrangement.  Oups! Really did not think that through for the holder. I wanted to not interfered with the ramp, but unless I bend my stick it does not meet nowhere near :-) Fixed that by carving a shallow through on the side piece, that was fun with the tray loaded, holding it with my head while I carved.


I'm using the space to keep my spare blades for the planes in the till. Some NOS Stanley, some Veritas blade and matching cap iron, and of course some of various angle for my Veritas Low Angle plane.

Yes, its a lousy stain job on the holder, lesson learned, buy fresh stuff next time. 
Can has been chucked.

The plane tray is also fastened, and decided on how I am going to put my dividers in.

I could squeeze them in closer and fit a small plane at the end like a Stanley No 130, but I decided instead to go for wider spacer to be able to screw them in, no glue so  I could rearrange them later 

Machined the divider strips

Before I screw them in, I decided to check the fit of my No 8. 
Lo and behold, it does fit flat, the nose just clear the end


So it look like I can fit at least one more plane securely, as long as it it skinny. 
Stanley rabbet plane No 191 shown

I got the RH side pretty well all spoken for with my plane tools, card brush for files, bench brush, strop and a small parts cleaning brush which I use to clean the planes before storing them back in.


On the other side, still lots of room. All I got so far is various steel rulers.


All I got left is to wait for the dividers to dry and screw them in.
I think, I can officially call this Plane till project finished and time to move on to the next project.
What will it be? Don't know, have a few on my list :-)

Bob, planning away his next bright ideas.