Various forms of hand held tools had been designed thu the ages to bore holes, but to really ensure a level of angular precision, requires some sort of fixed apparatus which hold the drill implement at 90 degrees (some have adjustable table for angles in between). Enter the drill press. And yes they made their apparition long before electricity...
Besides holding the bit at a fixed angle, the other requirement is a down feed force. Either supplied by you via a lever or spining a wheel, or... with some sort of mechanical ingeniosity.
The Miller-Falls No 25 Breast drill equiped with a chain drive on the chuck.
As the chuck rotate, it tigthen the chain and pull the drill bit into the workpiece.
Makes drilling into metal or hard woods much easier
Some of the early design, simply mounted a regular hand drill in a special frame to hold straight. And of course some were simply made with a built in drill apparatus. Similar construction as the lowly hand drill but not removeable.
These rather smallish DP were meant to be bolted temporarely on a bench surface, hence being "portable". They stand about 12 to 20 in hight above the bench
Miller-Falls bench DP using a replaceable hand drill.
Don't let the pics with the hand drill mounted fooled you, it has been modified to look more permanent. It does indeed use a regular hand drill and probably only certain model(s) ?? Lever action push the drill down.
Pics from EBay
A Goodell-Pratt Toolsmith small bench DP
On this one, the down force is exerted by spinning the top wheel
Pic from EBay
Miller-Falls No 210 bench DP
It use a built in mechanisn rather than a removable hand drill
Pic from EBay
This similar sized one is meant to be more
permanently bolted to the work surface.
This one still sport the archaic one size hole chuck
with a set screw sticking out.
Pic from EBay
Similarly, today, they make small bench rig to secure a portable electric hand drill, transforming it into a small drill press.
A well made bench drill rig. Cast aluminun and steel.
Never used it, but at $5 in a yard sale, I just had to have it :-)
This Rig the Port-A-Lign hold the electric drill by its chuck shaft,
meaning you have to remove the chuck to put it on then reinstalled it.
Annoying, I left a dedicated drill in it for years. The taped parts are the drill original screw parts for that operation
And here is the dedicated drill I used on it.
The long space between the drill housing and the chuck, was to hold the removable sliding piece between the post. I left it on for eons, making it a knuckle buster with an often rotating piece, but I got used to it, Heather not so much, oups, hence why I finally removed it
Another design, which was also portable, was the Beam Boring Machine (BBM). It enables you to bring the drill press to the beam, which is a smart idea since it is a lot easier to bring the tool to the beams than vice versa.
Beam Boring Machines, or Carpenter Boring Machines
or Barn Beam Boring machine and etc.
They come in two flavours: Upright (fixed) or Angular
Mine has a fixed drilling colunm, but fancier models, have a tilting head, enabling angle drilling and... enabled the head to be lowered almost flat on the bed for easier storage and portability.
An angle adjustable or angular BBM
Fold not quite flat for storage
Pic from EBay
In use, you lay down the BBM bed on the beam and sit on it to secure it in position. That put you in front of the machine and you can just turn the handles to operated it. At the end of the operation, most have some sort of rack and pinion device to crank it back up out of the hole. On mine you simply slide a gear over to engage that feature.
Slide the gear on the handle's square shaft to the left to engage the rack gear.
Mine is missing the top clip to hold the head.
The big set screw sticking out of the chuck would give OSHA a heart attack, but you are sitting in front of it a fixed distance, it would be hard to lean into it
When it reach its uppermost position, it engage some sort of clip to secure the head up, ready to be moved for the next hole.
The retaining latch and clip are seen in the middle of the top arch.
It is missing on mine, I will have to come up with something.
Pic from EBay
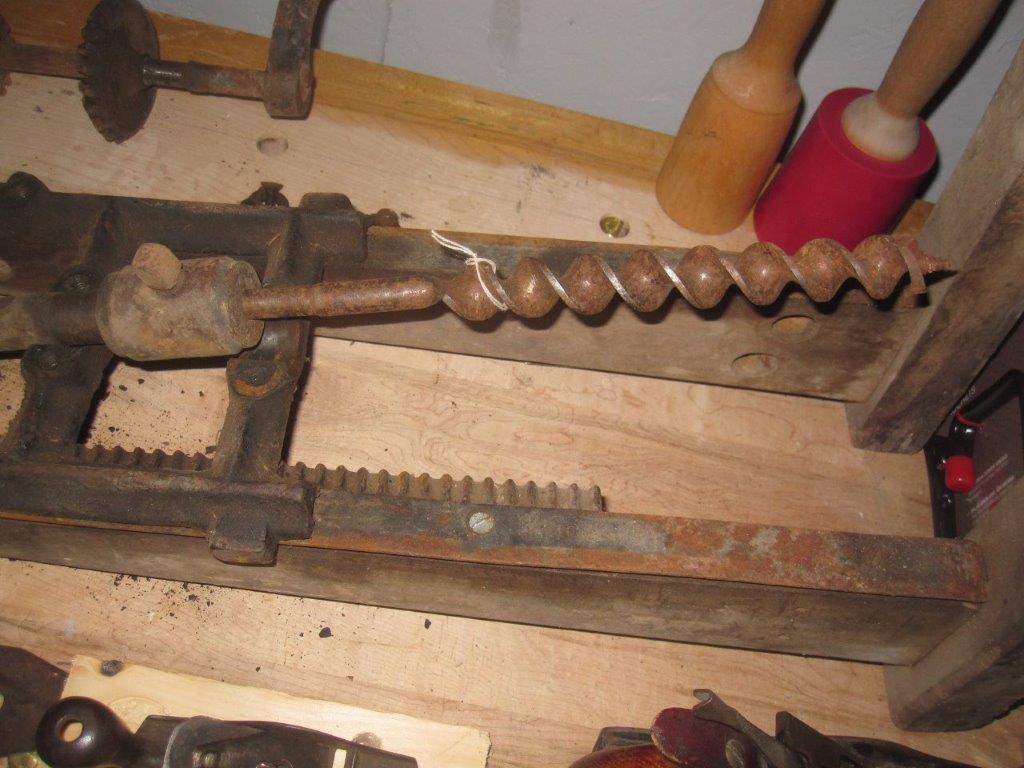
Another mechanical contraption of the days, was the Post Drill Press, or sometimes refered to as a Blacksmith Post Drill
1902 advertisement
The idea being that long before electricity, blacksmith and farmers, often required the ability to drill thru metal. A hand tool is great in this application since the drilling speed is only as fast as you make it. In other words, its slow rotation and steady down pressure makes it ideal to drill thru metal and being of constant down pressure, it is easier on the bits. Their somewhat slower speed are not as great in wood drilling, but they still work fine. Some, such as mine, have provision to select two and sometimes 3 speeds by simply moving the handle boss on a different pinions.
Mine in the garage, awaiting a good degunking and possibly a paint job (?)
The only thing I had to replaced so far, was the missing bolt to secure the drill press table on its moveable bracket. It is in operating condition and complete. It has 2 speed and a lever operated auto retraction mechanism.
Quite a fancy model from Champion Blower & Forge Co.
I have yet to identify this model, it is not cast into it, as they usually are ??
They are called Post Drill because they were meant to be installed on a post inside a barn or a blacksmith shop. Mounting one straight on the wall will not allowed enough clearances for your hands and you will scraped your knuckles.
I have an old 6X6 post, drying in the garage
and I bought a post block for it.
Their ideal mounting height should allow you to comfortably crank it without
having to reach up while cranking. Note also that the handle's extension sticking out is adjustable. That way you can accomodate differing height persons and varies the strength of the stroke. The mass of the flywheel attached to one side, smooth out the rotational jerkyness of the hand cranking and gives it momentum.
They are quite safe in use. A late friend of mine used to have a little shop in Digby, called "The return of the toy maker". Kids could make and assemble a small boat kit under adult supervision. He had a few hand operated and foot operated machinery, such as Post drill, Barnes foot pedal Scrollsaw, Delta hand cranked scroll saw and etc. It was safe and fun for the kids to make the few operations required: Cut the shape on the scroll saws, drill holes for the mast on the Post drill and etc
These post drills used 1/2 inch shank bits and they must be long enough to enable the full range of drilling.
My one and only BBM bit, shown mounted on its chuck,
also worked on my Post drill.
Same size's archaic chuck as used on my Post Drill chuck.
They are much longer than the regular brace bits.
In case you wondered, the bit is sticking out at an odd angle
because the BBM is in pieces on my bench...still
They often have a flat spot on one side of the bit's shank, since the typical chuck of the day was simply a round cylinder with a matching sized hole (smidgen bigger opening) and a set screw sticking on the side. This screw sticking out was one of the first modification to appears in the name of operator safety. The spinning chuck with a screw sticking out can bite you if you forget about it. Now, when spinning by hand, it is not much of a problem, since if you stop turning, it can be made to stop quickly. But as we transitioned toward line shaft driven machinery, and still using the same archaic chuck design, it became more of a safety issue with the corresponding increase in speed rotation.
And once mandated, there were of course a few patented "safety" chuck available to retrofit lots of machines for the safety of the industrial workers.
Some simply recessed the screw inside the chuck body, others were
a tad more complicated. The "safety" types chuck quickly became standard issue until replaced by the Jacobs chuck, still in use today
Incidently, the most commun modification for them is to simply mounted a
Jacobs style chuck onto the existing cylindrical chuck.
NO modification required and you can used various drill bits easily and even used an extension shaft for the bits if required. That simple hack also correct one of the original chuck design flaw, because the bit was simply push to one side for attachment, you end up with a slightly offset bit. Amazingly, because the work piece is normally not secured but held in your hands, you can get by with a amazing amount of offset (within reasons) and still drill straight down, because the piece is moving along the eccentricity of the bit. You have to experienced it to believed it, (
or watch You tube) but it does work well in spite of the offset... and the missing flywheel in this video
The ingenious part of them is the simple but efficient auto-feed mechanism.
Imagine that, you just crank up the handle and the bit advance automatically at a constant rate. You can also adjust somewhat the feed rate for the material on hands.
These patented features on the Champion are said to
really speed up the operations required to drill
That simple mechanism allow you to used one hand to secure the piece while cranking the DP with the other hand.
Check out this amazing contraption in use
Having been primarely designed for metal working, they have the same limitations as today's Electric Drill Press, a small work table... Since I am going to introduced it into my hand tools shop, I will probably make up a bigger worktable better suited for my uses.
Back in the days of line shaft driven machinery, the
Camel back Pillar drill made its apparition. It gets its name from its overall construction details/look.
They are still prized today. Their mass and slow speed are much appreciated.
Most in uses today, have been converted to electricity, that is, they replaced the
line shaft with an electric motor.
NOT the kind of tool to buy thru EBay, the shipping alone would be horrendous :-) These are better off to see in person and make arrangements to bring it back safely. Either in your own truck or have it shipped via commercial shipper.
They were quite plentiful and are still around. As I mentioned earlier they are still prized today.
And of course, once electricity made it everywhere (
the electrification of rural America) the form of the electric drill press we are accustomed to, came rapidly into general useage.
And although designed primarely for metal working (hence the small table) it quickly became a fixture into many woodworking applications.
An auxilliary table, better suited to woodworking
is a must have, easy to make, accessory
Pic from Woodcraft
The only bad thing, being that the sharp increase in rotation speeds, necessitated different bits design. But if you dont respect the different speed requirements of the various bits (I.E. change the speed up or down via multiple pulleys arrangements) you will damaged the bit caused by the heat generated by the rotation speed. That was never an issue in hand cranked operated machinery...
Having long recognized the limitations for woodworking usage, some manufacturers have came out with
various design better suited for drilling wood. Multiple speeds to accomodate the drill bits and the material being drilled, a better suited work table and etc.
But if there is one thing, I always found frivolous, it is the introduction of various laser pointing system, so you can see were you are about to drill. Really?? Have you tried lowering the bit to the spot...
A laser gizmo doodad to add to your DP...NOT
Pic from manufacturer
Drill presses have comes a long way and they are still very much handy to have in your shop. For working on both metal and wood. As we saw, they came in various flavours and sizes for every jobs imaginable in various price points. Get one... or ... collect them all :-)
And NO, I have no room for a Camel back DP :-)
Bob, making room in my hand tool shop for the Post drill