Thursday, January 24, 2019

Taking care of business

Tool`s maintenance that is...
Long overdue, it`s the bane of any tool hoarder,  err I meant tool aficionado :-)
The more you have, the more you are gonna have to clean, restore, sharpen tune up and etc.
It never really end, cause rust don't sleep...

Recently, I do not have much shop time.  Jean is re-re-arranging the living room, so that gives raise to many small projects and, YES, trips to the stores :-)

We just recently mounted the TV to the wall and rearranged the room around it, but the piece under  has already been replaced and I just now realized it :-)

Gone under is the small table replaced by the desk which used to be at the entrance,
meaning another has moved to replace it and, and...
That pic is off the air with my outside antenna BTW

During my last project, mounting the TV on the wall, I had to resort to hand brace and hand drills to install it, my power cordless driver and drills being at my daughter place with a few more tools...
While using them, I noticed that they were overdue for a trip to the wire wheel, so off they went.

They were degunked, stripped down some parts soaked in Evaporust then wire wheel at my drill press. Finally oiled (WD40) and then the wood parts rubbed down with Howard  Feed & Wax.
This being my new regimen to service my tools.

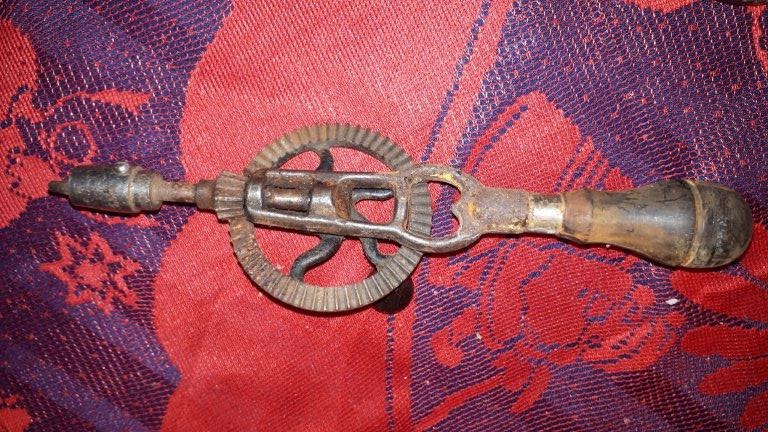
Stanley Rule & Level Co
New Britain USA

No 984.
The handle ferrule is brass, work hardened and cracked (as they are often)
and its plating wearing thin.


Stanley
There was some flaking plating gone under the head and the handle ferrule plating is wearing out.
Other that that, she is all de-rusted and purring again.

Full box ratchet, Barber`s chuck, Rosewood or Cocobolo head and handle.  A very handy tool to have and a keeper.  Must figured out how to hang it in my boring till...

You know I just could not stop there, so as I put back some tools in the boring till, more came out to the garage. De-gunked, strip down, dunk in evaporust, wire wheel oil and waxed.

That went on for a few days, need a break from it now :-)

Next was my MF No 2, it was getting gunky and harder to operate. Now, understand that even gunked, she is still a good operator, but cleaned and oiled?  WOW,  that is one smooth running hand drill!

 Gorgeous Cocobolo handle.

Millers Falls No 2, earlier model with the little wheel 
to keep the gear meshed down under pressure.  Brilliant design!

Millers Falls Co
* No. 2
Millers Falls Mass

Took me a few minutes to figured out how to remove the drive wheel,
The wheel adj. mechanism was solidly frozen together in rust.
WD 40 did the trick.   The center offset shaft push out from the wheel, wheel comes off and the driving wheel can be removed.

That one is a sure candidate for a repaint job, the frame has loss most of its black paint, well worn.
And the red on the wheel is a mere shadow of its former self.  I will strip the paint then repaint it at a later date.  Cannot spray inside for some reasons that escape me :-)

Then, in no particular order, the following that were in my boring till all came out to play and got cleaned,

This poor MF No 1, which normally reside inside my carving tool box, got separated and was found lying at the bottom of a plastic container which got water ingress.
She is in pretty sad shape :-(  But fear not!

Stripped, cleaned awaiting reassembly

From L-R
MF No 1, MF No 5 and Stanley No 626

So How did that poor No 1 came out??  Pretty good, I`m happy


The handle was what I was the most worry about, 
it had a clearly tell tale line and discoloration from resting in shallow water.
Pretty well gone if you ask me, pheww...

That unique and smaller chuck is great to hold small bits which is why it normally stay inside my carving tool box, I used it to pierced holes for the fret saw.

The frame is pretty bare in places, would have to be repainted to protect the frame.  The side handle knob was still solidly frozen last night, today she finally broke free after numerous soaking in WD 40.  Back in service, purring again.

MF No 5 is next:


The newer looking brass ferrule is a replacement from LV.
It had a cracked handle which I previously repaired.
The wood parts are starting to show a crazed finish, would need stripping and refinishing later.
The red paint is in good shape, but the frame has some bare spot.

Stanley No 626:


The black paint on the wheel is near perfect, but the handle finish is peeling off in chunks to bare wood.  Not sure how I will address that.  Obviously a strip and refinish job, but how to best duplicate the original finish??  I am all ears if anyone has suggestions...

Yesterday output:


Previously did a pipe wrench, one from Dad, which saw numerous plumbing jobs … and was getting a tad rusty, so why not? :-)


1/4 inch to 2 inch pipe wrench.  Another candidate for a repaint

And of course a lots of brace bits and C-Clamps.  Definitively need a break from this routine :-)
Meanwhile, plus 12 Celsius today, so our skating rink is all melted again...

Yesterday we cleared the snow and the kids were skating on it.

Today, its all melted again.

But I cannot still removed my last projector left over from my Christmas light decorations. 
Still solidly frozen in the ground.  I'm afraid it will have to fend for itself all winter...

Bob, switching gears.  Another trip coming up soon

Monday, January 21, 2019

Post snowpocalyspe...

Well, many of my friends living elsewhere got it pretty bad, but here sheltered in the Annapolis valley, we got off easy peasy, yet again...
The Bay of Fundy and the north mountain often act as a dividing wedge in our storms passing by, the worst splitting north toward New Brunswick shores.
It looked pretty bad on the satellites and radar pictures, but we were kinda in the eye.
Some snow accumulations, not much, followed by a rapid raising in temp, turned into icy rain, then rain, melted all the snow we had.
Inside my garage workshop it went from minus 10 Celsius (about the lowest so far) to plus 6 Celsius within hours... Strong winds at time, more broken branches around my property, and that's about it!!

After a small dusting of fresh snow on top, this is what we were left with...
Never seen such a big pond in my front yard.
Hopefully it will quickly freeze and make a great skating surface for the kids.

We had a small pond left over from the last similar storm bust, 
that we were using as a small skating surface.

So really just about the same amount of snow that Ken got earlier this month :-)

Ken's snow
Bob's snow

So how does one spent the time during a storm???
How about a quick project, like putting the TV on the wall?
Should be a quick one, I previously mounted the large 50 inch plasma on the wall in the man cave, my PC monitor and another screen in the gym, so I know it`s an easy project.

I had previously marked the location of the studs on the wall using masking tape.
Reading the instruction, it instruct you to install the mounting plate on the TV first, then attach it to the wall bracket. They say, to used whatever bolt size fit your TV and bolts pattern (VESA mount)
The first bag I opened was of course, too big, it was the next size down M4. So you end up with spare parts right of the bat. These screws used a Phillips screwdriver.

Then, when seeing how the bracket would be attach to it, it quickly became obvious that the two nuts required (metric of course) were not included??? Whattttt?? ^%$@#

After rummaging thru my spare bolts and nuts inventory, did not found suitable donor.  Going to the stores? Its Sunday and there is a storm (?) brewing, wont be much open.  Beside, don`t feel like shoveling...yet

Finally, decided to replaced those two screws sticking out (were simply screw in from the back into threaded holes) with Imperial screws and nuts.  Go figure! I have very little stock in Metric size :-)

These new screws of course are using Robertson heads.  Problem is, I am in the middle of some renovation works at my daughter`s place, guess were my drill, driver and screwdrivers are?...
Plan C, I found others Robertson screwdrivers in the kitchen drawer, pheew.


My quickly growing pile of tools and supplies
 after many trips up and down to my shop downstairs and the garage

Since I could not threaded my new screws into that ^%#@ Metric thread, I used slightly smaller screws to fit. But that would leave the screw loose and unable to be tighten... OK so the plate will be screwed to the bracket, then the TV.  Just have to predrill my mounting holes on the wall and we are almost done...

Half an hour later... Since I do not have my cordless drill and driver here, I need something else to drill, then screw the lag bolts into the studs.  Oh and my drill bit box is also at the daughter...
Using a hand drill (MF No 2) and using a bit from my son's toolkit I'm putting together :-)
managed to drill the correct holes called for (5/16)

After more rummaging around, finally found a matching socket and wrench size
No ratchet, but I will be using a brace, so need to adapt.

My small selection of nut drivers for braces all used a square opening, for square nuts, 
which of course does not fit unto a modern hexagonal head, need modern socket set.
Then I needed some adapters for my 1/4 in drive socket.

Of course, my braces are not friendly with round shanks, 
but I was hoping it would lock better on an hex shape shank.

It kinda does, but when encountering too much resistance it slip no matter what.
That is as far as it got,  Finished with the wrench

 And using it, I see that this brace is overdue for a trip to the wire wheel...Squirrels

And a mere 3 hours after I started, the $#@*& TV is on the wall :-)

Meanwhile Rudy got exhausted of seeing me running around looking for supplies and tools.
So he just dragged his favorite blanky (from the chairs) and took my spot on the couch (Sheldon's spot :-) Are you done yet? There is a bag of treats over here...

We do not have  a suitable piece of furniture to put under, so a project for another day (added to the list).  In the mean time would be using a small table.

Oh, look at the time,  I`m starving...

Later we finished putting the room back together and sat down
 to enjoy the fruits of this labour of love which took no time at all.


The plan is to upgrade this older 32 inch 720P to a bigger screen (about 42 in max for that spot) and new electronics (receiver, speakers and etc). But for now it will do until I get around to built a piece for this corner.

Meanwhile spend a lot of time at my wire wheel.  I have been dunking in Evaporust and wire brushing a ``few`` pieces.  Most of my brace bits, a bunch of braces, and lately my C-Clamps after founding them rusting in the bottom of a container which had water ingress.

On the L after Evaporust and wire wheel, R as found

Then I went nut and did all my C-Clamps, about 17 :-)


Bob, getting low on storm chips, beer and Evaporust

Tuesday, January 15, 2019

Making a small personal drum

Today Jean and I went to a drum making workshop, taught by Mi'kmaq elder Carolyn Landry in Kentville NS.
We each made our own personal drum.  This is how the day went.
We were wondering how we would be able to pull this off in our given 1 and 1/2 hour workshop.
The secret?  That wood ring is pre made and the soaking deer hide already cut to size and punched.  We are essentially putting together a kit.  It is then a very do-able project under our instructor supervision.  The hide and the stringing lanyards are both deer hide.  The lanyards are cut in a circle to make really long strings.

The hardest part is centering, and keeping it centered, our hide.
Mine is up front, Jean to my right.

I got a strip cut (a tad short, yikes) and strung around my hide.
NO tape measure, we just guesstimated the length with our eyeballs :-)

Once tied loosely around, making sure the hide is still centered.

The remainder of the long lanyard is tied to the strip that was weaved around,
 then starting in the top quadrant, threaded Left then Right, all the way around.
there are 12 "pockets" to go around

It is important at this stage to leave the stringing not too tight
 because it will tighten itself as it dry

Then starting with three strings together wrap around at least 5 times, 
and repeat for the next bunch of 3.  The pockets all around are tucked in.

You end up with  a cross in the middle which is where you hold the drum by.
Not bad for my first attempt but I am slightly off center

Our four almost finished drums

Jean finishing her

Belle with her drum.
Everyone was quite happy how our drums all turned out

Later I will trim the ends by the knots

Our final product, complete with drum stick

We then went outside to give our blessing to the animals that provided us with the hide (Hunted)
and the trees that provide the wood pieces, with an offering of tobacco.
Smudging, ourselves and the drums were next with sage.

Our instructor Carolyn starting the sage on fire

My three fellows apprentices awaiting the smudging

Jean being smudged 

Then her drum was also

And then it was my turn

including my own personal drum


A very pleasant experience, we had a great bunch of people.
That was a very interesting project, learned a lot.  Our drums are now resting at home were they will undergo drying for at least 1 week before being ready to play.
Next I must learn her language (Mi'kmaq), well at least the words to the honor songs and learn to play my personal drum.


Bob, still young enough to learn new things :-)