Showing posts with label Chair making. Show all posts

Monday, September 28, 2020

Fixing the Muskoka chair

 Muskoka chairs are like the Canadian equivalent of the infamous American Adirondack chairs.

The biggest difference? Ours always had the back curved theirs were flat. 

So there you go, don't know who were first but ours are better :-)

Having fanned the flames on line, lets look at why it needed repairs.

The bottom board has rotted and broke.
need to make a new one.  Used old one to trace new one, 
remembering to make each ends longer, were rotted off.

The areas under each ends are rotted also.

This corner board is also rotting.
Was gonna make a patch but too far gone.

Lets carve a new bottom piece with a rip saw, Disston D8.

OK, good enough to move on to chiseling the rest.

After chisel, spokeshave and some sanding, 
check for fit.

Still haven't clued in that my ends are tapered, not square.


I even shoot my ends square on the shooting board...Doh!! :-)

Meanwhile started the surgery on the chair frame.
Excavated until I found solid wood.

Splitting pieces to fit

New patches pieces glued in oversized, to be trimmed later.

While that glue set, start ripping my new corner piece.


Some planing at my bench, followed by rough carving the shape.
Oooh that gouge is in need of sharpening :-)

Finished carving it with my chisel, mostly bevel down work.

Test fit, OK.

Transferring the screws holes.  

New and old side by side.
Took longer to stop and take pictures than to carved it.

Off to my sophisticated paint booth it went.

Meanwhile test fitting the new bottom part.

Carved new patches areas.

Primed spots

Found the left over paint from its original paint job in 2012, never been opened since.
  Its a bit soupy cause I thinned it down for the spray gun.

Mix and work fine.

Painted the primed spots on the chair and gave the two area were vertical end piece 
goes in, a good soaking with a liquid wood hardener.
Once dried, covered with yellow paint.

Which about a month after starting, bring us finally to this day, putting the pieces together.

New and old pieces.

I thought I taught of everything still managed to get wrong bits.
 Grrrr Square drive and Robertson don't play nice together. 
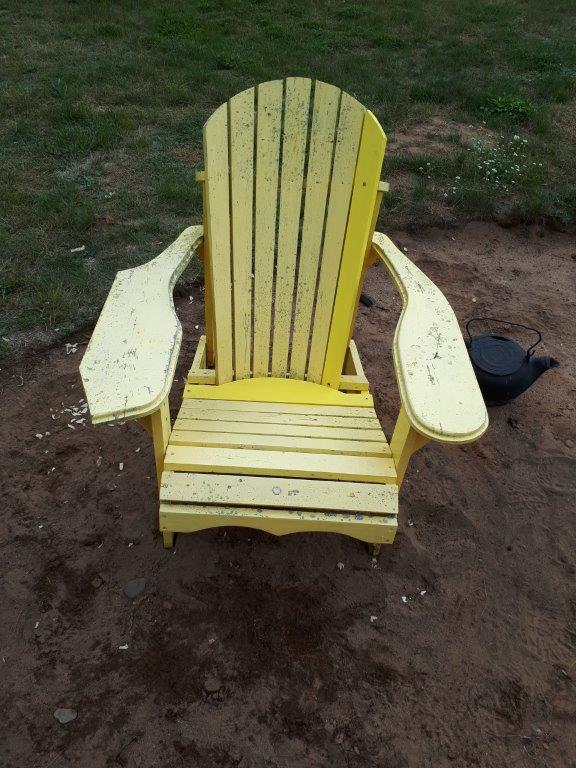
Done.
Yes, I still managed to forget the tapering ends on new bottom piece 
and compound angle on top piece is wrong side.
Both will be rectified with a few quick swipe of a block plane in the Spring.  
At which point both chairs would be washed and painted different colours.


Calling this one done and siting down for my drink.
Another off list.  Next...
Old pieces will be burned

Earlier today also completed earth works around front gate posts.

Done until Spring.
At which time I will paint gate black.  Just primer right now.

I am happy on how it turned out.

Still undecided about redoing the front rocks formation, 
had to removed one for post installation.

Another day of completed projects,
Done for the day.  After supper nite cap.


Bob, done for the day, going over his To do (sometime) list :-)


Friday, August 11, 2017

And so it was,...

...That on this glorious 72nd day of June, I finished my chair in the month of June build extravaganza hosted on line by Brian Eve, currently in Spain.

 72nd  of June??? Well yes, let see...

June 10th (day one) I realized that I had something suitable for such an entry!

Translation:
 I banged my toes one too many times 
on this pile of @@#$#&%*%chair...

By June 12th (second day of work on it), I started to wonder how much fun I was going to have at glue time...

That is one complete split.
A previous one was glued slightly offset in thickness.

There is a lot of tension in that chair, and it is obviously a manufactured one, done mostly with machines, no attention given to swelling and compression, like a good chair maker would had.

After a few years with the heat of a wood fireplace, in the winters, it shrank and fall apart every Spring literally.  That would be normal with lots of antique chairs BTW.
The devil is in the details, which were mostly ignored in the days of mass productions. Only time can truly judge the effectiveness of a design...
There are no shortcuts.

Self explanatory ... :-)

So my first bright plan was to disassemble it (just because I can) and rebuilt it, turning the two spindles that were missing. Turns out, there was only one missing (on the arm rest) and it was long missing, and was told not to fixed it, but rather solidify it for display.  Keeping the old weathered look.

So plan B, on June the 56th, (3rd day of work) I started by gluing up the lower assembly to each parts of the seat.

That was not too complicated, but I keep making sure 
both halves would still come together.

It basically laid there ever since, until, yet again it became in our way and had to move again...

On June the 71st (fourth day of work) I glued both halves together. That turned out to be a very &??%$#@*)?!@ exceptionally smooth operation, hence no pics! :-) In the end, I ended up with a small step just like the other previously glued half. Best I could do without pulling all my hairs out (I don't have that much left, so I don't like doing that...)

There was an amazing amount of tension building up when trying to mary both halves with the undercarriage already glued, hence fix... Lesson learn, should had take the whole seat out, all spindles out, then glue the seat blank properly.  But instead, to expedite and keep it weathered, I did partial subassemblies, trying to guess the best sequence and easiest way (yeah right :-)

Today (5th day of work on it) after the glued was fully cured, and did some light scraping, glued up the rest of the back splat, arms spindles etc.

Lots of banging on and off a few times, light sanding and scraping on some tight tenons and...&*@#$%?** TADA! Done

And to perhaps my ultimate surprise, after all that banging on it, it still is together, only split a small part by a screw for the arm. Fixed.


So there you go, it only took 5 days in June to accomplished that, well into the month allowed :-)

After a quick spray coat of weatherproofing, it will go on take it place back into our latest resting spot, which is in the shade from about 0900 to mid afternoon, right now. The sun start to be in your eyes through the foliage around 1530

Its resting place once finished. 
That was just to get a feel of the look


The rocking chair will go on the front piece of landscape fabric.
pic taken at 1540

Behind the chair, I am calculating the amount of light this area get

Once I know what it is, it is just a matter of choosing like plants...
I also know the PH of the soil. Too easy :-)
Knowing these two things make for easier gardening/landscaping.

The candle lamp fixture got an electronic LED candle. It has a timer, so whatever time I start it, it shuts off 4 hours later and start next day at same time I initially started it.


I saw a small Solar LED projector I wanted in a recent flyer, must look for it.
It would suit the decor just right... :-)
Need a small table for our morning coffees and we are all set.

And,  YES, at each station, there is a ground post for Rudy leash and we move his ground pillow around. NO he is not spoiled :-)

Bob, ready for a siesta...

Monday, June 12, 2017

Chair re-built day 1 or...

...What did I get myself into..??

Its pretty hot today, 39C with Humidex, if this keeps up, soon I'll be able to grow my own Saguaro cactus.. :-)

Yeah, dream on... So let's take an inventory of all the parts and condition, to see what I got myself into this time :-)

Most, if not, all the pieces seems to be present, 
including one loose spindle

The back of the chair's arm. Look OK, 
the arms juncture are starting to work loose

The loose spindle goes in here.
The seat has a gaping crack

One side got three (3) spindles
The other has one missing. 
Does not look terribly difficult to reproduce neither
 (these could become Famous last words... :-)

The seat had previously came apart at all the board's junction, it seems.
Very messy glue job...but it seems to be holding pretty good, which it was all that mattered, this is part of an landscape feature... 

It has been reglued together previously, glue type unknown.
That expansion pulled out one of the bottom rungs.

So, it does not look too bad. Some of the wood has become light, very light (punkie?) Could use a good coat of liquid epoxy to soak in.

Probably would have to remove all the spindles and do a complete tear down. Will take lots of pictures, because I have this sneaky feeling that things could get a tad hairy at glue time... :-)
Will have to think through the glue up sequence...
Once re-assembled, I should put some sort of finish to weather proof it better.

All in all, not too bad, should be able to do that in a day (??AM I crazy??)
So should be doable this month. Only one new part to make, that in itself could take a day :-)


Bob, the eternal optimist, sipping a cold one...
Boy, did I mentioned how hot it was today? :-)