Showing posts with label Tools storage. Show all posts

Thursday, January 2, 2020

My son's tools kit

A while back I asked my sons Tim and Matt if they would be interested in having a hand tools woodworking kit.  Since then, with Jean, came one more son, Levy and one daughter Opal.
So, my tool kits requirements has changed somewhat.  Need more tools :-)
Oh and I also picked up 4 grand kids, 3 girls and a boy :-)
Yes, they are keeping me busy :-)

I have been accumulating tools for them all, time to see where I stand with my supply and start (?) figuring out how I am going to fit them all into suitable containers.  Said containers must fit into my car for delivery.  2 in Ontario, 2+ in Nova Scotia.

So during the holiday break I started to gathered the tools I want to put in inside to get some ideas of the size I would required.

It kinda makes a big pile... :-)


Once I had my first pile of tools put together, my first thought was like that Chihuahua from a Taco Bell commercial of long ago "I think I need a bigger box" :-)
Yeah, a tad overwhelming, but the show must go on.

First I checked my list twice, being so close to Christmas and all, it was only natural :-)
Then I reasoned that some of my tool's choices could be changed.  Remove, add, change etc.
If you never tried to come up with a minimalist list of tools, go ahead and try, not so easy, heh?
So many choices, so many wants mixing in with needs.
My starting point was my last Minimalist tool list I made years ago, March 2016.
I stayed pretty true to it, but made some modifications as I went along.  Will update my lists as they are completed, but for now this is were I stand.

The Measurements and Marking section.
I since dropped one marking knife.
Both the trammel bar and pinch stick would be smaller, I just grabbed what I got.
The setup block set and the dial caliper made it.

The plane selection.
Trying both wooden and metal planes selection to gauge the size requirements.
I ditched the block plane, and rethinking the small plow plane

Sawing selection
I am still on the fence WRT the fret saw??
Wondering about the hacksaw?  I still think that it is needed in a well rounded kit.
And it MUST be of a high tension frame, compound lever action.

Bang Bang section 
With maybe one more nail set size and another Vix bit??
The small Warrington hammer (8 Oz)  double as a wooden plane hammer

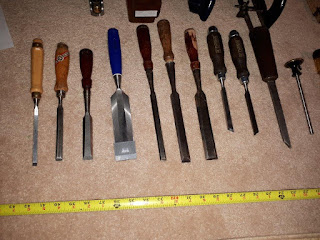
Chisels and gouge selection
Still on the fence regarding the appropriate size of gouge, but it is representative

The boring pile.
Only one size of Yankee screwdriver will make it.  I got two sizes I'm mulling about.
The brace countersink bit is out, replaced by the hand held countersink with three sizes bits, 
very handy, I used it often.  The Yankee to 1/4 in Hex bit adapter, with a good set of 1/4 in Hex bits , should handle most everything in the fastening department.  The hand drill comes with a set of small brad points bits, 1/16 to 1/4 in in 1/64 increments.  The brace with only a few bits, about 4.  The small push drill has its complement of 8 bits, inside the handle

The scraping section.
Tought about putting in a No 80 Cabinet scraper, but a tad challenged for space 

For my first attempt, I'm trying to see how big of a wall cabinet that would required.  Next I'll see about some sort of tool box storage.   Although they all get similar tool's kit, space will dictate how best, to accommodate them for their requirements.  The next and biggest challenge would be to accommodate a proper bench to use them.  That is where a Morovian  design will undoubtedly shine.
Tim, living in a high rise apartment in a city (Hamilton Ontario) is really crammed for space.  That would be trickier, but I got some ideas.

After some measuring, came out with the following dimensions:

Starting point for sizing cabinets.
I quickly ditched the 30 inch wide cabinet as being too unwieldy for the space, 
and settled on 24 in wide cabinet 7 in deep and doors of 5 in deep. 
The box sizes below are the required real estate to fit the specifics tool sections

First iteration came up as such: The chisels, rasp, files on the RH door 
and all the saws in the LH door.  But no room for any planes?? humm

Top is the RH door, bottom is the LH door with the saws, which don't quite fit, hum...
Unless I stacked them all, but not very practical, so I went back to the drawing board.

Stacking the saws side by side takes up a lot less space

Adding the planes

Then trying the metallic planes, gave me a bit more room,
 can squeeze in the router and No 78

These experiments led me to redesign the space of the cabinet as such:

I shifted the boring tools and bits on the LH door were the saws were to go

That fits pretty well everything with the following exceptions:
- Hacksaw (keep or leave out?)
- Coping saw (should be able to hang it up somewhere)
- Fret saw (leave out)
- Router plane (must fit)
- Duplex Rabbet plane No 78 (must fit)
- Small plow plane (would like to fit it in)


That is a lot better than my first iteration were I was going to store the three amigo's planes (Jointer, Jack, Smoother) on top of cabinet, for lack of space.

What is not apparent from these trials is that the cabinet depth allowed for the stacking of some tools.
The long narrow tools (Winding stick, Pinch stick and Trammel bar) all are set on the inside of the cabinets vertical sides.  So based on my experiments, I think it is doable to fit the projected 24 wide X 30 in tall,  7 in deep cabinet with 5 in deep doors.

Now time to muck up some holders and see how my bright ideas shakes out.

Happy New Year everyone

Bob, with limited shop time but using the dining room table for his experiments.
Yap, all cleared now, apparently it is needed to eat, go figured :-)

Tuesday, June 12, 2018

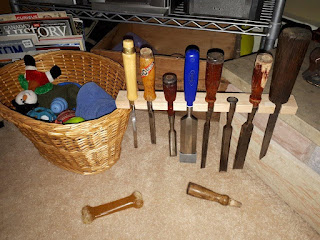
The chisel bar

As part of figuring out how best to sized up this article project for my needs, I decided that starting with the chisel bar would help me zero in on my max width.

So armed with my usual suspects, out I go about spacing them out. Regarless of space limitations, I want good clearances around the handles to reach in with my big paws.

If I make an open hole, only from the top, the “hole” has to be sized to the chisel width.
Advantages: Easier to make with a laminated sandwhich, using spacers about 1/2 inch thick, spaced as needed.
disadvantage: Tools required more space on top to be put in and pulled out.

If I make an open slot in front, I can then used a standard size hole, for them all regardless of sizes.
It just have to support the handles OR the sockets (never by the handle) of true socket chisels.
Stanley Everlasting and Record Marples may look like socket chisels, but they are hybrids and the handle cannot be separated.
And the size of the slots has to be able to pass the neck of the chisel blade.
Advantages: one piece construction, no sandwhich required.  Probably more flexible?
Tools are easier to put in and removed, since they go from the front, not from the top.

Maybe I should muck up both for comparison, and see how it works out in my given 5 pounds bag...

while I ponder on these and other's on the meaning of life questions, I may as well try my existing chisel holders I had for years, on my pegboard system. Spacing should be just about right.


The three I dragged out are all the same size holes, but at different spacing's

From L-R
1-1/2 inches holes spacing's
1-3/4 inches spacing's
and finally from Boring till, 2 inch spacing's

Why you should never hang socket chisels by their handles

In this one, the blade can easily fall off

Same in this one

Although it may looks like it is not good, its perfectly OK with these Blue Chips Marples,
they are not true socket chisels, the handle's cannot be easily separated.
You can also see the thickness limitation of this design with this wide blade tool.
The space between the handle and the neck of the blade must fit within the slot.

And what about the spacing's differences between the three.

With 1-1/2 in spacing's

With 1-3/4 in spacing's

and the two inches from the Boring till ??  Too large, I don't like it at all.


Between these twos, I prefer the 1-13/4 in spacing, just about right for my paws and still relatively compact. Now that I know roughly how long my chisel bar is, I am sticking with my earlier choices: 4 Bevel Edges, 3 Paring, 2 Skew, 1 Mortise chisel. 10 in all.  Still leave me about one foot for my screwdriver's, awl, Rod marking gauge, knife etc.  Lots of room


Meanwhile, the Boring till holders were removed and given a coat of Restore-A- Finish, followed by a coat of Feed-N-Wax
The till box itself was given a once over with eraser and a fresh coat of paint. Beautitone Natura
The two should be reunited soon and hung up on the wall.

The boring tool holders, after their coat of Restore-A-Finish 

The three products used. The first two for the hardwood holders,
and the latex paint for the box

Holders removed, need a quick scrub clean,
erase pencil marks and a fresh coat of paint.
Getting R Done
Got the box cleaned up and a fresh coat of paint.

Bob, mucking away.... :-)


Monday, June 11, 2018

The space under the window

Now that the Boring till is done, I can look at the space remaining between the Plane till and the Boring till, under the window...

It used to have a left over small peg board in front of it, and my first inclination was to simply put in a custom fitted one and used my old tricks with peg boards to customized it the way I want it.

But then I saw this article and it made me wondered... Maybe used that as a project...
Seems more fun than framing a piece of pegboard for sure.


But of course such a project should be sized to accommodate your own tool kit.
So quick doodle using Doodle Draw 2.0 and I got some idea of what I intend to put in it.

The space I'm working on has a space of  about 30 high X 34 wide and about 5-3/4 deep.
The magazine article project is 23-3/4 high X 23-3/4 wide X 4-1/2 deep.
Should fit no problems... 

First list of tools wanted off the cuff

It is after all on prime real estate in front of the bench, it better be useful...

First thing that comes to mind are chisels; Bevel edges, a few sizes, Paring chisels, I got three, Corner or Skew chisels, a pair, Mortise chisel, only one size needed, 1/4 or 5/16, a couple of gouges.

A few marking gauges, dividers.  The way I work, I like to let my tools set to a dimension during the whole projects. Since I often juggle projects and need a few more measurements, I need a few.

Screwdrivers: Robertson and common is all I need, no Phillips thank you.
A scratch awl, shop knife, marking knifes (2)

A few try square, a 12 in combination square, a few Veritas saddle squares, rules, tape measures
The four commonly used joinery planes: Rabbet, Shoulder, Router and Plow plane.
The three most used bench planes, Jack, Smooth and Bock plane
No 80 Cabinet scraper and card scrapers (3)

Hang in front on pegs, coping saw, Fret saw and drawknife or Spokeshave

And of course it has to fit all within the available space...
The proverbial trying to shove in 50 pounds of tools in a 5 pound bag... There as to be a way... It will fit :-)

First quick round up of the usual suspects and we are starting to get a better sense of the space required.  Hummm, I think I need a bigger wall!!

The source of much inspirations and bright ideas (Tm)

Ok, so surely I can do some paring in this over the top need list...

It looks big, and it does indeed take a lot of real estate

The joinery planes (4) would be residing inside a top shelve on this rack,
so lets removed them for now

Hummm still pretty big if you ask me.
I could squeezed in more space by using open ended slots for the chisels rack.
That way, I don't need as much clearances above them.
Some tools  could be stored horizontally if need be


But anyway you look at it, I don't really need 4 try squares and a 12 in combination square
Screwdrivers and small tools (awl, marking knifes etc) could be doubled up on two rows
The number of marking gauges is also up for debate inside both of my minds (Military and civilian) :-)

Missing from pic are Panel gauge, which could be hung on the cabinet side along with the go/nogo gauges.
Two gouges were supposed to make it but are currently MIA.
Similarly a few, if not most, of the small tools are missing (Awl, marking knifes, etc.)

 So how big are we? It sure look big but how big??

About 36 inches high

By 42 inches wide, way overboard

One thing I must remember is that the bench wall is covered in tills (Planes tills, Saw till, Boring till)
I don't have to go too far to reach into all these, merely a few steps away.
What I do need for sure is chisels rack, marking & measuring tools, a few screwdrivers (most used)
Everything else is gravy... Or should I say right next door to the bench!

But that will not stop me from getting my cake and eating it too. Let them eat cakes she once said :-)

So I think my first order of business would be to muck up (Brian Tm) the chisel and small tools rack and see how much room it will take. Must fit within my optimum space. The actual space under the window is bigger, but I do not want to be bigger than what I figured out to fit nicely under and still gives me access on its sides to hang more stuff. You know, It has to all fit within that proverbial 5 pounds bag...

My coffee fueled mind this morning is asking me what was I thinking last nite with all these tools :-)

So this is my next tool storage till I will be building. Don't know how long it will take me, but I am pretty sure I can beat my last till time to completion (2 years, oups).

There are also a few other projects to either start or finished, including a few build in the yard.
But now I have a renew interest in completing my shop. The oldest grand daughter (11) asked me if we could build projects together. That is music to my ears and of course we can Meadow, just need to clean up and get the shop ship shape (on all decks)

So, build this and finish clearing, organizing quickly and lets make stuff together,
I could not be happier

Bob, proud grand father on a mission
.


Thursday, June 8, 2017

The gardening tool station

Another of my "quick" yard project in a day. Well actually that one was built in a day, Friday, except for installing the door, hardware and the protective finishing.
So yeah, doable in a day.... if you don't have grandkids running around, make a trip to the vet and basically have a life to interfere :-)

Earlier I installed a post, left over piece of 4X4 from the barrel stand project, and put in two hanging plant's bracket.  Its location will also help running the
irrigation lines to the beds above ground. There are height differences to be respected for my solar drip system


Construction was simple, butt joints, glued and nails.
I used a water resistant outdoor glue, Titebond II, galvanized finish nails, 1-1/2 in and Liquid nail adhesive to seal the roof panels.
Galvanized nails have a hot zinc dip which makes them somewhat lumpy. This rough coating makes them grip more tenaciously than your regular bright finished wire nails, plus they won't leave rusty streaks on the wood later on.


3PM Friday, almost done

There was no plan in the magazine, just a picture of the finished product, a material list and a partial exploded view. A one page skimpy article basically.
Not that there is anything complicated about it...

The only weakness I can find with this sketchy design in the magazine, was the front gable attachment. I added a 1-1/2 screw on each sides of the gable to help reinforce the connection. That connection is thru end grain, not the most solid... But If I built another one, I would redesign that connection to be attached more solidly.

Before the grand peanuts arrived after school, I had two roof panels 
to put on and the door blank.

Door panel dry fit into opening.  I cut everything to the specified 
dimensions and amazingly, all the parts fitted... :-)

Just in time for the grand peanuts arrival.
The rest would have to wait...

 I am pretty happy with the boards I found at my local box store (Kent Building supplies) 1X12X6 pîne boards for about $6 each.  I had to culled the pile to find mostly clear boards, but I was able to cut off most of the knots. My only gripe has to be my 1X12 actually measured 11-1/4 wide... exactly the specified width for this project... One of my roof panel had a cup in it, it split when I nailed it flat. I simply worked some more of my exterior glue in the partial crack.

Did not got to work on it until today, Thursday, Cut the gain for the hinges, and install door

Put on hinge on door, scribed around, removed hinge
then cut shallow groove with chisel

My small router Stanley 271, set to the thickness of the hinge 
is then used to mark the thickness 

The resulting hinge gains

Similarly the router was used to cut the hinges gains 
on the cabinet parts

Outside, I gave it a coat of Thomson water seal and wood protector

Installed on post and filled with some tools.
It is secured by two screws from the inside, to prevent twist
 and two metal brackets from under

My door panel has developed a significant cup, so that the door does not closed flat unless I put some pressure on it, which of course created some stress cracks. Similar to what happened with one of my roof panels.
I may have to revisit that door panel and make a new one. If and when I would used laminated stock instead of relying on a large piece.

Only thing left is to install the door handle and locking hasp, but that would have to wait until the temp drop down a bit, it is brutally hot today, but the wind is keeping most of the bugs away. They don't seems to fly well with these shearing winds :-)

When she got home, she added more tools.
I will have to organized them better, with holders and hooks of some sort.
The plant hanger's hooks are a great place to hold Rudy's leash 
while working in the garden :-) 

My sophisticated, temporary locking mechanism...
Until I get around making a new door...

Bob, sipping a refreshing cold one and re-thinking the door