I am currently in the middle of a metallic plane rehab marathon, so I thought I shared some of my techniques and methods that I used.
My output so far, the Stanley No 3 Type 17 is still in parts awaiting its body to dry
Being a user with a large assortments to choose from (OK I'll admit to be a bit of a collector too :-)
I do not go for a new blingy look, I just want to stop rust and further damages and makes them usable again.
That meant preservation not full restoration to a like new conditions, not erasing clues to its manufacture (preserving machined surfaces, repairing versus replacing, when possible. Keeping or preserving the originals finishes and etc.
But at the end of the day, the final objective being to make the tool functional again. I will then sharpen the cutting bit, touch up and preserve the original finishes if I can, or in worst cases scenarios, I may strip and repaint.
But above all, what I am willing to do to the artifacts is depending on its historical significance and quantity to be found at large.
A common plane like a Stanley No 4, of which Stanley made Bazillions, I would not hesitate to modify or totally repaint, if I want too, cause it wont affect its significance.
On a rare example, on the other hand, I will do minimal work, preserving it as much as I can, without changing it.
This one for example, I would be hesitant to strip and repaint.
But I still have to address some rust issues
Like I said before many times, researching its history and provenance FIRST goes a long way about how I am going to approach it.
Next, I will give the metal item a good cleaning with Krud Kutter, being a degreaser, it cuts thru years of grime.
A good scrubbing to remove dirt and grime
is important before attempting to remove rust, regardless of methods used
Wood parts gets a cleaning with Murphy oil soap if they were unfinished (like a wood plane) metallic planes tote and front knob on the other hand are often finished with a lacquer dip or varnish of some sort. These I will gives them a good wipe of Finish restorer then a hand buffing coat of Feed & Wax.
Before and...
After. Cleaned and protected
Scraped and blend with paint thinner
There are a few proprietary Finish restorer out there.
Formby being one, but is not available here in Canada and I find it rather expensive on line... I found
this one locally, and it work fine.
Howard Restore A Finish and Feed N Wax
works great for me. The paint thinner I used first to removed
the ubiquitous white paint splatters that always seems to be present on old tools
That and light scrapping.
My understanding of it, is that it contains a mild quantity of solvents to surface melt the original finish and blend in the new stuff. In doing so, it also wipes out the grime that was accumulating on top of the coating.
But how do you know if it works? You stand there in your dress pants slathering the stuff on a plane tote with a rag, not wearing any gloves of course, cause real....
Then you find that the tote finish seem to become a tad softer and your hands are sticky, and then you scratch an itch on your head, then notice grime on your hands which you then wipe on your pants (Force of habits) and that is how THIS pair of pants got ruined, Dear, I swear :-) Yap, its working...
It is important to take apart as much as you can, without damaging it, in order to assess better its condition.
Liquid Wrench and WD40 helps a lot freeing stuck screws. But be absolutely sure to use the proper sized flat screwdriver, or you will damaged the screw slot. HINT, get yourself some real
woodworking screwdrivers. The slots have parallel walls, not tapered. Damaged slots will be addressed gently with a file when necessary
Any of these three products will get you unstuck... most of the time
Other times I had to relent to this weapon of last resorts, the gasp, Impact driver.
Used only when absolutely necessary and if present no danger to the item.
If it won`t budge, leave it alone before causing damages
As found, damages from using wrong screwdrivers. Tst Tst...
Gave them a quick file job. In worse case, I would have to recut the slot
using a hack saw and a file
Quick once over at the wire wheel, good to go.
No more burrs.
Once clean, you can then assess properly its condition.
Sometimes cleaning will reveal damages that were unseen before.
A cracked cheek on a plane for examples or a previous brazed repair (Bummer :-( )
See the brazed repair on this Stanley No 41?
It has been painted over and I did not really noticed until I start cleaning it :-(
But the reduced price, with an almost full box of cutters made it still a good deal.
And one which I could afford :-)
Rust (metal oxidations) must be stopped in order to prevent further damages.
There are many ways to do this, from Electrolysis, to Sand blasting , but the method I used the most is a good soaking in Evaporust. That stuff is non toxic and gentle on my septic system.
My usual rust removal arsenal.
Chemicals, files, rifflers files, rust eraser (fine and medium), scrubbies (various colors),
scrapers, brushes etc. small detail sander (broke the belt :-(
Got some more somewhere..??
Some parts being larger or long, such as a hand saw blade, may required some other means instead of being able to dunk it in a suitable container.
Or sometimes, you just need to address a small area. In cases like that I simply saturated the area with paper towels soaked in Evaporust. I put it inside a plastic bag to retard evaporation and let it do its magic
On this one
I just needed to touch up a small spot of rust forming on the sole.
I simply put on a drop or two of Evaporust on it, then wait a bit.
Hit it with a scrubby, Rust remover eraser fine then Autosol.
Gone! And I don't expect it to come back
This Stanley No 3 Type 17, had quite a rusty part on the bed, behind the frog.
Out of the oven
Remainders look OK, thanks to the protective coat of paint still present.
Soak a wad of paper towels with Evaporust, then put on the area,
which was previously cleaned with Krud Kutter.
Put the whole thing inside a bag to slow down the evaporation,
but I don't think it was necessary, unless left unattended for a while.
Strange reaction inside the bag...??
I would periodically check on it, hit it with a scrubby to remove the loosen rust, re-soak, wait and repeat until satisfied.
I did not bother with the bag after a few cycles, it just gets in the way
and my wad was still soaked
After a few rounds, I`m happy with it.
This is out of the oven
I will then gave it one last scrubbing, sanding then paint it in this case
Chemical chelation expose fresh metal, which would flash rust quickly if left unprotected after.
It is critical that after its bath in Evaporust that the object be rinsed thoroughly with water to stop the chemical actions. You then have to dry it before it start rusting.
Similarly after a good scrubbing with Krud Kutter, the item will get a good rinse off then subjected to heat to dry.
Record No 05 fresh from its rinse off
I used to dry them using my wife Hair dryer, which I rendered Kaput doing so, so I then used my shop heat gun (bought, at her suggestion, when I replaced her very expensive hair dryer :-) After a few years of faithful service, it too gave up the ghost in a shower of sparks then smoke...R.I.P.
My current method is using the kitchen oven. Words to the wise, you may want to negotiate with your spouse first before using kitchen appliances for your tools, just saying :-)
I set the oven at 200 F, put the parts in after being pat dried.
Set timer for 10 mins, before it does, when it reach temp, I turn the oven off, crack open the door
and put the fan on high. There should not be any smell coming out, since all we did previously was to degreased, derust it, then it had a good rinse off. The fan is just an habit and insurance for Jean :-)
You may noticed the small Toaster oven next to it?
I bought that for this use, but she commanded it for using in the kitchen...
Using this routine my parts are slowly exposed to temps up to 200F then going down about the same.
The idea is to gently warmed them off, hot enough to drive off moisture in small spaces but not too hot to distort or loose the temper of the steel. They should stay not too hot to be handled with bare hands. (OK, it is warm..er). Now, when you take a warm piece of steel to a cold garage to wire brushed it, it could rust over due to the condensation which will take place if left alone. I go around that problem (minimized it) by letting the parts cool off to room temperature first and go at it with a purpose. A few minutes is all it takes, rust stays at bay.
Sometimes depending on the location or extend of the rust, I tried other means such as soaking and rubbing with Autosol
Put in a generous coating of Autosol, then worked it in scraping with a screwdriver
See the rust bloom inside the recess for the blade assy. screw?
After doing same treatment.
Finished off with a spray of WD40, then wiped.
Note there is a slight red overcast from overspray of the red frog,
but it is for all purpose rust free...enough, it would then be protected
In some cases I would use a thread chaser to cleaned the threads.
But for the most part, they comes out of the Evaporust bath, clean
Once the rust issues have been addressed, it is important to protect the areas affected.
That means anything from simply a soak in WD40 (screws and small parts) or a rub down with Autosol (it leaves behind a protective coating) or in worst case and depending where, a painting.
From touch up to complete strip and prime/paint, like I did for my
Beam Boring Machine .
In this Stanley No 3 Type 17, I`m currently working on, I opted to touch up the paint with a good rust paint
Some of my go to products.
Key words to look for: Rust, Paint. It will preserve what we just did
and protect against further rust forming
My sophisticated spray booth area in the garage.
For some reasons that escape me, I'm not allowed to spray inside anymore :-)
My, also sophisticated drying area, inside the furnace room
All I did was sprayed the two most rusty area that I previously de-rusted.
Hoping to blend in the old with the new.
Only after these steps, will I bother to sand the areas which requires it: The sole, side wings, machined areas etc.
Using a long flat piece of granite (Ralph`s 80 grit runway) is not a luxury, but a real boon. Especially when handling a 24 in long Stanley No 8. Trying to make do with something too short will only introduce unevenness. Mine is a left over backsplash piece from our new vanity (61 in long)
Currently sitting on my 120 grit runway,
I only bother with 80 grit and 120 grit for my runway. I usually gets my strip of sand paper by cutting off long belts for sander, whatever long enough to do the job at hand.
Depending on the results of the few first passes, I may go down to 80 grit, but at any rate, I stop at 120. Plenty shiny to do its job without erasing too much details nor making the soles and wings too thin for no good reasons. Simply my opinion, go ahead and shine to a high bling level if you want, your tools...
The brass adjuster knob, I clean using a paste of Bar`s keeper Friend
and an old tooth brush. In some case, I have to resort to an old scrubby to scoured the inside
The blade I will de-rust mechanically (sand papers, rust eraser etc) but in worst case, it will get a dunk in Evaporust. I always finished with a wiped on coat of WD40, but now I mostly wiped on a coat of Autosol instead.
I will spend some time flattening the back, mostly to assess it, not to sharpen it yet.
As long as I`m satisfied that I can go beyond pitting at the edge, I'm happy.
At reassembly time, threads inside and out, get a spritz of WD40, both for lubrication and to prevent rust. Any moving parts get similar treatment, then after a quick wipe of the extra WD40, it is ready for its glamour shots
Record No 03
My Millers Falls No 8 from the user till
At parade rest, did not required too much, that one is from my stable of users
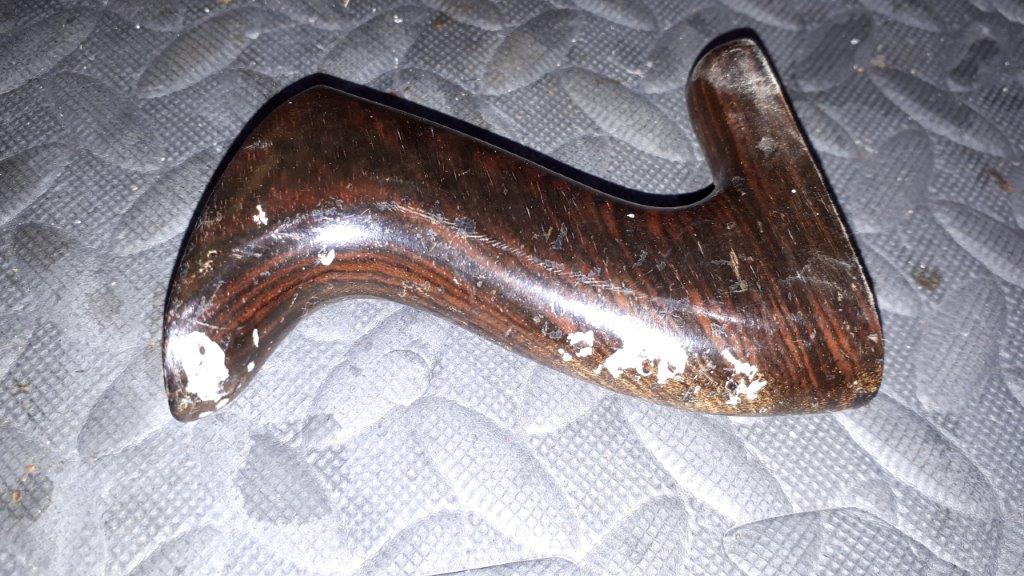
The handle is in need of a refinish job
After my Howard products treatment
Millers Falls No 8
Stanley No 3 Type 17 I'm working on.
Awaiting and watching paint to dry :-)
Next time any of them comes out to play, it will then get sharpened. For now it is strictly before going in storage, knowing I have stop further damages
Bob, the tool custodian for further generations and beyond... :-)