Well, almost... But read on to find out...
Been busy the last few days, then Monday, my computer crashes and did not recognized boot device...hummm not good...
Tried to remember to take some pics as I went thru the steps. Here’s how it went in pictures.
After soaking in Evaporust for a while, the hardware got cleaned up, the threads chased, cleaned, then lubricated with WD40
In between these small jobs, the frame and pinions rack, which were previously primed got painted . The journal covers pieces, were cleaned then primed, and painted the next day.
After "consultation" with my girlfriend,
moved my spray paint operations outside :-)
The gears got a good scraping and scrubbing
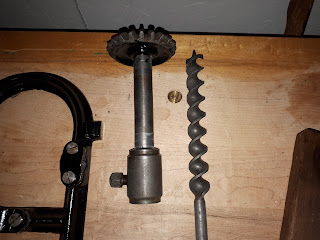
Really impressed by how the spindle came out, straight from its Evaporust bath. Only took a small amount of picking with a dental tool, no sanding...
The scene Tuesday nite. The carriage and pinion’s track are painted, along with the journal covers.
The side tracks are flatten and de-rusted.
The crank handle bar is cleaned, derusted, ready for paint. Its wooden ball handles will need refinishing after.
The remaining of the hardware (nuts and bolts, screws) along with my only BBM boring bit, are still soaking in Evaporust.
Wednesday, all the remaining hardware is cleaned, painted the final parts, decided to paint the side tracks, masking off an area that shown no paint. Duplicating what I found while cleaning them.
Thursday paint touch ups, and start attaching metal parts on the wood sides.
Friday, removed masking tape and scraped paint traces where they dont belong and polished (LV tool wax) spindle and crank shaft. Started re-assembly of components.
Loosen/tighten bolts, squeeze this way, push that way, I am quickly chasing my tail around..
Would probably need to re drill square, flat bottom holes in bottom of bed mortise. That was the most damaged area which had lots of rot. Fibers are no doubt compressed not straight and are now stabilized in epoxy.
One of the upper sides appears also to be sitting a bit higher than the other??
I did not measured them, but i am pretty sure they are equal length.
May need some shims also. But for now, i am calling it done. It is back together and I can move it out of the way, and move on. I only started on this project to get it out of the way without loosing spare parts...
Wood handles, would need to be washed. Some areas crack filled, there are lots of dings on one of the knobs. Refinished, probably in a darker stain then waxed.
Before and after pics
Bit as cleaned, will not need much work at all, came out looking sharp out of the Evaporust bath, including the often pesky threads at the tip. Could use a good buffing, bit look a dull grey, typical of chemical rust removal process (chelation). The white stuff you see on the business end are fibers from the paper towel used to pad dry.
Look unused.
Notice the lone upturned cutting spur.
Not a Jennings pattern
That beam being necessitated by my Post drill.
I will probably hang up my Post drill on it, as is, just to get it out of my way in the garage. It will eventually required a complete tear down and paint job, but it will have to wait till Spring for the weather and me to have time for it :-)
Bob, with one project out of the way. Next, back on deck, is the Boring Till...


Bob is this for display or to use? It is an eye popping difference with the before and after pics.
ReplyDeleteFor use , it is a tool after all.
ReplyDeleteNext time i get to it, ill fix the frame issue and finish the handles. May touch up the bit...
So far, I managed to get some some shoptime everyday.
Bob, who can start to see progress in his shop.
Bob,
ReplyDelete"After "consultation" with my girlfriend,
moved my spray paint operations outside :-)"
MsBubba and I often have those "consultations". My final response is always "Yes dear", Her parts usually contain variations on "I can't believe you can be so dumb". Yes dear.
ken
Yes, Ken...exactly :-)
ReplyDeleteBob, who somehow managed to NOT turned his dress pants into yet another pair of working pants... Yes Dear :-)
You to,
ReplyDeleteI have a closet full of "work clothes"., not many go out to dinner clothes.
Why would I change pants/shirt just to do this glue up, it'll only take a couple of minutes. BTDT too many times and have paid the price,
BTW, she's right I can be dumb as a brick.
ken
LOL Ken, that is exactly how the majority of my new work clothes, just happened....somehow...who knew ? :-)
ReplyDeleteAnd ya, Ms Bubba is right, we can be both dumb as a brick at times... so they says, but to me my line has always been: Im not lazy, Im efficient:-)
Truth be known, that line does not always works...you been warned :-)
Bob, pondering if i should changes before going to the shop??
Wow Bob, that came out stunningly good. And the bit looks to be in great shape even before touching up. Congratulations!
ReplyDeleteThanks Matt.
ReplyDeleteStill got more work to do, the handle’s ball, fix the frame, and the flash still picks up orangy rust here and there. Tonite I assessed the frame and start fixing the handles ball, epoxy and wood filler.
Oh, and yes progress on boring till also...
Bob, still PC deprived
I was so impressed how the BBM bit came out of the Evaporust bath, i started to cleaned more of my rusty brace bits, more soaking over nite.
ReplyDeleteBob