Wednesday, September 29, 2021

The return of the Post Drill

 It has been a while I had a chance to touch it since Spring.

Now that I am finished with a lot of higher priorities projects and with Jean gone for a few days, I can now go back to it.  I was getting a bit anxious because it is a very messy project, I must go outside to degrease/derust/paint.  We are already late September, won't have many more nice days to work on it outside.

Its been laying around in the garage for a while and it shows

Dusty and with cobwebs.


Brought Jean's small compressor out to blow the dust and dirt out.  It spent the summer in the greenhouse used to blow up pool's toys.


After some final (?) Scraping and a last coat of Krud Kutter paint prep, I brushed a gloss black oil based rust paint.  

I like the way the paint flows and leveled out.  
Easier than trying to spray and better results.

I had some brief short-lived ideas about doing a paint strip job in gold and dry brushing the raised cast letters in red, but reality set in and I must be done SOON 😁

So I'll go with simply dry brushing white paint on it.  All I had was a high temp white spray paint can.  Went to the store shopping


Came back with a paint can of the same fancy rust paint but in white.  A bit overkill yes, but I'll take it. Also got two small foam brushes for the lettering

Oh, that hand drill?
I just happened to be passing by a yard sale or two on my way to the stores:-)


My dry brushing techniques leaves a lot to be desired.

First of all, it was hardly "dry" , had to load paint on the brush often for it to works .  Made a mess with using the foam brush first, which i made messier trying to wipe it off and start again.  So yeah, scraping and repainting later made it better, but I'll touch it up a  bit.

While it is no doubts a very good rust paint, it tends to dry strangely.  Whenever you need to go near it, you will get black marks on you.  Whenever you try to scrape it, it never seems to be dry and you still end up with black marks on your clothes.  Honest Dear, that is my story :-)

The work table, I am not yet, painting the bottom gloss black.  It is currently flat black.  I need some judicious filings to make it sit 90 degrees to spindle.  The cast bracket is slightly twisted, NOT trying to straighten it.  Should be able to correct with some filings and perhaps brass shims??

Top surface will be sanded

the solid steel post also is in need of sanding

The brackets for the post and table 

Found this detail while cleaning the part.  
It is in the back and probably not much visible, but I thought I give it a try.
A lot harder than I thought :-)

Done with re-re-touching the paint, as good as it is gonna get :-)


Some sanding on the rods, reassemble the small parts, lubricate thoroughly, then ready to be mounted on the beam..  I will add the remaining heavy parts AFTER it is up. 

Previously found a period correct oil can oiler

Next, while the paint dry, (eventually) time to go revisit the beam in my shop.

Its been holding up in the shop for more than a year by now.  It has done all its stupid wood tricks and settled by now.

I am going to bolt the post to the main floor joist (where clamp is)
add a spacer to blocking on RHS and lock it with a carriage bolt

Bottom of post is secured in a post cement block.
You can see how much it has twisted since.

The bottom of the post rest in a cement post block for a 6x6.  It is heavy, you will not move the post if you kicked it, while still allowing the post to twist as it needed it

Cross board held by a clamp is by calculated height
for the bottom of the back board on the Post drill.
Final height may vary :-)

Managed to finished another small project, in between paint drying.

The small foot stool which had a broken corner block for its leg.

I previously cut and fitted the two new corner blocks, remained only to attached and colour matched them.

I only needed one block, but I ended up with two and rebuilt one corner from the ground up.

I decided after I glued my blocks, that I should stained it darker brown to match.
Would only be ever seen if looking under stool 

Next it will get recovered... later

For now, it is back into service

Then, since I have now a temporary shelter, I can actually walk all around my poor Unisaw.

The bottom wheeled rack I made years ago is in dire need of paint
I am NOT taking the Unisaw off its wheeled base.

When we came back here in 2011, they broke the button at the end of my T-Square fence.

Never had luck getting a replacement.  Found something close at Busy Bee, but the hole is slightly smaller.  Mine originally had an elongated button, my replacement are rounds like my older Beisemeyer fence I once had

Tapped the hole bigger with correct tap size.
Made effortless cut in that hard Bakelite like plastic.
The molding line was filed off to make it more comfortable.

Screw tight, no looseness

Work like a charm

Magnet is what hold it up.

Winter project, bring in 220V in garage

Added lite to the temporary shelter, next is alarms/security.measures


Bob, scratching his forehead  wondering where these black marks came from on his forehead ?? :-)

Friday, September 10, 2021

Finally got a break in the weather

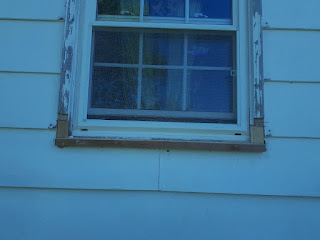
 And got my window finished.  Well almost...

Been racing against Larry  but today is when he is passing south of us and we will get rained out for a while.

Tuesday and Wednesday were the only two sunny day of the week. So Wed morning I finished installing the new sill plate and rebuilding the lower parts of the sash.  Everything is now weather tite with epoxy.  Remain to sand and prime the sash.  Thursday, not enough time to burn off the dew before the rain start.  Will have to wait after Larry, she is getting quickly overcast...

Turned out, Thursday was a bust, all the rain went mostly around us, but we stayed dry, just a bit of intermittent sprinkle, about 1mm of rain.

In hindsight, I whish I had primed my window Thursday, because it looks like its gonna be a few more days before the sun returns

 At least my epoxy is dry and I proceeded with scraping and sanding.

Calling my window sash done for now, she is epoxy weather tight.

How it went, mostly pictorial:

Previously, I had manufactured, 2 new sill plates and the other missing bit.

Made and installed missing piece of groove on the right


Once cured and a slight trim making sure everything lines up. 
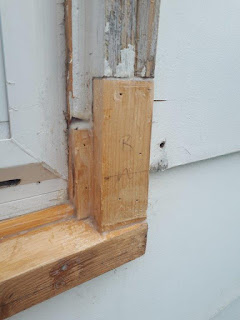
Sill was installed and first bottom layer on right
Epoxy glued and attached with 5 deck screws (trim head)
Original was held by caulk and nails
Making sure not to attach sill to house, just the sash.

.  
Then it was time to address the large cavities I found around the frame.
Cavities around the window sash and house opening 
foamed with low expansion foam 

Once cured and trimmed off, 
Starting to rebuild lower sashes portions.
It is a lot easier to build it back up with rectangular pieces 
than to try carve the whole profile and making it match.
First bottom layer installed on the left, second on right. 
Everything I add is epoxied in place and pinned 
with 18 ga air nailer, while epoxy cured

For the top and final layer, had to cut the bottom with a matching angle of the sill plate.
Turns out that was an unnecessary exercise with my bevel angle gauge. 
 A few swipes of the block plane was easier to eyeballed it

Finally had to give in and sharpen the chisel I had been abusing errr. using for a few days.

Many chips in the edge.
The price one pay when digging out rot in search of solid wood...
Nails and others assorted fasteners bits

Much faster than by hands, which means,
 I have no longer any excuse for putting it off so long :-)

Did not got them all out completely, small scratches left, 
but sure work better :-)
 
Working on my Maritimer's Low Tide Bench MLTB 
Try saying that with a mouthful of coffee :-)
Yes, it is the lower steps to my front entrance.

Three layers of wood epoxied on that corner.
Yes, my top piece rotated out a bit.  Did not catch that earlier.
If it interfere with the aluminum cladding, I'll just trimmed it squarer

Only two layers on this side.
On both sides there is about $20 of epoxy used.
All rot removed, solid wood reinforced with epoxy

The longest was the waiting in between layers to dry, at least 5 hours, before I could start trimming for next layer on top.  
In the end, I chickened out and did not dared priming the frame Thurs, expecting rains from Hurricane Larry, but, nope, no rain yet really....

But I did scraped and sanded the frame ready for its priming coat.
Final touch will be caulking around frame, then ready for its cladding

No reasons to go nutso, the whole window frame will be cladded in Aluminum.
I just wanted to remove the dead and rotten wood before they cladded it.

Meanwhile we emptied the pool yesterday and readied the yard for high winds

Next year, I will pay more attention to where the empty valve is located.
Will be rotated  close to 180 degrees next year.
Dug a small trench to helped it along. 
.
It does not look too good for me to prime my window and start on the last one.

The colorful half circle in BRH corner is Hurricane Larry coming up

What I often used to juggle my work priorities ahead.
Including finding spots to escape on a few mini stay-cations :-) 


But the good news is...

That one does not need a whole new sill.
Just repairs to the corners.  The weakest link...
But I do have a spare sill plate I made earlier if I need it.
The one I just finished fixing had to many rot spots, made a new one.
Guessing both frames are identical?
They are still original to the house, 1976.
Windows itself was replaced earlier by previous owner with 
an older style window insert, about 20 years ago.


Friday morning Sept 10 2021 0840


Bob, Sending prayers to my friends in Newfoundland, and my fellow Rotarians in St Pierre et Miquelon
they are predicted to be hit hard by Hurricane Larry.  Stay safe :-(

Monday, September 6, 2021

The start of greenhouse No 2

My work on the window has been stalled for a while.  It rain and rain and another TS remnants pass by and it rain and... Rinse and repeat.

That is why I had the time to document that little skew rabbet plane.

 In the mean time, I also started erecting, temporarily, her second greenhouse frame.

In this box, future greenhouse.

Said green house will be erected besides the existing one, but later.

It would reside on the left of the existing one.
Where there is currently a small flower bed.
Older pic, that garden plot has grown a bit since :-)

Why, because it would requires moving a small garden, cutting down a cluster of small trees and levelling a spot.  Not happening this year.  But we need the temporary shelter now.

The plan for this year is to used it for storage in order to empty the current shed and demolished it. 

That shed has long expired its Best Before Due date, not spending anymore money into this eye sore  sink hole.

In this early May pic you can see the shed in the back 
It started life as a small baby barn, then someone, years ago, expanded it on the side to make a bigger shed.
Dumb idea unless you are prepared to totally reframe one side to attach or you end up with lots of wasted space for the size increase.
Where the ladder sit is basically the intended spot for greenhouse No 2

Demolish and replace.  But where to put the stuff in between sheds? 

Canadian Tire had a sale on those 10X20 temporary shelter, bought one with the intend of using the steel frame as a greenhouse.  Will see how the current one survived winter and learned from it.

Meanwhile, Jean left for a meeting and I was left alone with the dogs, so...

Don't know what I would do without my tractor and trailer.
Save my back numerous times.
 Being tilting, I often used that feature to load and unload heavy items by myself.

The box says 3 persons to put it up in about 3 hours.
That is how far I got by myself in 3 hours.

Why this location so close to the vegetable garden and the pine tree?
Because it is the only suitable location to erect it on a flattish spot

I was a good boy and read the instructions first.  That was easy, mostly pictures and no words.  Universal language what? :-)
I spread out everything first to inventory and piled up my parts by part Numbers.
Would had been faster if the two slightly different length screws were separated.  
54 plus 30 of the other make a big pile to sort.
Did not wanted to play with all those screws over the grass, so used my driveway to assemble my frames by the garage then dragged then out to the nearest tree where they went.

I used the tree on the left to hold up my end piece to fasten the other to it.
That worked great, so I put on another and then realized hum.  How am I going to drag it between the tree and the vine wall, it's a tight fit??  And sure enough, I had to turned the partial assembly to fit in between.  Good thing I stop my assembly when I did, 3 frame just fit. :-)

Before It even went in, I had to trim some branches on the big pine tree beside it.
I had previously staked the 10X20 area it would be using, so I knew which branches to cut first. 

See, I was a good boy.
This is where I was stopped when Jean came back.
It was just me and the dogs up to now.
Does that count as the three peoples required? :-)
Together we finished squaring the frame and secured it down.
Then we installed both end panels.


By then it was supper time, we stopped and left the main tarp for tomorrow.

Oh look, it rained, surprise!

Yes it is close to the vegetable garden and the pine tree.
Only practical suitable flat spot available.

We will then finished it and start moving out the stuff from the existing shed.

On its last leg, roof on addition is leaking.
Notice one end is on stills the other on the ground.
The Rubbermaid vertical storage shed is full with plant pots.
And many more elsewhere :-)

Once shed is demolished, will see how much of its existing platform we can recycle if any.

It is sitting on an elevated platform on the Baby barn side, instead of making a flat spot first.

Make for a steep ramp to bring stuff in and out.  Another minus point point in its column .

If nothing else, we will have a better idea of the future shed footprint.  

Do we cut down more small trees to shift it to the right and make it flat on the ground, or a different location altogether?

Whatever we do, there is a  power line feed to the shed (Front left hand corner).  Currently feeding the greenhouse and pool filter.  Yes, GFCI protected.  I do not want to remove that electrical service so will need something over it.

To build or to buy?? Will see.

Storage priorities outside right now are:  Her gardening tools, the tractor and its various implements, a pot shed.  Yes she has quite a few plant pots of various sizes.  When I asked her if she needs all of these, she asked me if I needed all the tools I have.  Hum, I guess, YES, she needs them all :-)

In the end there shall be: 2 greenhouses, A SHE shed (doubling as a potting room), a garden tools shed and tool stations, storage with a wide door for the tractor and its implements.

And then there shall be light on the garage floor :-)

Meanwhile, my small pile of tools and supply to finished my window is standing by, waiting for a sunny day....


Bob, sharpening his pencil for the various sheds ideas.