While I was experimenting with my back rails locations, I decided that at 4 in wide, I would ended up with too large a tenon for my liking. Too large, because I would be weakening the side piece (the mortises are located to be flush with the rabbet, a 1/2 in from the edge, and a large tenon is expected to move more (seasonal expansion)
That is also why, I wanted to cut the mortises, before I cut the rabbet.
So I decided to recut then to 3 in instead. That way, I end up with a 2 in tenon, I can live with that :-)
I must do that before I start my joinery on them
The tenons are offset by a 1/4 in on the inside of the till, the back ending up flush with the back rabbet to support the back beaded pieces
A good mortise & tenon joint should be friction fit and the two pieces should hold together, with no glue. Not too tight that you have to bang it it all the way, just friction fit. Careful, we only have a 1/2 in wide piece of wood on one side of the mortise, and it is further reduced to 1/2 thick (lost a 1/4 in for the rabbet)

Test piece to check my gauges settings. My gauges are set using my setting blocks

A good fit is a friction fit that can hold itself, without having to force
it down with a mallet, hand pressures should be sufficient.
The rails being 3 in wide, I will cut the tenons 1/2 in narrower on each sides, ending up with a 2 in tenon. My first design consideration was to go with a 1/4 in but, I'm trying to keep those mortise relatively small, for strength. If I was using a hardwood, I would not hesitated to go at 1/4 in, but pine is relatively soft and break easy.
After marking all my pieces, using two gauges presets, one 3/4 the other 1/2 in
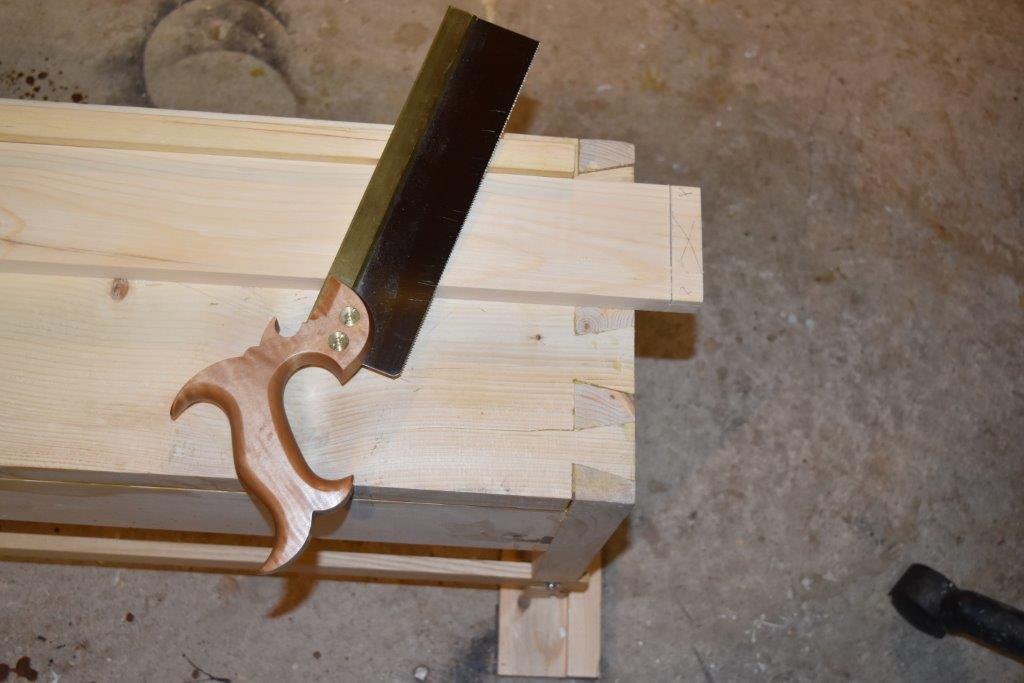
I cut the face on my saw bench with my stop fence

Then back to the bench, I cut a groove using knife/chisel to ensure my cut start straight

Cutting down to the line until the side piece falls off

Cut surface off the saw. Would be cleaned up at the end.
But first must cut down its width by 1/2 in on each sides
My shoulders are cleaned up using a shoulder plane, but if you don't have one, don't fret it, using a chisel would do. But if you do a good clean saw cut, you probably don't even have to clean them up. The saw used and the type of wood, and yes, how fuzzy you are (you and the wood fibers :-), are all going to determined if you need to clean up the shoulders or not.

All I need is a light clean up to ensure I have a tight line at my show face

First dry fit assembly

Oh, that dadoed piece on the side of the bench?
Yes, I suppose I should be finishing those dovetails...:-)
Again not necessary, but I may decided to go with a split, wedged tenon, mostly because I can...
Prior to assembly, the tenon are split-ted with one cut on each end of the tenon. Similarly, the side of the mortise wall must be angled to accept the tenon which would be pushed wider by the wedge.
That small slope on each ends of the mortise would be done AFTER I trim to fit my tenons for a snug fit.
The wedges are glued in and cut flush after dried.
Depending on how deep the cut are on my tenon, I sometimes pre-drill a small hole to prevent the wedging action to break off the tenon. A stop hole.
With this completed, we can now proceed with a dry fit and glue our saw till carcass. lets not forget the drawers dividers (2) while we are at it.
Once fully cooked, it will be time to figure out the size of our back boards, then machined them by hand. Machine by hands? sound like an anachronism, doesn't it?
Next part back boards.
Now, if you'll excuse me, I have some dovetails to finished...:-)
Bob, the galoot
No comments:
Post a Comment