The shell bits and its derivatives are fine for small hole, but are not efficient and quickly becomes unpractical for larger holes. Enter the center bits.
Today Paddle's bit or sometimes called Spade bits, are the direct descendants of the humble center bits.

No one really know when they arrived, but we know for sure that by the early 18th century they were in usage. By the 19th century, the center bits were firmly entrenched in woodworking. Remember that we have to wait for the invention of the brace before these bits were developed.
So what is that infamous drilling bit we referred to as the Center Bit (in brace terminology), and why does it matter that we learn the proper geometry and such to troubleshoot it?
Simple, because they are great (when properly shaped and sharpened) and that they are old and often mangled beyond recognition, never mind as a drilling implement! Armed with this knowledge you can spot a good one from a desperate cause in ... a flash! (Zoom, Zoom)

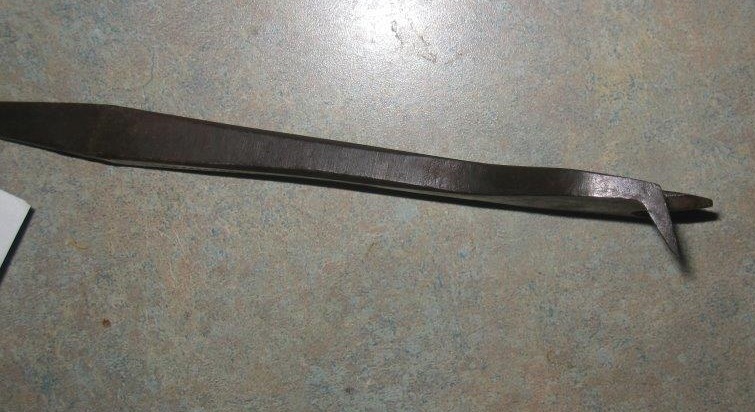
Is this bit OK?
What is it suppose to look like?
3 Rules:
1- The center point (the pin) should come tapered to the center and should be the longest part. (or you are drilling off center, making oblong holes)
It should also be made of sharp square edges (or it will not cut its way down for the cutting edges to do their work and require more pressure to cut)
Think bird cage awl action.
2- No part of the bit should be protruding past the lip of the cutter or the side spur cutting edge. (or you will jam...solidly in a hurry)
3- The side spur should score the bottom of the hole before the lip cutter (the router) engage. (Or the perimeter of the hole would be ragged, and difficult to start)
Resulting in a clean shallow circle mark into our piece, before engaging the bottom lip cutter. (Or If you have more of a scratch line than a neat scored line, you need sharpening. Or if the cutter cannot leave pre-cut outside edges, (being too short) you will have tear out.)

Recognize the important bits?

On this drawing the cutting lip is bend inward.
The numbers referred to my 3 rules.
I will admit that I usually look at the bit end upside down, but nonetheless, you should recognize quickly those critical dimensions when looking at the business end.
You may have noticed that the cutting edge of the bottom lip is sitting at an angle. DO NOT change it! No, it will not leave the bottom of the hole flat (like another of its derivative, the Forstner)
Notice the outside bend, that's the cutting lip.

Notice its angles (2) DO NOT change the bevel.
If you have to touch it, watch out that it can still pass No 1 to 3 after...

Parts of the bit;
The center point is called the pin, it center the bit action.
The side cutter is called the nicker or the spur, it define the hole perimeter.
The cutting lip is called the chisel or router, it lift (remove) the core of the hole.
Everywhere the wood is touching the bit, these surfaces should be shiny smooth.
It would help the bit (reduce friction) and help move out the swarf (wooden bits)
But again and again WATCH that you did not violate rules No 1 to 3 inclusively... You may end up with an undersized (nominal) size to achieved it, that's fine, it's just a different size hole bit from now on.
And by the way, these were for the most part hand forged for years, even if using dies, the sizes varies slightly from their nominal sizes (often not stamped)
The only way to measure accurately their "sizes", is to measure the actual hole they make. Because even a small offset of the center pin will produce a slightly elongated hole. Why so casual about their sizes? Historically, people drilled smaller thru holes then enlarged them to the desired sizes using hollow tapered bits. That and/or you simply adjust whatever to size what goes inside the hole...
Close was close enough!
Similarly I always make my mortises first then cut my tenon to fit, easier that way.

Top shell bit, bottom hollow taper bit.
LESS IS MORE
And that's the beauty of these bits, once in proper shape, they only requires an occasional light touch up. Providing you took care of them. If you meet Rules No 1, 2 and 3, they should work easily, polishing some surfaces more would help, but be very careful...
Some defects are easily fixed, some take a bit more work, but some are just too far gone. If they are good steel, hang on to them and reshaped the bottom of it, they make fine custom sized bits or circular pattern scoring bit. Ditto for spade bits :-)
Lets look at some real world artifacts:

From L-R: the last one has definitively a spur cutter now
too short to work correctly, pass.
The other ones look OK to So-So, hard to tell at that angle
One and three appears to me to be to have the highest spur of the pack.
Yes, its a very subjective conjunction right now, but it should help you weed out the bad ones on EBay or better yet, in person with the bit in your hands.
Realized that it does not take much of change in viewing angle to make the spur look too short or longer. But sadly they often have too short a spur cutter.
Lets try again

From L-R: the second one is twisted, no doubt because it's cutting
geometry has been fooled with, it quickly jammed,
and some ham fisted guy twisted it! DAMHIKT.
Too bad, it still had a long side cutter :-(
The first one is too short (spur cutter), the remainders look OK.
The fourth one really look off center! The last one slightly off center.
Correcting an off center bit

Off to the left.........Off the the right.
They usually becomes off center after careless sharpening of the center pin.
The arris of all sides should be sharp, so that it can cut like a drilling awl.
That means filing the sides. If you remove more material on one side, you shift the center point.
Correcting it requires removing material on the offending side to bring it back in line. This offset is exaggerated in my drawing, but you get the idea.One note of caution, this operation of course reduces the length of the center pin, it must still be longer than the rest.
You may be tempted to filed down the side spur, but it cannot be shorter than the cutting lip. When looking at a off center bit, try to visualize if you can bring it back within the length constraints, if not...Pass.
Shaping the side spur
In order to work effectively we must pay attention, not just at the length, but also at the shape of the spur. The shape of it help score cleanly as much as its sharpness. CAUTION, the tapering is done on the inside of the spur, not the outside or you will violate rule No 2. If you file the outside, you will make the bit cut off center (lopsided) and change its diameter.

Notice the leading edge of the spur on the left.
It's somewhat like half the side spur on a familiar Jennings bit

The spur should also have a small relief angle at the trailing edge.
Sharpening the cutting lip (router)
You should only have to lightly touch up the bevel and the underside to produce a sharp edge. Be very careful NOT TO CHANGE the cutting geometry.
It does not have to be crazy sharp to work well!!

View from the top.
If the outside edge of the cutting lip is sticking out further
than the spur, it must be brought back in line
Using Center bits in a Brace
After making sure the the bit in question meet the above pre-requisites, let's chuck the bit into your favorite brace.
Run the bit backward first to establish lightly, your perimeter of the cut. Are we making a round circle? You want also confirm that the spur engage before the router. When turning in the right direction (to cut) it should leave a nice scored line, not a ragged scratched line.

That is more of a scraping action than a scoring one, need touch up.
If not, stop and spend a few minutes touching up the bit. Understand that some wood species would not scribes as easy as some other, no matter how sharp. So do not chase your tail on this one. Hint, try making a circle with a marking knife if unsure!! Look at the results.

That's more like it, look at the scoring mark on the bottom right.
Remember that different types of wood will react differently around the periphery of the hole because of grain directions, chances are it will not be a perfect score all around. This is pine and we could make it better still.

Look at the shape of the shavings, little cones shape, that's how it's suppose to cut. Notice how badly it cut in the previous hole. The difference in action only took a few swipe of my file.

Cutting action of the router (cutting lip).
If you change the angle of the bevel you will change the thickness of the shavings. Too thick, it will stop cutting and jam, too thin it is not efficient.
Worse case scenario, it will not lift any wood out of the center.
Especially if you inadvertently file upward the bottom of the cutting lip.
Look at line D-C on the right.

Obviously the hole represented is not to scale with the bit.
But you can easily see how the chips are formed and lifted
by the levering action of the router (Cutting lip).
Once satisfied, watch hypnotically the chips being lifted out by the cutting lip all around the radius of the scribes line.
Now, because you got mesmerized, you went crooked, so start again, but this time pay attention! :-)
Look at the chips coming out of the hole. You should be pulling out nice thick shavings that curl upon themselves.
Look and feel the edges of the hole. It should be well defined and smooth inside.

The bottom of the hole is not flat and is deeper on one side.
NOTE: Since a good one has a longer center pin, watch out on the other side, if you do not want to poke thru. If making a thru hole, stop when the end poke thru then continue drilling from this side.
If all this is a bit overwhelming, trust me, it is a lot easier to tuned up a center bit than it is to described the process in words.
First, learn to recognize what all the parts should look like, their relationship to each other and their effect overall on the performance of the bit.
They are plentiful out there, but a lot of them are used up or misshapen badly.
Try to visualize what need to be done to bring back the mangled bit back in service. Can it be done and still meet Rules 1, 2 and 3 ?
If so, fix it, if not pass.
They are usually wrought iron or high carbon steel, a regular file will touch them up easily. The use of an auger bit file is recommended because of its safe sides.
But you can use a regular slim file. I often uses my diamond paddle folding file.

Once correctly shaped and sharpened, center bits will quickly becomes your favorite bit, because they are so easy to touch up after.
Last words:
- Once sharpened, please protect their cutting edges, do not throw them haphazardly in a pile inside a metal drawer. Each should have its dedicated spot to protect them. Think bit roll or rack.
- These are not meant to cut at high speed, do not uses in an electric drill, uses in a brace only. Hint, the spade bit is designed for high speed, hence its slightly changed cutting geometry.
Bob, the old Drill Sgt.
Thanks for the tutorial Bob. I've passed on a lot these bits but now that I have an idea of how to breathe some new life into them, I'll probably won't be able to find any at all now.
ReplyDeleteFantastic! When buying a new type of tool, I too-often get burned on the first one. I've looked a few sets at the Tools of the Trades show but found the choice a little bewildering. This will give me loads more confidence.
ReplyDeleteRalph and Paul Thanks.
ReplyDeleteWhen buying old tools, knowing what to look for is half the battle. The other half is knowing how to restored them.
Most of what I learned about old tools came the hard way and by collecting lots.
Wow! Thanks for this, Bob. I know you put a lot of work into this blog. Really appreciate it, even though I don't have any center bits.
ReplyDeleteThanks Matt, much appreciate your comment.
ReplyDeleteIf there are any subjects you would like covered, I'm open to suggestions.
Thanks for this, I purchased a set and found they required alot of pressure even after I "sharpened" them so I probably did it wrong I'll go back over them
ReplyDeleteHi Michael
ReplyDeleteIf they requires too much pressure to cut, take a look at the router part first then the pin. If you have a negative angle on the bottom of the router (cutting edge) it would be hard to engage it into the cut. You don't need much of an angle there to mess things up. Second, the pin should have sharp arris to be able to cut into the work without undue pressure. Careful that you don't shift the center point.
Bob
Hey Bob
ReplyDeleteThis is an excellent post. Now I know how to restore the collection of centre bits I got from my father. He never used them, he was very much a power tool woodworker. Most of my centre bits were made by Marples and probably not used for close to a century is my guess. I also have a few of those shell and hollow taper bits in the collection, but have no idea what you do with them or how to restore them. Maybe if you feel like this type of post in future, I would love to hear your thoughts on those.
Thanks again for the great post.
Gerhard
I guess in one of my flea market buys there was one of these bits. I didn't worked pretty well so I forgot about it. But know I will have a look if I can bring it back to work (if I can find it again).
ReplyDeleteExcellent post.
Cheers,
Stefan
HI Gerhard, always a pleasure to hear from you.
ReplyDeleteAs long as the side spurs are longer than the router, you have a good chance of rescuing them. Give them a try, yours kids will love seeing the magical curvy shavings produced. Its also a great tool for us unplugged Woodworker tool (when the kids don't monopolize it :-) Its also a pretty safe combination.for them
What I call A Win-Win for both parents and kids.
I have no idea how it would work in some of your native hardwoods, but in softwood, should work great and easily (here would be pine and softer hardwood)
Bob
Let us know how you make out.
I will give it some thought, re post on these other specialized bits restoration, care and feeding :-)
Hello Stefan, glad to see you survived previous idea you gleaned from another of my post :-) (how wife should dress for sewing)
ReplyDeleteThat's the fun thing about these bits, on the surface they look very simple, but they are a really sophisticated instrument to make effortlessly clean holes.
Can be very maddening when not working and trying to sharpening them. As long as those three rules are meet , should not be much trouble to restore, if not, they will never work as they should...if they even work..
Give it a shot, it is honestly fun to see those shavings rewarding your work spend tuning them.
Bob, the kid at heart, I shall remain :-)
Wish I could find a few at a reasonable price.
ReplyDeleteWow... Great information on woodworking bits. I really enjoyed reading this blog post. It is always important to use perfect woodworking bits.
ReplyDeleteThis blog captures attention from start to finish. The content is clear, relevant, and full of value, making it enjoyable and useful for readers seeking genuine insights and knowledge.
ReplyDeleteDrill Bits & Parts
Enrgtech
discountfinderpro