Narex, 25 degrees
Pigsticker 30 degrees
Using my Veritas angle checker I measured both my Narex mortise chisels and my pigsticker chisels since they both had different bevel angles.
The Narex are ground at 25 and the Pigsticker at 30 degrees.
My stop blocks are labelled to avoid confusion; Narex and Pigsticks.
The final touch was to attached the thin spacer to kick all these preset angles about 2 degrees for a micro bevel, if so desired. I did not do as recommended by Chris and give the jig a French Polish, but I did used mint flavored dental floss to attached it! Hope this will do, to appease the Schwarz :-)
Next it was time to finished the joinery on the Plane till parts.
It is kind of useless trying to balance a long board on a small one, so I simply secured the top and bottom boards in turn vertically to the bench and use my Bessey corner clamp to hold it at 90 and securely to the other board.
I shine my bench lite under to help set the baseline.
The short board is held at 90 degrees, I checked with a try square
I use a pencil line which I then just split or leave the line when I saw with my dovetail saw.
I found the secret to blade longevity with these thin fret blades, is to not let the blade overheat too fast, or it then become stretch and bend. I then stop after about 3 sockets, let it cool off a bit then resume.
Slow and steady win this race.
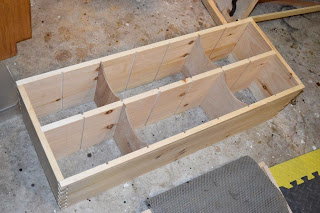
Got my chisels sharpened and the joinery finished, now its time to do a dry fit, and check how the planes will fit. Last minute chance before I glue it.
Yes, they fit like I thought, good to go.
Just to make sure it does not get out of skew on me, I'll put in 2 dividers in each row while it is being clamped.
If I get these 8 dividers slots to align, the rest will for sure and that is my primary objective, not necessarily perfectly square. Reasonably square for sure, but I can always tweak the outside of the cabinets with a few judiciously placed plane's swipes. Results; the dividers will go in without problems, it will fit squarely to its mate's till, and it will look like it is straight ...from across the street :- )
Once dried, it will be cleaned up with my plane and chisels as required
Next it will be primed and painted, the same color. Remember its name?
How could you forget, such a name ? :-)
I still think it is a bit pale, I would like it a tad darker perhaps... but its OK, its growing on me, either that or I'm not noticing, my wife reminds me sometimes that " I am so observant!?"
Oh, you got an haircut?? :-)
Next, I need to cut and install one part of the French cleats on the wall. I want to make the bottom of this till in line with the larger plane till.
The remaining space on top of my new till to the top of the bigger till will be occupied by my upcoming saw till.
Now it is time to turn my attention back to the saw till.
Bob, thinking ahead to the next project after the saw till ... :-)


Using the bessey corner clamp for holding the boards whilemarkiing is good use for them. I might try that if I can find them.
ReplyDeleteon wide boards I will sometimes uses one on each corners. I sure makes it easier.
ReplyDeleteAnd by shining a lite under it is easy to see how to register the baseline. In theory both should be perfectly flat and line up when solidly registered inside the clamp, but boards don't always cooperate that easily, with the lite I can see easily how the baseline lines up.
Bob
Nice job on the movable dividers. I always have a problem figuring out how to hang those in my plane cabinet. Making it your way also means that if you ever get a new plane or sell an old one, you don't have to rebuild the entire cabinet.
ReplyDeleteBrgds
Jonas
Thanks Jonas.
ReplyDeleteYes, that's why I decided to put dividers every 5 in or so, in order to accommodate changes down the road. I don't think I need to keep 2 Stanley 45 and 2 or 3 wood plows etc, but for now, they will have a home :-)
Cheers
Bob