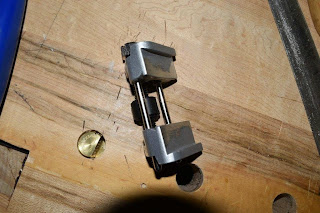
Thanks to a reminder from Ralph, I went looking for what was previously written about this ubiquitous side clamping jig. It is both inexpensive and works well, but like many tools out of the box, can easily be tuned to work even better.
Here is what Chris had to say about it: Tune up a cheap honing guide.
And I went looking for Deneb video on tune up Honing guide modification.
I remember watching and reading those before, but it has been a while. So after refreshing my memories, off I go down to my shop and gave it a once over.
Interestingly, my old one was perfectly flat, while my new one had a slight bump in the middle. Easily fixed with a file as per Deneb and Chris instructions
Marples 1/8 in Bevel Edge chisel, tricky to hold straight, not enough purchased on it.
Marples 1/4 in Bevel Edge chisel, no problems
Not sure what is causing the round shadows at the bottom of some of my pics??
I'm guessing its the lens barrel? Will have to figured it out.
Sash mortise chisel 1/8 in, has to go above the cut outs but I'm worry that it has no support under and may pushed out. I suppose I could put something under.
Even tried for fun my swan neck mortise cleaning chisel, almost , but cannot go far enough in to quite match the existing bevel. No biggie, easily done free hand and it does not need to be super sharp, just a stout sharp arise.
Checked how big of a chisel it would accommodated.
1/4 in firmer chisel.These bigger mortise chisels rest on the top of the guide rods
and its pretty secured.
1/2 pigsticker. Being lower into the guide I suppose it would changed the angle slightly?
1-1/2 Marples Bevel edge chisel is about the biggest I have that it would take.
The 2 in Marples Bevel Edge doesn't quite fit, and does not hold tight enough on the top portion because of its quite large side beveled edge.
Then one of my biggest plane iron, a Stanley No 8 plane iron.
It would go from 1-1/8 to all the way to 3-3/8 quite a range on the top portion.
Never came across a regular plane iron (as opposed to a complex moulding iron) that wide, but you never know, I only have 118 planes, so it may still be out there :-)
Perhaps a cooper long plane??
So it takes easily my bevel edge chisels from 1/4 in to 1-1/2 in, and handles all my bench plane's iron. Very nice, still not perfect but I love this little jig, and do not see why I would ever pay more for a fancier guide since this cheap one works so good. I'm still on the fence regarding the keel jig
to handle correctly my smallest blades, but honestly, I don't think its worth the hassle to used a guide for them, take very little time free hand. Ditto for my 2 in Marples Bevel Edge chisel, lots of registration surface on that one for sure and the exact angle is irrelevant. Sharp is all that matter.
After testing the action and fit on various blades, it is time to give it a real life work out. I have no shortage of blades to try :-) I also found that my LV plane cap iron screwdriver does a good job to tighten the guide securely without applying gorilla forces on it, also easier to balance than a long regular screwdriver. I suspect my old guide may have last longer using this screwdriver than the old brute force I'm used to :-)
But first it is time to make a board and a few setting blocks for it.
And if you are wondering what is happening with my plans for the second plane till, I am still at the wood gathering stage for it. I already got my 8 dividers for it, left over from my earlier till but they are only 6-1/2 in high. If I make the cubicles height as planed, 7 in high, they wont do. I may revisit my height requirements and should be starting construction soon this week.


Hi Bob,
ReplyDeleteI have 3 of these guides but I don't use them much anymore. I found that the lower vee notch for beveled sided chisels don't hold the chisel square. They do work well for doing plane irons - #3 to #7 - haven't had any problems with them.
I will admit that the lower portion for the chisel is a bit hit and miss. It depends on the size and shapes of the bevel on the chisels. Some fit good, some not so much. Also the smaller size are a bit of a pain to register while tightening. Nonetheless from 1/4 to 1-1/2 it hold my Marples BE chisel pretty good. How square, will be revealed once I sharpen them. Bench plane irons like you said are very good. But for the price it is excellent.
ReplyDeleteRobert,
ReplyDeleteIt appears you are using a camera mounted "flash", if so the dark area is the shadow from either your lens or the lens shade. Move the flash off camera to cure the shadow or if unable step back a little and crop as needed.
ken
Thanks Ken, it is the built in mounted flash on the camera. I do plan to buy a stand alone Speedlite for it, probably the Nikon SB-700. In the mean time I'll probably try my old Sunpack flash from my 35mm days. I'll also will have to use my new software to crop them. Another learning curve, yeah...
ReplyDelete