Last nite, as I was hoping, I glued and pinned the skirt feet bracket pieces.
Sorry for the compressor noises love, Oups
I took my time and slipped slide in the glue trying to locate the corners perfectly, as I knew they will fit. My bright idea was to use the 23 ga pinner but the only pins I currently have (or more correctly, located) were much on the short side, barely protruding past my skirt pieces. I thought that should do the trick, just hold them in place long enough for the glue to grab. And since unbeknownst to me, I was doing rubbed joint...should grab fast :-)
Was a tad frustrating, but managed to go around the box with my pieces and everything lined up at the corners beautifully.
And then I took this pic and my heart sank....

Pic I took at 2130
Oh shit, the box is rocking badly.
Quickly pried off the two offending corners, measured around the box, I was off by less than 1/8.
What happened?? My box is square and same height around, my skirt pieces were clamped together, the two long ones then the two small ones to cleaned up the profile, and ensuring they came out the same. But after they got an individual sanding to clean up some spots, they varied a bit in width on the flat part. When I glued them, I made sure to line up the flat part to the box bottom.
Well Dah! Although, both long and short pieces were flat to each other, they were not quite the same between the pairs. Not by much but enough to throw me off. One lesson learned the hard way.
Only problem now, is I'm not so sure anymore I have a strong glue bond all around. Concern I have is, that is all that is supporting the whole weight of the box, the box is not resting on it, like I would had done if this was a piece of furniture (stronger that way, and negate my weight concerns).
I will reinforced the mitre corners with glue blocks which would be resting from the box bottom to the floor. All the weight would be bear by them, relieving my weight worries...
How much does one ashes box weight?

3.666 Kg, it's a tad on the heavy side.
Between the dovetailed construction and the glue joint of the skirt/feet
and the glue blocks under, should be plenty strong.
Slow morning, I was up late last nite, watching Toronto make NBA history and I had to drop off my car at 0800 at the dealership for the passenger air bag recall.
I am still tired, must be careful not to make any stupid mistakes so close to the end.

Trimmed the pieces on the stiles

Touch up my most used chisel in this built on my new slipstones
which somehow followed me home during my yesterday chocolate run :-)

Ohhhh I like it. Fast and wicked sharp.

This is the chisel I will be using for my mortise.

But first since I done the tenon before the mortise, I have to make sure
they are straight every which way. Before cutting my mortise to match.
I would normally cut the mortise first, so this is kinda backward for me.

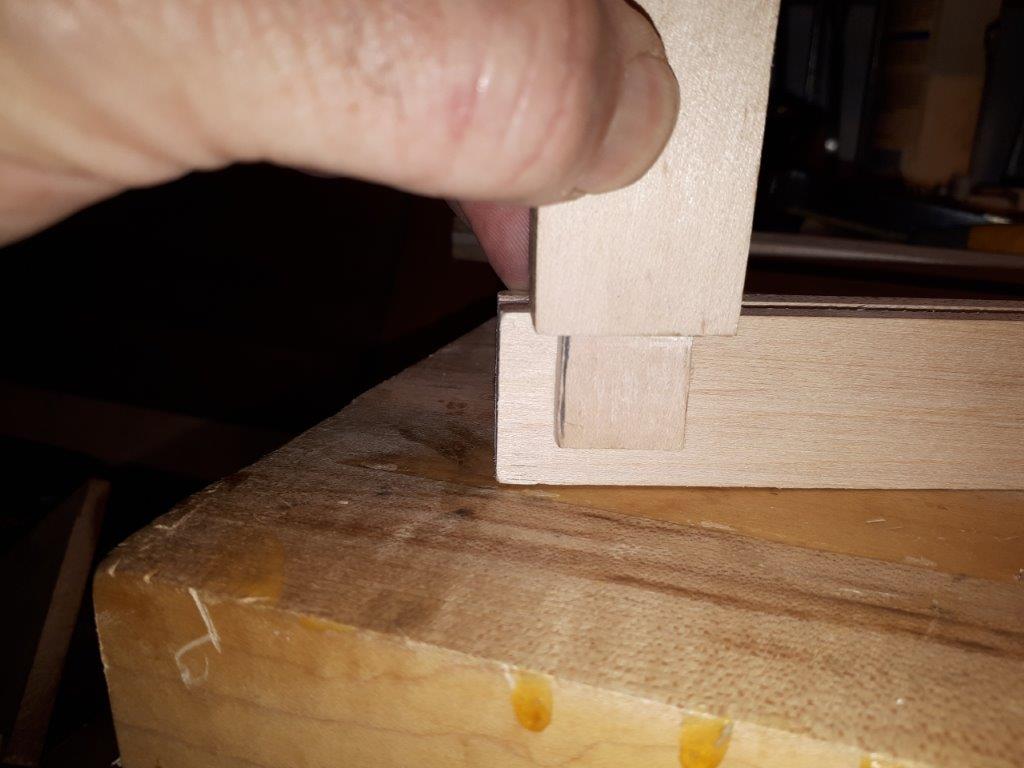
both tenon trimmed, ready for mortising
First we must adjust our mortise gauge to our tool. Forget measurements, use the actual tools as references.

Setting the gauge pins close

I always do my final adjustments on a piece of scrap wood.
Strike lines and see where the chisel fall within.
In this pic, took me 3 tries (bottom LH corner), the top cut is the one
Now the real fun begin. I am going to attempt to cut a slightly larger mortise than the existing groove.
But more worry some is the fact that I already cut my stiles to the right length, leaving me not enough meat at the ends, like I would had normally done. Will need reinforcement.
First bright idea was to use the vise and back the thin wall by another piece.
Did not work too good, the work piece keep sliding down and I'm leery to break the groove walls, so I put in a spacer to reinforce them.

Nixed Plan A, going with Plan B.
Danger Danger Mr Robinson, there is no spacer in the back up piece !!
Instead I sandwiched it between pieces of scrap with a clamp and rest it on the top of the bench.

That worked good, I can torque it down without worries.
Now got my mortise roughly as deep as I dare to make it.
It has to be below the groove bottom, for strength.
Testing the depth.

And checking on the actual tenon.
That is how far it would go, if I left my tenon at that length.
Then decided to cut a bit shorter my tenon.
And that is when the first fatal screw up happened, I clamp the piece in the vise to cut it then heard a sickening cracking noise...

Forgot to slip in a spacer inside the groove and my piece broke in two places
OK, so I'll just glued it back on with my new Gorilla instant glue I just bought, just in case...


I just glued in the bottom crack, once done, I'll glued in the other one
Seems to be taking forever to dry for a so called instant glue??

@#$%&?! Not an instant glue. Could they print it smaller? Tabarnack!
It is just regular foamy Gorilla glue %$$#@

Quick trip to the store, bought some real instant glue.
Set in 10 seconds, that's more like it!

They sure looks alike don't they.
I did not screw in the blue top to pierce the tube in this pic.

Not worth re-gluing, would need a new piece , longer to be able to do it properly.
Like I should had done in the first place.
At this point I gave up on the frame and panel idea for the cover.
Went outside to have a coffee with Jean, I told her what happened, and why there would be no cover for the box. I am exhausted and I am starting to make too many mistakes that I knew better.
She said I cannot bring in just the box with no cover, so she talk me into just making a slab for the cover. Ironically that was Plan A, but I went with a frame & panel, worrying about a large slab expanding/contracting.
After looking over at my spare pieces left over, quickly figured out that the best combination that worked was by using the two long pieces for box No 2.
The resulting slab would have the right length but will be too wide and will have to be cut.
Will simply make new pieces later when I start No 2...later...much later

At 1630 my cover Plan C is starting to take shape.
While that cure, time to sand the box and give it its first coat of whatever.
Did some experiment on the side, with what I bought today and what I have on hand. Need something that dry fast. Settled on using my Howard refinisher Golden Oak colour.
I wanted something that would make the grain figure pop.


first coat wiped on.
Then I will simply polished it off with a wax compound.
Feed & Wax, my other Howard product.
Using some small pine offcuts from a longer piece, I simply split them with a chisel, pared a bit then saw to proper length and glue in each corner. Machined surfaces inside the corners.

The whole weight of Paul is going to rest on these four (4)
glue blocks, plus the skirt glue line. Good to go.
After supper, took my new panel out of the clamps and scrapped the glue line, and off to the woodshop to run it thru the wide belt sander.
Then shot the edges with my LV LA jack plane. That plane is pretty amazing on this figure maple, I can pull off whisper thin full shavings. Incidentally it is smoother sailing on the end grain than the long edge. It quickly let you know which way it prefers.

Panel cut near final size then all edges were shot with the plane.
After rip to correct width, gave it a quick sanding with the Random Orbital sander with 150 grit and called it a day.

Ready to go back home.
In this shot angle the glue blocks are showing, hum.
Pare them smaller or paint black??
One hour later back home, tack rag then wipe of the same stain on the remainder of the box and let to air out outside. Kind of strong smelly. Hopefully will dissipate before tomorrow when I close the box one last time...


Later tonite, before going to bed I will give the whole thing a coat of Feed & Wax then buffed.
The only thing remaining are to drill some countersink holes for the cover screws and attach the plaque on the box.
That is it for the nite, having a cold one now. Not going near the box nor touching it for a while, don't want to jinx it.
Bob, totally out of gas...running on empty. Blogging is the only thing that keep me going and motivated.
He ain't heavy, he's my brother.
ReplyDeleteTrue that...
ReplyDeleteWow, looking great.
ReplyDeleteThanks, the least I can do for Paul, he was a good friend.
ReplyDeleteIt was a labour of love.
Bob, choking up
Bob,
ReplyDeleteCongrats, the box looks great. Paul was lucky and I expect you are as well, good friends are rare and precious.
ken
Thanks Ken
ReplyDeleteYou are right, Friends are always special to me.
Bob, bringing Paul to the Legion
Nicely done, Bob. With limited time and lots of challenges, you managed to pull off a very fine box.
ReplyDeleteAnd BTW, congrats to your Raptors - they beat my local team.
Thanks Matt
ReplyDeleteI am happy the way it came out.
Oh, I did not realized that the Golden State warrior was from your neck of the wood.
Was a very well matched tournament till the very end.
Bob, who never really watch basketball before, I am a hockey guy :-)
The bracket feet make it in my opinion. I tried several Gorilla glues and I wasn't happy with any of them. I do like the Rapid Fuse even though it isn't an instant glue.
ReplyDeleteThsbks Ralph.
ReplyDeleteI agree, i wanted something more than just a a a plain box. Thats what i came up with.
Bob,
ReplyDeleteI just noticed the photo of your new stone. Did it come in a box? How does the surface feel? It looks very much like a Pike or Norton Lily White Washita. If it is you done good.
ken
HI Ken
ReplyDeleteThey came in a box alright, but a Sharpe & Brown 4 in caliper box :-)
It is translucent very hard and raise a wicked sharp edge fast, I like it :-) They others are a variety of grades/materials/grits. Mostly shaped slips for gouges.
They look pretty well like natural stones. Most have a chips, but for $20, not complaining.
Bob