Sgt Rudy reporting with Aviator Handyman, Sir
What? Did I heard food?
You are on your own Aviator!
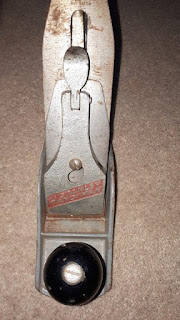
Stanley Handyman H1204
The name says it all. It is not a professional model...
Stanley had three economy lines before, the Four Square 1923-1935 and in the 1930s they also had Defiance and Victor economy planes.
After WW2 there was a big demand for housing with returning servicemen and the rise of the Week End Handyman gave birth to new lines of lower cost tools, alongside the continuing demand for "professional tools". Stanley answered the call with the Handyman line up. That Handyman name (and Yankee) were acquired with the purchase of North Bros mfg. in 1946.
Sadly with the rise of the new fangled power tools, the demand for Professional planes declined, but the rise of the Handyman special's tools continued unabated to this day... sadly
Stanley was well positioned to fill that increasing demand. Stanley, the tool box of the world was now their motto and rallying cry !
We saw earlier how a smaller company, Millers Falls, produced a lower cost version of their regular models by using less costly materials and performing less machining on what was essentially the same castings as their regular planes were. That made sense for a smaller company.
Big bad boy Stanley, on the other hand decided to simply (?) re-engineered a cheaper version of the standard Stanley-Bailey. Namely, they reverted to an older, simpler frog and receiver design and horror, came up with an even cheaper looking and painted all over frog surface.
You would think that re-engineering a product would be a more expensive proposition, but Stanley had the economy of scale on its side. And how many Bazillions would you like for your stores? We can deliver! A lot of Sears Craftsman tools were made for them by Sargent and MF, but Stanley made their Handyman for Sears under the Companion label. Sears own cheaper line alongside Craftsman.
They probably supplied them to Montgomery-Ward and others as well.
Recognize that frog/receiver design?
They reverted back to an older Type 6 1888-1890.
That design was basically unchanged until the new step frog design of Type 9
Of course, the critical frog and mating receiver surfaces are simply painted all over, like the MF, but the frog used washer's head screws (no separate washer to loose) and the black painted hardwood parts are attached using the familiar two parts design. Except that instead of using a brass cylinder, they used aluminum to lessen the cost..?? Would had been simpler and cheaper to go with a one piece screw like they did in WW 2, but heh, its Stanley, it can overdesign a simplified version if it wanted to... :-)
Lets give the Handyman the usual treatment, this poor thing has been left neglected in my garage for a long time... and it shows. Mea Culpea :-(
Using the usual suspect, except I used WD40 instead of Jig-A-Loo
Reminder, I'm out of WD 40...
Body and frog currently being scrubbed with Krud Kutter
The blade and cap iron were pretty well rusted near the critical edges,
so they got a soaking in Evaporust. Ditto for lever cap
Normally I would be worry about creating a tell tale line, but I'm not in this case, since I just dip it for 15 mins or so, take it out, scrub with a grey scrubby (coarse) soak back, repeat until I'm satisfied I got all the rust neutralized. Finished off with a light sanding all over with the Fine rust eraser, then a coat of Autosol. Ready to go back in storage, until it comes out to play, at which point, I'll sharpen the blade
One side
And the other.
I can clearly see the name stamped, it was pretty well obscured in rust
Either after Evaporust or a scrubbing with Krud Kutter, I rinse them well then "bake" my parts at 200F for about 10 mins. Ensuring they are thoroughly dried before I start sanding, lubricating etc.
What is that box besides the oven?
Oh, I made a deal with Jean. I clean my messes (better) and can keep using the kitchen oven
until further notice.. Who knew, that I was messy?? :-)
Happy how the lever cap came out of Evaporust, rust eraser, Autosol.
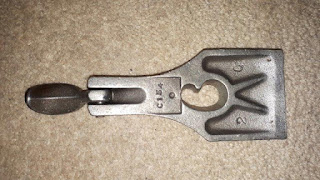
Notice provision in the casting for the missing spring. Just like MF and others.
That keyhole feature does not shows up with Stanley before 1935.
That critical junction of the blade, cap iron and lever cap was looking badly rusted
but they all came out good.
That missing spring is causing wear and galling
on the softer punched steel cap iron. Definitively not tool steel like on the MF.
That cap iron is stamped H in the back.
Making sure it does not end up on their better planes ? :-)
Similarly, the sides and sole of the receiver casting got a similar rust treatment, except, I encountered more serious rust, which required more heavy duty elbow grease...
Don't know what substance caused this rust, but it is a bit thick.
Razor scraper and WD 40 to the rescue
I switched the runway sandpaper from 120 to 80 grit, that is after a few passes.
Whatever caused the rust, left an etch
After 80, 120 grit, fine rust eraser then Autosol, calling it done.
The hollow behind the mouth is irrelevant, the front of the mouth is pretty good save for a few remaining scratches, but mostly lower than the mouth.
With the cheesy frog we have to work with, this is more than enough!!
The sides got similar process.
The lever cap cleaned up good with Krud Kutter follow by a wipe of Autosol
Ready to be made one again.
Notice the aluminum barrel for the tote, instead of the usual brass.
A complicate way to lessen the cost...
Paint losses? If you look carefully the missing blue paint at the bottom of the frog, is...
Found it! its on the receiver bosses :-)
The special washer's head screws to attach the frog.
No separate part to loose (subdue wow)
Of course since the whole head rotate, it is scraping off the paint around the slots .
Some bright idea...
Since there is no central rib to help center the frog...
… and the sloppy fit, it is easy to misalign the frog.
Shown exaggerated, but you get the picture.
Before blaming a crooked bed casting, check if it is square to the mouth.
Notice no wedge splitting's knob inside the receiver ring.
Glamour shots
Cast Y lever, plated steel nut (?)
Other than that, everything else is pretty well the same as the MF, albeit, this one has a better finished lever cap with a fancy hammered metallic finish. Trying to imitated a cheaper plating version I suppose? The name Stanley Handyman is clearly cast and highlighted in red paint.
Throughout the years it underwent color variations of the bed (grey, black, darker and lighter blue)
Frog (red, grey, blue, black)
Similarly the lever cap had a few finished variations, ending up plated
By the way, you can still buy a version of this plane, now called 1-12-204 Stanley Handyman
Complete with plastic handles and plastic adjuster nut...How much cheaper can they make it..??
Oh, but the lever cap is now plated...oooohh Blingy!
So how does it compared to the MF? Really no comparison's, at any price point. The MF has a real frog, whereas the Handyman has some pale imitation frog and no provision to move aft/fore in a straight line, making it easy to misalign the frog. Can it make shavings? Yes, of course if you have the patience and know how :-) It was adequate for its intent market. Not fine woodworking, but shaving off a sticky door and such, a Handyman tool!
But the real proof would be in the pudding...
Bob, who is reeking of WD 40. One more then we play :-)


Dang, Bob. That's a thorough coverage of this (in my view) poor excuse for a plane. These posts have been long, but I can't seem to pry my eyes away. Thanks for all the info.
ReplyDeleteYoure welcome Matt
ReplyDeleteYes, as planes goes, that is a no frill El Cheapo. But it is after all a tool, that good or bad, was influencial. It deserve some attention... :-)
Bob, curious to see how they will perform.
I have four Stanley handyman planes, all #4s. I replaced all handles and totes with oversized maple parts, lapped, tuned, sharpened...they are now my faves. I have all the other Stanley Bailey line and as nice as they are they don't feel as well and perform as well as the ones I customized for me. They don't feel cheap and they don't perform cheap. They are what you make of them...missing brass.
ReplyDeleteI know there are many different types in the Handyman series but the navy colored, made in usa, seems to be my preferance. It should say "Stanley Handyman" across the lever cap. The single line "Handyman" should be avoided. Too many cheap parts. Replace the wood with something better and now you have a piece of art. A tool you can be proud of.
ReplyDeleteSorry I'm a newbie & I bought a used Handyman & there is a metal plate between the frog & the sole. Was this for shipping or to give greater strength?
ReplyDeleteHi! Thanks for this information.If you want to know more about it.Please Click here.Handyman
ReplyDeleteThis was a great blog that I really enjoyed reading. I like the way you explained the complex topics in simple terms. I especially liked how you made them easy to understand. I enjoyed reading and have learned quite a bit from reading your blog. Lastly, if there is anyone who is looking for a reliable and trusted handyman Service in Edinburgh, then I recommend Umega Home Repairs as the best Edinburgh Handyman Service.
ReplyDeleteThis site provides an organized directory of local handyman-near-me services, making it easy to find reliable help nearby.
ReplyDeleteThe structure is clean and SEO-friendly, ideal for boosting visibility in local searches.
Great resource for homeowners looking for quick and trustworthy handyman support.
Residential handyman services cover a wide range of home repair and maintenance tasks. From fixing doors to painting walls, these experts keep your home in top shape. Reliable, affordable, and ideal for busy homeowners, our Residential Handyman Services are just what you need to maintain your living space effortlessly.
ReplyDeleteGreat post! It’s informative and clearly shows a passion for quality workmanship. Handyman Services in Alpharetta, GA provide the same level of expertise and reliability for all home repair and improvement needs.
ReplyDeleteYour article gave me exactly the information I needed. The Ceiling light installation service from Straight-Cut Handyman Services was outstanding. They installed everything perfectly and safely. I highly recommend their services!
ReplyDeleteGreat article! You explained everything clearly and made it easy to understand why professional ontario handyman services are so important for home maintenance and repairs. This kind of information really helps homeowners save time and avoid costly mistakes. Thanks for sharing such practical and useful content—well done!
ReplyDeleteI found your blog extremely informative and useful. We chose Superb Ontime Construction for Residential construction in Fremont CA, and the results were outstanding. The project was handled smoothly from start to finish. I highly recommend their services.
ReplyDelete