There are a few specialised planes to make windows, the ones I found are called Adjustable Sash planes (an American invention I believed), since the space between the decorative cut and the glass rabbet is variable, adjusted by screwing or unscrewing the two part of the body apart.

My two new acquisition for my herd
Window sash making, the making of the glass window frame, was a specialized trade at one time. Even after the division of labour between the carpenters (framers) and the house joiners (finish carpentry, trim work) Window making quickly became a speciality... and for good reason. It demand an attention to details, the ability to craft good work precisely and specialised tools.
Traditionally, before the window maker became a trade, such work was reserved for their best housewright (Finish carpenter, joiners)

Some of the tools of the trade:
From Top L-R CW
Sash Scribing plane (it really is a table top plane but posing as)
Recessed screw adjustable Sash plane (with appropriate screwdriver)
Wood screw Adjustable Sash plane
Reverse Ovolo moulding plane
Sash Filletster plane
Stanley No 45 Combination plane (could cut the rabbet and the decorative cut (ovolo etc)
Two sash mortise chisel besides a typical English regular Pigsticker chisel (for comparison)
Typical joiner mallet
Sash Backsaw
Missing are the templets, the Sash gouge and the sticking board.
The windows frames themselves were not that difficult to make, but you have to ensure a square rigid assembly using solid joinery, no glue. The glue available in those days would be quickly rendered useless outside in the elements.
Mortise and tenon drawbored or dovetailed (often pinned) would be the joinery of choices for the window sashes. Oh and make sure to uses a wood species that is straight grained and decay resistant, one side being exposed to the outside. Yes, they often used pine back in the days, but it was old growth, tight grained wood, unlike today fast growing pine stock found at the lumberyards. Larch was also used.
The difficulties come from the delicate looking, graceful muntin bars that divided the window opening in 6 smaller openings. In the classic 3X2 window sash (6 panes per sash).

Lead cased diamond pattern windows, sometimes called Tudor windows.
What was previously used before the advent of the sash windows.

Ham house situated besides the river Thames in Ham south of Richmond in London, built in 1610. It has the classic 3X2 window sashes
Prior to that, the lead cased diamond pattern window was prominent. The sash window first appeared in the late 17th century and even today, double hung sash windows are still popular and come in aluminum or PVC, besides traditional wood sash.

Classic 3X2 PVC Double hungs windows that I put in my house.
Low to none maintenance.
In the earliest windows up to 1740, the size (width) of the muntin was 1-1/2 to even 2 inch. Making joinery in bars of this size was easier and did not required specialised tools, commonly used joiner tools did the job.
A plow or rabbet plane could cut the glazing rabbet and a simple molding plane could cut the ovolo.
The size of these bars was gradually reduced for aesthetic reasons, reaching 3/4 in by the end of the 18th century, and about 5/8 by the beginning of the19th century. Such small pieces of wood created a demand for specialised tools to be able to work efficiently.
The reason of course why the windows of the days had to used numerous smaller panes of glass to cover the opening was simply because the limitation was how big a pane of glass they could make... Only smaller ones. Gradually the size of the glass panes increased to larger ones, enabling the uses of less panes of glass until finally conquering the size limitations,. Today we can make very large panes of glass of all sorts.
Why do we bother with the decorative element on the outside part of the muntin (sash bars, glazing bars)?
Because, being on the inside, and in plain sight it makes the size of the bars appears lighter.
Besides the simple bevel profile, numerous others were used, some using Ogee, Ovolo and etc.


Pic from Ralph
He cut the two side of the decorative cut with a moulding plane. Next if he was to rip the molding and then cut the glazier rabbet on both side, he would had made a sash bar...
Looking at that shape you would probably been wondering how you would hold the narrow piece for the rabbeting operation on both sides?
The answer of course is by using a Stick Moulding board, one adapted to our typical mouldings. There were a few variations, depending on the types and number of cuts required. In the example above, using Ralph picture, that would had been the 2 planes, 4 cut method.
First cut in the first position on the sticking board, cutting the rabbet using a Sash Filletster plane

Flip board over then cut other side of rabbet as above

The third and fourth cut are done in the second position of the sticking board using a moulding plane such as Ovolo etc.

Another form of specialized Sticking board for sash bars

Sash ovolo pairs with matching templet
The typical planes used to form the sash bars, or muntin, sometimes came as a matched pairs.
One cut the side profiles on the length of the bars (Sash plane) and another cut the matching coping profile on the end of the bars, called Sash Scribing planes . Such planes are rarely found as a match pairs, having long been separated since birth....

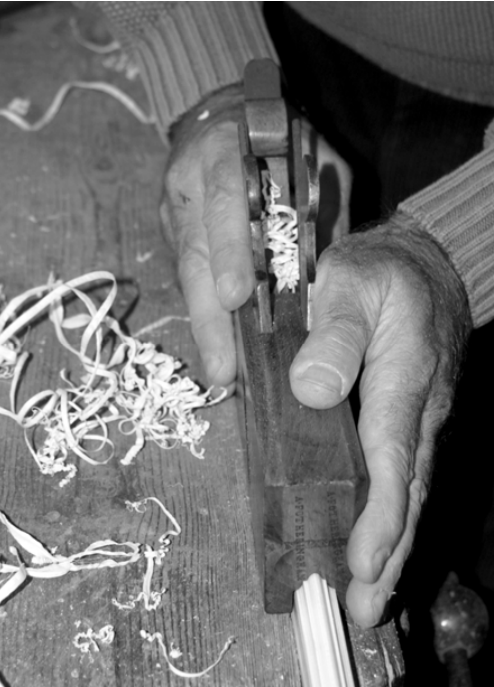
How the Sash Scribing plane was used


Another form of Sash scribing plane
Today windows sash are cut by shaper cutters, much like the rail and style molding set used in raised panel door making.
And technically, we can of course cut the matching coping profile using chisel and gouge.
This is one use were the in-cannel gouge (meaning the bevel or bezel is on the inside of the gouge) is better, having a straight curve profile on the outside enabling us to pare precisely up and down to an outside line. Hint, some text books referred to such gouges a paring gouge. You can of course used the more plentiful out-cannel gouge, but the outside curve would be bevelled hence you cannot pare straight down.

Scribe templet with specialised sash gouge. It has a built in depth stop
For repeatability and precision, such gouge and chisel work was often executed using a templet (template). There would be such templet used to pare the 45 degrees and coping the end of the bars.
Such templet often came with the mirror profile of the sash bars to nest it securely inside in the correct orientation.

Using a Miter templet
Another plane that was sometime used was the Sash Filletster plane, often mistaken for a plow plane, being very similar. Like any Filletster planes, the fence would slide under the stock of the plane, whereas the plow plane fence does not.

18th century Sash Fillister plane
(iron removed in storage, one stem wedge missing)
Ever wondered why the Stanley No 45 Combination plane has two holes, one on top of each other on the fence to attach it to the bars? The bottom hole position is for regular plowing, while the top hole allow the fence to slide under the skate (essentially the sole) making it a Filletster plane.

Bottom hole location for regular Plow operation

Top hole location for Filletster operation
Using the Stanley No 45 it is possible to cut all operations on our sash bars with only one plane (except the scribing part).
The next evolution was to make specialised sash moulding planes which could cut both side of the profile at once with the board held on the edge on a bench vise. Still two planes method, but only three cuts
Finally the Adjustable Sash plane, cut the whole thing with only one plane and two cuts. These are the ones I just found

The one on the left is adjusted by loosening the locking collar then adjust the screw, then re-lock. it is also fully boxed. The other one has no boxing and is adjusted by turning a wood screw in and out. Yes the steel screws in the brass collar were frozen, Liquid Wrench took care of that. The English pattern Cabinet maker screwdriver shown is the correct size to fit the screw.

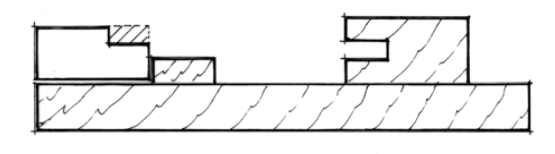
In this Sandusky catalog illustration you can see how the two cutters cut each part, one the rabbet, the other the decorative cut.

Can you make up the profile?
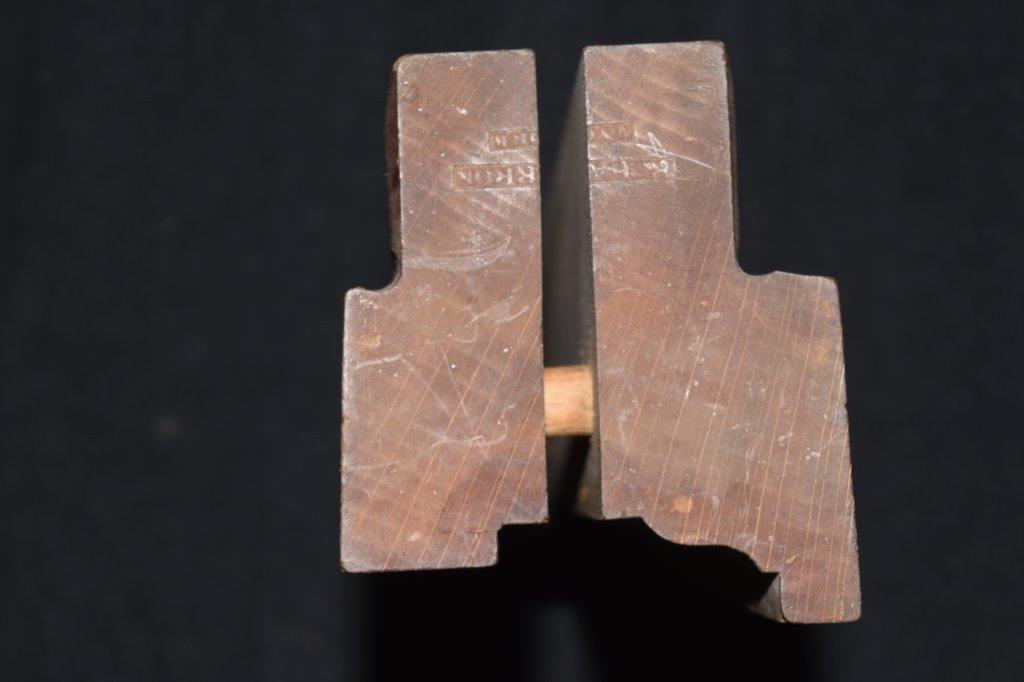
Shown both closed

Closed


Opened. It varies the length of the flat part on the decorative cut side
The screw adjust one, opened.
They both have dowel to ensure they stay true
And you may have guessed that using this type of planes, required yet a slightly different type of sticking board than shown previously.
The horizontal sash bars (rails) are mortised into the vertical sash bars (stiles) using, you guessed it, a sash mortise chisel.... :-)

Two proper sash mortise chisels beside the regular
English Pigsticker mortise chisel for size comparison
The rip saw would have riped the sash bars to size first, then finally the sash backsaw would have performed all the cross cut operations involved.
The saw bench and the bench hook, a mitre block would had been used in those cuts.
Watch this video to see it all come together...
Darn if I can find my sticking board, I would have to make a new one I guess... Another post :-)
Bob, with a few tools MIA around him
References: With Apologies to Jane Rees, some of the information's provided came from an article published in EIAA.
As usual Bob, very interesting. Now that you've got those planes, we'll expect to see some handmade windows in the near future. Time to replace that old PVC!
ReplyDeleteI've passed on a few sash planes because I didn't see the need for them. I do have a couple that profile the inside edges (marked 1 & 2). Figured I could use them for shelf edges etc. After reading this, I wish I had bought them now.
ReplyDeleteBob,
ReplyDeleteAs always good post but....You are having way too much fun :-). Also good video of a skilled workman.
ken
Hi Matt
ReplyDeleteHumm that would be 10 windows, 6 sash bars per windows... i think ill stick with my PVC windows :-)
Bob
Ralph, I too, passed numerous times on sash planes, not knowing what they were or how used. Now that i have the time..... and better knowledge :-)
ReplyDeleteBob
Thanks Ken
ReplyDeleteTrue, i am having fun, but i dont think that there is such thing as having too much fun :-)
Yes pretty neat video, the amazing thing for me was the realization that no glue was used. That demand tight joinery and the need to lock the whole window sash together by pinning the joints. And it must resist the stress of opening and closing these sashes. Pretty cool
Bob,about to go on a tool finding run with Rudy :-)
Where are the sash doweling boxes and the sash pocket chisels?
ReplyDeleteSee wkfine tools on reproducing sash doweling boxes.
Dave Nelson.
These are wonderful and inspirational, thank you for posting them
ReplyDeleteFascinating article, thanks! I'm keen to know the historical source for your diagram which dates various glazing bar profiles, please. We've just joined the Oxfordshire Buildings Recorders, and are learning how to date buildings from architectural detail. So far, your diagram is the only one I've found with dating, but I could do with knowing the source.
ReplyDeleteThanks a lot
Buffy McClelland
Thank you for the article which is very useful as I'm planning some handtool built windows. One issues which is puzzling me is that of tearout when cutting the reverse face of the muntin. i hould be grateful for any advice or guidence
ReplyDeleteWorked with an older carpenter for a few years. We talked window making on breaks ect. He promised to teach me but passed away to soon. One important point he made, and he's the only one that has is to mill the coped ends first while they are inboard shape. This obviously would mean some careful planning and probably mean some trial runs. Alot of work but once you have a size, you have a template with dimensions.
DeleteHI Unknown
ReplyDeleteAssuming that you are using a proper sticking board and a sharp plane, with straight grain pieces of wood (important for making them but also for longevity) should not be much of an issue.
The tool(s) you are using, also could be an issue.
But most likely, culprit is wood selection.
Bob, hoping this help
Oh, yeah, one thing I forgot to mention is how do you get such straight grain for making those parts? By riving wood, you get the straightest possible long grain. The sticking board, matching well the piece for good support, should give you a stable surface, which should plane as easily if flipped over.
ReplyDeleteBob
I found it easier to make the rabbet first. Then the sticking board can be clamped on the rabbet. You forgot to mention the sash doweling box used to drill the dowel holes in the bars, stiles and rails. A member of a collectors group I belong to made wooden windows in Scotland until the 1960s. He said they used southern yellow pine for the pieces. The holes for the pegs were drilled and the parts were assembled using square bamboo pegs. I tried the process and it worked great. I made eight sash doweling boxes for a display. I would send photos but I don't see a way to attach them. I wrote an article on building the boxes and it was posted on Wictor Kuc's web site.
ReplyDeleteHI David, thanks for the insight.
ReplyDeleteIndeed there are many ways to go about cutting the sash bar profile. Which operations was done first depended a lot of the tools available and how the sticking board was set up.
Don't think I ever heard of the sash dowelling box, but you picked my curiosity. Will have to look it up.
Thanks again David
If you look for sash doweling boxes you will find a photo of one I made of tulip wood. It is a copy of one made by Varvill. The article I wrote should be available on the Fine Woodworking web site. If you let me know how, I will send photos of all eight boxes. Dave Nelson
ReplyDeleteHello Wankero
ReplyDeleteIf you want to share those pics with us, you can send to me via my email wwbobinns@gmail.com
Thanks in advance
Bob
Very interesting read, plenty of mentions of Ovolo but none of Lambs Tongue? Some of the sash planes pictured show a profile which is far more attractive, known as Lambs Tongue. If you make windows by hand, worth using this profile, looks amazing!
ReplyDeleteWow, been looking at your website London Sash Windows repairs. Great to see these old windows can be made anew again. Keep up the good work. Will have to look for that lamb tongue profile
ReplyDeleteCheers
Bob
Thank you Bob, appreciated coming from someone with such a nice blog themselves, we do try and I do as much writing as time allows in the hopes more people will realise they don't need to rip out entirely and replace!
ReplyDeleteHear Hear my friend!
ReplyDeleteLove to see old building keep their characters. They have outlast us, they should go on a few more lifes
Cheers Mate
Bob
As a considerable part of this came straight out of my article on Sash Window making published in the EAIA Chronicle, a credit would have been appreciated. Jane Rees
ReplyDeleteSome of the information's came from research online, various sources.
ReplyDeleteDon't recall accessing that EAIA article, but apologize and more than happy to give credits were credits is due.
Corrections being made
Thank you for bringing it up to my attention
Bob
Thanks for sharing such informative blog. Best decorator in Faversham provides a complete decorating service, this includes thorough preparation of the area and surfaces before starting the actual painting and decorating. Call 01795 554530 today!
ReplyDeleteTimber sash windows Faversham
Thanks for giving us precise knowledge of window replacement. When replacing your windows, it isn't necessary to choose the best materials and hire the best window replacement professionals. I got my window replaced from Window installation Vancouver. I'm impressed by their services.
ReplyDeleteWindow glass replacement Vancouver
Patio door glass Vancouver
Very useful blog. Thanks for sharing such amazing updates. Keep sharing. Van Security Leeds
ReplyDeleteNice article, the information you have shared here is really helpful, keep sharing them.
ReplyDeletewooden windows installation in Muswell Hill
Really liked this interesting blog post to read out where I got Sash planes and window making and here I installed Vacuum Insulated Glass in my home windows which is looking fantastic.
ReplyDeleteAbsolutely captivating glimpse into the artistry of sash windows. The progression of tools and methods is undeniably remarkable.
ReplyDeleteEducational
ReplyDeleteNice Post Visit US
ReplyDeleteCasement Windows Vancouver BC
Casement Windows Surrey BC
Nice Post Visit Us
ReplyDeleteBest Window Companies In Richmond
Top Windows Installation Companies in Richmond
Concrete Patio Installations in Comox
ReplyDeleteThis comment has been removed by the author.
ReplyDeleteI love how you highlight the finesse needed to shape those delicate muntins—it's wild how much precision went into such small pieces. Reading this actually made me appreciate modern tools a bit more, especially after dealing with window installation long island recently.
ReplyDelete