I was not sure if it was complete, beside the obvious missing boring bit, so I researched it on line and discovered that what they were asking, at 1/2 price sale no less, was quite a good deal, so.... It followed me home later on... Honest :-)

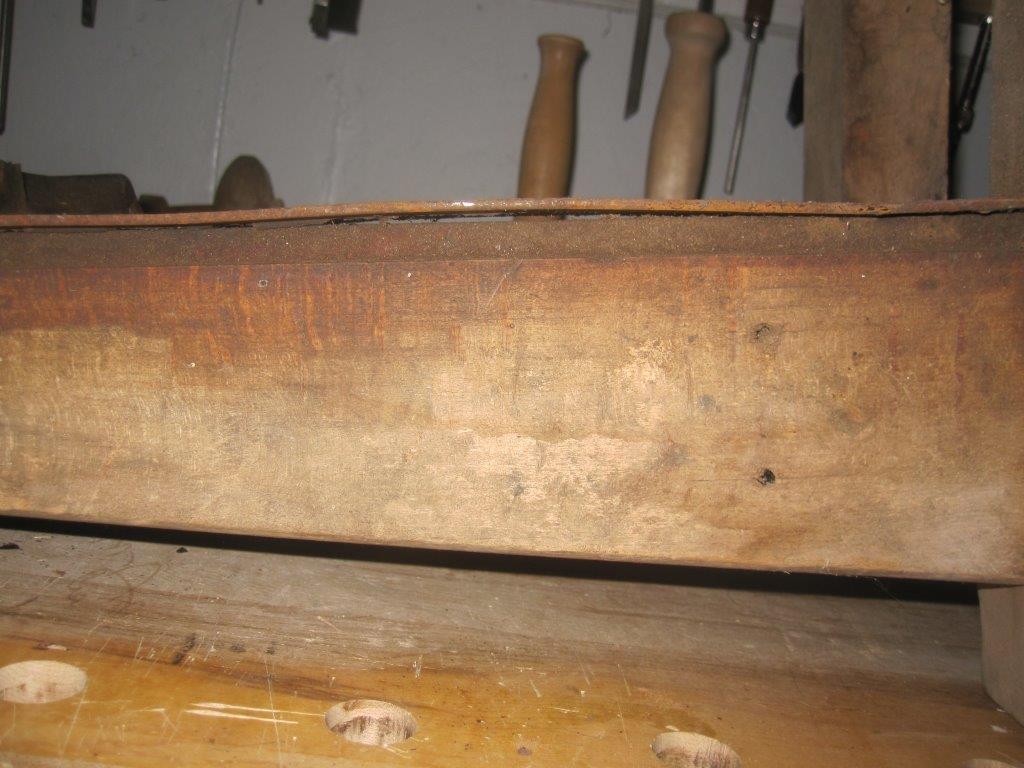
Notice the empty dado on the top cross member,
that is where the holding clip would have been.
The only missing bit I can figured out is the clip on top to hold the carriage up, but someone long ago replaced it by a small piece of metal that you simply turn to hold it or release it. It work, so why re-invent the wheel... for now.

The Jerry-rig holding tourniquet.

Notice the empty dado where the holding clip would have been,
The gear in the middle slides to the left to engage the track to raise the carrier.


This is what I think the holding bracket would have looked like.
Its advantage would be that as the carriage is cranked up,
it would snap in place to park it up without any intervention.
Once positioned to drill just push on the bottom of the clip
to release the carriage
Other than that, everything is accounted for, the gearing turns, albeit a tad sticky, and the carriage return gear slides in and out as expected.
The wood works need a good cleaning and I will probably put on some sort of finish on it to protect it, there is some play in the joint where the uprights are fastened to the bottom boards, will have to investigate and correct. The whole assembly is mounted by long thru bolts so I suspect there could be some dry rot causing problems, no big deal, I have the technology :-)
So, all I have to do now is to disassemble it, clean it, paint the metal work and lubricate the gearing and bushings.

The screw heads were covered in goop,
probably dry up grease of some sort

All bushing covers removed, look good.
No pitting or galling on the shafts under the bushings
One of the metal tracks on the sides, where the carriage slides up & down,
has a small bow on it. It does make the carriage a tad stiffer when going over.
Easy fix that I would have to do. All the metal bits are to be stripped from the wood frame anyway.
The hardest part could be to find a suitable bit for it. I found some on line but they are asking way more than I paid for the machine ... :-(
But fear not, I think I can jury rig something, will see.

The business end of the chuck, just a a round opening
with a big set screw on the side

A regular brace bit does not fit because of the square tapered tang.
Cutting it off, it would still be too loose for the hole size.

Got this twist bit with the right diameter shank and a flat spot, look perfect.

An indeed it fit great, so now I know the diameter I need.
These beam boring bits also have a long length to them 12 to 17 in long.
My regular bits are a "bit" on the short side.

My tape measure says 1/2 inch

But my drill bit gauge says it is bigger
by a smidgen, guessing 9/16 in

The bolts do not go all the way through but are captured
in a nut on the side piece


Except that on both sides, a bolt is missing!
The fun part would be to find suitable square head bolts and nuts.
You can see some rot has taken places under the frame which is to be expected as these are often found laying in a barn on the floor or on a cement floor even, both would eventually results in this kind of problems. No big deal. I want to keep it as original as possible, so I will solidify the punky areas with liquid PC-Petrifier.

The bottle of PC-Petrifier in the background is some sort of liquid epoxy (?) that penetrate the wood fibers and solidify them. Unlike regular epoxy, it is very liquid, almost like water and penetrate deep. I used that a lot in old home restorations with good success.
That PC-Petrifier does not alter the wood surface other than impart a semi gloss to the area. I usually remove as much punky wood as I can, then saturate the area with it to prevent further rot and ensure I have a solid foundation to epoxy glue in pieces of wood that I later shape to blend in the repairs. Normally it would be painted over, but in this case I want to preserve as much as I can the original wood, so unless pretty punky (does not seem to be yet) I will just treat the bottom with it before applying some protective clear finish over the whole wood work.
I want a low sheen, not glossy.
The metal parts I will take apart and derust them, assess the paint condition on it (look like it was Japanned?) and probably repaint it black.
My goal being, I want the final product to retain its old look but be a working tool. As for lubrication of the gears and shafts, don't know yet what I'll use. I seen most people on YouTube used WD-40, but I'm thinking something better lasting like a grease of some sort. White Lithium perhaps? Will have a
look at what I have in the garage...
But at any rate, one should always open the bushings, clean, inspect and lubricate them when first acquired.
End of boring part 1 :-)
Bob, who got another side distractions on the go, but must finish lamps first...
Looks very interesting, Bob. You planning to do some timber framing? Oh, yeah "it followed me home". I'll bet it ate your homework, too :)
ReplyDelete"...jury rig..."
ReplyDeleteI'll gladly sit one a jury of your peers to pass judgment.
With these machines, the most difficult challenge is finding properly machined bits. I suspect that the majority of these beam borers were purchased for the one barn project with one bit. This model is the cheapest with none of the bells and whistles on more professional models.
The bits are 1/2" standard. It appears that your twist drill bit is suffering some surface rust, which has expanded its circumference.
It also appears that you've suffered a loss at the top of the arch on the sliding assembly. These machines are top heavy and often show damage to the arm, and in this case, to the upright holding mechanism. It probably was snapped off when it was tipped over and then filed down. The turn button was then added on to hold the sliding portion up. This assessment is not conclusive since so many of these were made with an astounding number of modifications so I think that the example of the holding catch is really just another repair to similar damage as yours has suffered.
try this for the square head bolts/nuts
ReplyDeletehttp://www.blacksmithbolt.com
Hi Matt
ReplyDeleteNot really into timber framing, but... I could not pass :-)
NO homework's have been eaten so far, but chairs rungs, shoe insoles, TV remote, cords to the laptop, cell charger etc... Yes Rudy is going thru his teething phase right now :-)
And NO I have not introduce him to my shop yet, will wait till that phase is over first :-)
Bob, with his hands full
HI again Potomacker
ReplyDeleteThanks for your comments, always appreciated.
Have not found any markings on it yet, perhaps as I clean it?
It does not have all the bell and whistle has you mentioned, but it is a very versatile machine nonetheless, looking forward to put it back into use. 1/2 in standard bits heh, hum yes, there is surface rust on my bit so you are right and I should have picked up on that... :-)
I read some of your posts on your blog, very interesting.
You bring an insigthful view on the current Made in China tool market. I have seen some good stuff coming out of there but unfortunately, we often get to see "junk" caused by bottom line driven and clueless North American company execs. I waas shock and surprised about Pony clamps... Sad
Cheers
Bob, who has bought tools from man places around the world in my "travels"
It's a Snell boring machine. Made in Fiskdale, Massachusetts, early 20th c.
DeleteThanks Peter (?)
DeleteGlad someone could help me ID it. Cool now I'll have to do some more research into it :-)
Thank you
Bob and Ruddy
Thanks for that source Ralph, I did not knew of it.
ReplyDeleteSince their product offerings are commercially made, I will look around to see if I can find some locally. I noted on their site that the US postal rates are going up sharply, at that rate you will catch up with our rates... :-) Never cease to amazed me that I can buy something on Amazon, shipped directly from China, delivered at my door step lots cheaper than I can send a parcel to Quebec or Ontario from Nova Scotia... Go figure!
Bob, looking for square heads bolts
Hi Bob,
ReplyDeletethat's interesting stuff. Never seen that before. You have got my full attention.
Curious to see how it will go on.
Cheers,
Stefan
Hi Stefan
ReplyDeleteThese beam boring machines were common at one time and still prized by timber framers today. I don't see them in the while very often, and those for sale are often priced in the $hundreds of dollars.
Although I have no intention of doing timber framing, I just could not passed it :-) Don't know how long it will take me to restore it and put back in service, but in the mean time google or search on Youtube beam boring machine to see them in action.
They are pretty slick.
Bob still trying to find what Rudy did with my bag of screws for this morning project, sigh :-)
I have a similar tool. Do you have a value for ome that is complete?
ReplyDeleteHi Bob, I have only the carriage for this exact machine, and was wondering if you have any specifications for the rack that meshes with the carriage return spur gear. I was also wondering if you comment on why the beveled side of the upright is the side that the carriage is mounted to - wouldn't this bore an angled hole - or am I missing something? Thanks. creativechemist netscape net
ReplyDeleteHi Bill
DeleteI do not have the info you seek, but I could certainly take some measurements. As for th ebevel side in question. Not sure what you meant ? Reread my post did not saw it?
Ill get back to you with measurements
Bob
Hi Bob, Thank you so much for your reply. I appreciate you measuring your machine - I think a set of specs for that gear rack and the rails would really help anyone in a similar situation. I'm wondering if it's a standard linear rack pitch (8?) or because it was cast, if it was "custom". As for the bevel - I mean the taper of the uprights that hold the carriage. Maybe all of the pictures I've seen are at a bad angle and creates an illusion that the tapered side is facing forward, which I think may be the case. Thanks again for your blog and all of the work you put in, exploring and restoring these historic tools that still have importance and relevance.
ReplyDeleteHi I just found your blog from researching boring machines. I purchased a Snell boring machine as well. Looks alot like yours. I'm in Dartmouth. Have you had much luck with finding bits for yours?
ReplyDelete