Thursday, March 5, 2020

Bung borer

Bung borer are a class of tools that bore a tapered hole in a wooden  barrel, cask or flask.
The tool make a graduated tapered hole, called the bung hole
The bung, being made of wood, cork or rubber, having a matching taper will make a good seal.
Often two bungholes would be made.
The first one in the middle of the barrel, at its highest location when laying on its side, which was used for filling the barrel (or whatever vessels)
The second one, with the barrel now standing up, would be bored on one side of the head, near the rim, opposite the filling bung.  That would be the one that would receive a tapered wooden or metal tap for dispensing liquid.

The first models of bung borer used the age old pattern of a simple tapered spoon, later more sophisticated model would appear, numerous patented.

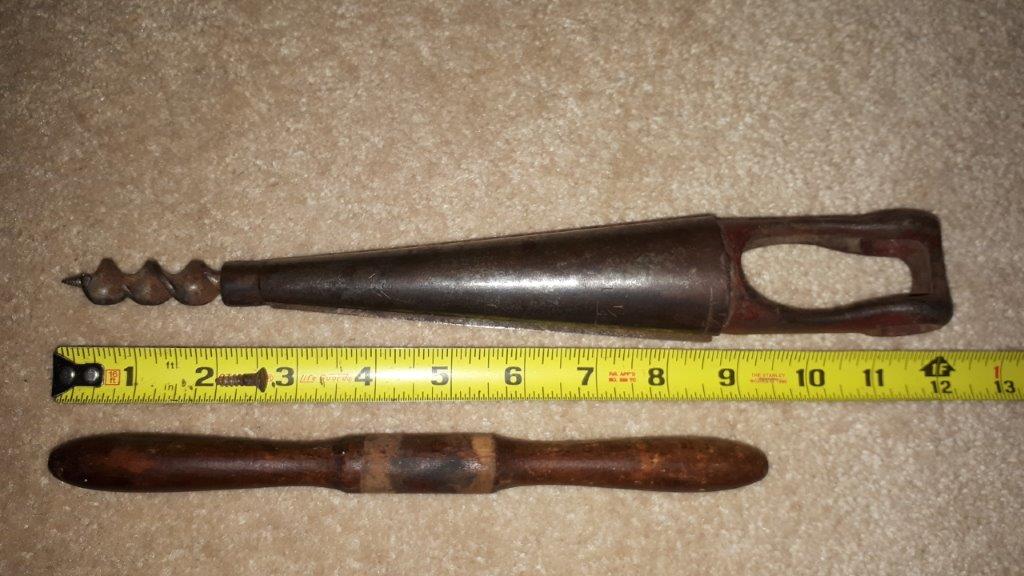
Top one is like my model
Bottom is the older tapered spoon shape
Pic from New Zealand Vintage Tool Collection Club


The Swan patented borer

The Brockett patented borer

As early as 1838 they had some patented mechanical contraptions machinery to cut both the bung holes and the bungs.  But the tool in question was intended for use primarily at the receiving end for dispensing liquid.

This is how this one came to be in my shop.

These items, including Rudy, followed me home (Tm) the end :-)

These tools, all came from Beans Antique and Collectibles, here in Wilmot.
Price tags were $73, they gave it to me for $57 tax in.
They changed their pricing by the way no longer everything 50%
Happy for what I got, worth it.  And yes, I'm a good customer :-)


Now let see what I got and why


CW from top
Hand auger handle, Bung borer and matching wooden spigot tap

The hand auger handle is destined to fix a current auger with a loose (worn out) handle)

My new handle appear a good fit, and now I have 
an historical model to turned new ones.
The original on this one (or a replacement) was roughly hand carved, not turned.
Also appears to be a soft wood?

A subject for another post, lets have a closer look at the remaining, related, objects

Rudy getting a closer sniff

See a difference is handle sizes?
That tell you a lot about the force to be exerted between these two tools

It's a yet unidentified maker's wood barrels, cask, bung borer

They were used as such
Ad from the 1880s for Enterprise Mfg Co of PA.


They were an hardware specialties company, better known for their mill grinders.
Top three pics from Etsy.

I do not know if mine is indeed such a model, but I can't see how mine would keep the chips inside the tool??
The one in the above ad has a short thread of the cutting bit (part of it enclosed inside hollow taper cylinder?), mine is longer exposed and there are no way the chips can slide inside the tapered hollow cylinder.

The bit is solidly fixed at the tip, there are no spaces between
 the top of the tip and the inside of cylinder
Other than that the construction appear identical.

Turned hardwood handle is fixed to top of tool casting by one small 5/8 wood screw.
Yes look funky, but that is the correct size flat screwdriver.

Grace tools saw screwdriver, perfect fit.

The wooden spigot I found seems to be a good match.
I suspect they long settled on a "standard" taper by then.

I wonder if it is the same taper used in chair's building?  Because if, so they would make a handy source of tapering tool for chair making.  Expect to pay about Cdn $35-50 for one of these, which is much cheaper than new customs chair making one's.

Construction:
The body is cast then the tapered cone and cutting lips are machined.  Short auger bit is affixed at the end.  Turned wood handle is secured by a single wood screw.


Cutting lip, bottom, is sticking out ever so slightly from the body.
You can see some nicks on the edge.
Take care in sharpening to only touch the inside of the lip, 
never the outside or you risk changing the outside diameter
 and lowering the cutting lip.  If you look closely inside the bottom, the auger bit is peened inside 

A look at the wooden spigot

Made up of three turned parts.
The main tapered part is cross drilled


Internal "conduit" is 3/8 dia

The Bung borer would benefit no doubt from a quick sharpening touch up, but 
let's give it a spin and see how it perform, as found...

Using a piece of hardwood, since barrels are mostly oak

This is harder than oak, but the cutting lips of the auger are not engaging.
In its defense, it is hard to apply much pressure from the height I am using it.

OK, so lets try on soft wood, pine


It kind of work, but it chew more than it cut

Typical mangled surface left from a bit in need of a tune up

At that rate, it would be a while before we get the tapering action involved.  Lets try drilling a hole to start it.

I just grab a bit, found out later, it was a 1 in bit

Forstner bit laying at about the 1 inch dia. on the borer
It is graduated at 3/4, 1, 1-1/4 and 1-1/2 in

The piece of stock I'm using is 3/4 in

Yea, it kind of start a bit high up

After a few turns.
It is easy to get carry away, its fun :-)

Yes, it is tearing going against the grain.
Will be improved after sharpening.
Remember this is "as found".


Now let see how the tap fit.

Simply pushed in by hand.


Pretty darn tight on the inside surface of the vessel.
And this is just hand tight.  In use they would be tapped in with a mallet.

Of course we had tear out on the front face.
But I am pretty sure once wet, this will make a leak proof connection in the back
Which can only be improved by sharpening it correctly.
Just a touch up really.

Interesting find, and now I know how it works.  
Sharpening, is added to my to do list Vol 3 page 6.

Meanwhile...

... Better start clearing out that table and clean up 
my wood chips before she gets home :-)

Bob, putting stuff away while shuffling more stuff

Friday, February 14, 2020

She said YES

We both been married before, both widows and we have decided to spent the rest of our life together.
She wants a regular wedding in the Catholic Church, so I am playing along, and going thru the rituals.  From courting, to proposition, etc etc... :-)

Being always unconventional, I figured we should start with a dry rehearsal of the honeymoon, so I took her off to Cayo Gulliermo in Cuba recently.
On a more serious note, having recently lost her mother, it was a timely and well deserved time to get away from everything.

Jean taking in the view from the entrance to the resort.
Infinity pools and the ocean


Of course part of the rituals, included proposing to her formally, by presenting her with a ring.
But said ring had to be presented in a box I was to make, her idea.

Of course the day chosen for propositioning her was today Feb 14th Saint Valentin day, and we just recently came back from Cuba, Tempus Fugit...

From this white beach to ...

...This white beach :-)
That was at Steve and Debbie place, where they were babysitting our dogs.
Debbie and Steve are the other set of grandparents to our grand kids. 

I racked my brain(s) over that box for a little while.  Believed it or not, my first inclination was to dovetailed the box, but being a small ring's box, that was quickly discarded as being a bit on the small and ridiculous side.  Then what??  Looking thru my recently re-sorted box of exotic woods, I thought, perhaps a bandsaw box? or carve something.  If you are used to carve Basswood and then try some of these rock hard exotics (many contains silica, which is murder on your edges), then you quickly abandoned that bright idea.

The other day we gave the dogs their baths and while they were chilling out afterward, I slipped downstairs to try something else.


Found a nice piece of Bird's eye maple, squared off two corners, then drilled a hole with a Forstner bit

Two corner edges are now squared off and I quickly (lightly) planed off a small area on both sides, before drilling.

It is a lot easier to hold a board under the drill press than a small cube, hence my sequence of operation

On my first nite, that is where I stopped, while I pondered where I am going with this...
Yes, Cuban rum and coke :-)

Overnite I tossed some ideas in the brain bucket, and proceed from there.

decided to make a cover from a different species.
Some uncarvable African exotic :-)
The blue/green speckles are remnants of fabric from a previous experiment

The cover was given a bevel around the top edges

Found some suitable hinges.
Would had prefer some thing better, but that is all I had.
The screws were a bit long, so to avoid blowing thru, I snipped the end of the screws
 with a side cutter. 

All my screws holes were pre drilled using my small LV Bird cage awl


I tried various material to make a ring holder in the cavity, cardboard, various density of foams, fabric covered or not etc.  In the end, my best bet was a piece of foam cut from a pipe insulating sleeve.

It gave me the right resilience to accept the ring and hold it.

The box, oiled and waxed


my final product


So this morning, I got on my knee and proposed to her officially, and she said ...YES


Our wedding date would be on Oct 14th 2020, in Middleton Nova Scotia.

Here goes my tool budget for a while :-)


Bob, off to Rotary duties

Monday, January 6, 2020

A quick woodworking distraction...

Jean lost her mother this past Friday, at times like these, days are kind of blurry but you gotta do whatever you gotta do to move on.  I was glad she was there for me when I lost Heather, I'm glad to be there for her now.

All that to say that her brother Joe asked me for help on a small woodworking project he wants to do, a epoxy river small table.  So I took the board home with me and it stays there for a couple days.  I know very well we can both uses the distraction so today I went to it in my small hand tools shop.

I did not thought of taking pics until I started then I misplaced my phone in the garage, so there are a few steps missing.

The walnut board he gave me has a wane on both edges (live edge).  His intention is to rip the board in half and trim both ends as marked in pencil.

My first thought was, a quick  trip to the base shop rip, joint, crosscut.
But its a bit overkill and haven't had the time for that.
Plan B, I'll simply rip it with my ripping monster Disston D8 4TPI

Its irregular shape makes it a bit problematic in my leg vise.
Used a deep reach clamp to hold the side

He had two lines, I got confused as to which ones I'm supposed to follow.  
When I first looked at it, I thought, its obvious one is darker.  Really??

Back of my initial cut

Everything was going fine until there was a loud bang (well in this old Airman ears it sound like muffled, but :-)...  Wow, the clamp literally disintegrated from the D8 sawing vibrations.

Failed clamp.  I think its a Mastercraft (Canadian Tire brand)
but nonetheless that was a surprise.

The only deep reach clamps I had available were my shop made Toggle clamps 
That held no problems.

I thought I raised my board high enough to finish my mating cut in the middle... 

...Close but no cigar, need to re-position board to finish, oh well

One edge has a small hollow, the other a corresponding small hump.

They both sit flattish

Shot both edges separately with my LA Veritas Jack plane

The starting thickness of my shavings to get to a flat surface.
I then reduce the depth of cut.

Check out the tear out on this board. Hard to see with flash on

Same shot, no flash, much more visible.  Flip board over, good to go

Both edges have been shot together and checked for square.
Now having a square reference ready to cross cut


It's at that point that I misplaced my phone in garage :-)
You see, Jean came with a bench top 10 in table saw and a 10 in miter saw, so I thought now that my board is square and not as wide, should fit under the miter saw.
Long story short, move stuff around find a place large enough to handle safely boards on floor and voila!

One board was still too large on each ends, which meant I had to finish cross cutting by hand
Back in the shop, got the shooting board out, shot both saw edges, give all cuts surfaces a quick wipe with a hard block faced sandpaper

The anticipated look for his river table.
No idea how wide its going to be.

There, done, ready for delivery.
Quick distraction but a heart felt one.

Meanwhile, the dogs are settling in nicely. Rudy is now around his beloved Diva 24/7. 

Rose, Jean's mother, little dog Diva is now living with us

Bob, moving on to another helping project with my daughter

Thursday, January 2, 2020

My son's tools kit

A while back I asked my sons Tim and Matt if they would be interested in having a hand tools woodworking kit.  Since then, with Jean, came one more son, Levy and one daughter Opal.
So, my tool kits requirements has changed somewhat.  Need more tools :-)
Oh and I also picked up 4 grand kids, 3 girls and a boy :-)
Yes, they are keeping me busy :-)

I have been accumulating tools for them all, time to see where I stand with my supply and start (?) figuring out how I am going to fit them all into suitable containers.  Said containers must fit into my car for delivery.  2 in Ontario, 2+ in Nova Scotia.

So during the holiday break I started to gathered the tools I want to put in inside to get some ideas of the size I would required.

It kinda makes a big pile... :-)


Once I had my first pile of tools put together, my first thought was like that Chihuahua from a Taco Bell commercial of long ago "I think I need a bigger box" :-)
Yeah, a tad overwhelming, but the show must go on.

First I checked my list twice, being so close to Christmas and all, it was only natural :-)
Then I reasoned that some of my tool's choices could be changed.  Remove, add, change etc.
If you never tried to come up with a minimalist list of tools, go ahead and try, not so easy, heh?
So many choices, so many wants mixing in with needs.
My starting point was my last Minimalist tool list I made years ago, March 2016.
I stayed pretty true to it, but made some modifications as I went along.  Will update my lists as they are completed, but for now this is were I stand.

The Measurements and Marking section.
I since dropped one marking knife.
Both the trammel bar and pinch stick would be smaller, I just grabbed what I got.
The setup block set and the dial caliper made it.

The plane selection.
Trying both wooden and metal planes selection to gauge the size requirements.
I ditched the block plane, and rethinking the small plow plane

Sawing selection
I am still on the fence WRT the fret saw??
Wondering about the hacksaw?  I still think that it is needed in a well rounded kit.
And it MUST be of a high tension frame, compound lever action.

Bang Bang section 
With maybe one more nail set size and another Vix bit??
The small Warrington hammer (8 Oz)  double as a wooden plane hammer

Chisels and gouge selection
Still on the fence regarding the appropriate size of gouge, but it is representative

The boring pile.
Only one size of Yankee screwdriver will make it.  I got two sizes I'm mulling about.
The brace countersink bit is out, replaced by the hand held countersink with three sizes bits, 
very handy, I used it often.  The Yankee to 1/4 in Hex bit adapter, with a good set of 1/4 in Hex bits , should handle most everything in the fastening department.  The hand drill comes with a set of small brad points bits, 1/16 to 1/4 in in 1/64 increments.  The brace with only a few bits, about 4.  The small push drill has its complement of 8 bits, inside the handle

The scraping section.
Tought about putting in a No 80 Cabinet scraper, but a tad challenged for space 

For my first attempt, I'm trying to see how big of a wall cabinet that would required.  Next I'll see about some sort of tool box storage.   Although they all get similar tool's kit, space will dictate how best, to accommodate them for their requirements.  The next and biggest challenge would be to accommodate a proper bench to use them.  That is where a Morovian  design will undoubtedly shine.
Tim, living in a high rise apartment in a city (Hamilton Ontario) is really crammed for space.  That would be trickier, but I got some ideas.

After some measuring, came out with the following dimensions:

Starting point for sizing cabinets.
I quickly ditched the 30 inch wide cabinet as being too unwieldy for the space, 
and settled on 24 in wide cabinet 7 in deep and doors of 5 in deep. 
The box sizes below are the required real estate to fit the specifics tool sections

First iteration came up as such: The chisels, rasp, files on the RH door 
and all the saws in the LH door.  But no room for any planes?? humm

Top is the RH door, bottom is the LH door with the saws, which don't quite fit, hum...
Unless I stacked them all, but not very practical, so I went back to the drawing board.

Stacking the saws side by side takes up a lot less space

Adding the planes

Then trying the metallic planes, gave me a bit more room,
 can squeeze in the router and No 78

These experiments led me to redesign the space of the cabinet as such:

I shifted the boring tools and bits on the LH door were the saws were to go

That fits pretty well everything with the following exceptions:
- Hacksaw (keep or leave out?)
- Coping saw (should be able to hang it up somewhere)
- Fret saw (leave out)
- Router plane (must fit)
- Duplex Rabbet plane No 78 (must fit)
- Small plow plane (would like to fit it in)


That is a lot better than my first iteration were I was going to store the three amigo's planes (Jointer, Jack, Smoother) on top of cabinet, for lack of space.

What is not apparent from these trials is that the cabinet depth allowed for the stacking of some tools.
The long narrow tools (Winding stick, Pinch stick and Trammel bar) all are set on the inside of the cabinets vertical sides.  So based on my experiments, I think it is doable to fit the projected 24 wide X 30 in tall,  7 in deep cabinet with 5 in deep doors.

Now time to muck up some holders and see how my bright ideas shakes out.

Happy New Year everyone

Bob, with limited shop time but using the dining room table for his experiments.
Yap, all cleared now, apparently it is needed to eat, go figured :-)