...for now. Time to catch up on a few things around the house next.
This is where we are now.

The side opening has been buttoned down for the season.

Install a new ventilated door up front
Both front opening have been sealed, but then I ran into problems...
VENTILATION and TEMPERATURE control
In order to better control the temperature inside, I needed to sealed it. Especially at the bottom perimeter to avoid the low frost area to penetrate inside.

What I started with

It quickly became obvious in the heat waves we had that I needed more ventilation.
Taking a cue from commercial greenhouses, I opened up one side (facing north)
I can roll up and down a three feet high section. I still need to put in a screen to keep the bugs out.
I also sealed up the front and back walls and added glued up chunk of Styrofoam pieces from my Amazon purchases along the bottoms. Bottom boards on both sides are caulked and sealed.
Front and back doors have new seals


When roll up I used those loops with a ball to fasten it up.
It is then tucked in under greenhouse plastic to keep it weather tight for the rain

The bottom is weigh down by a metal pole

The bottom boards are sealed with a bug resistant spray foam

Added shade cloths to both greenhouse.
They still let the sun rays passed thru but reduced the heat gain.
This one is a 70 % sun blocker. Does an amazing job of keeping it cooler.
There is a metal pipe at the bottom of my side roll up opening, its weight keep it closed
I spend lots of time sealing up the greenhouse envelope. Did a good job, I noticed after that when the greenhouse is all closed up and exhaust fan were running it was a bit louder and the louvers were not opening fully. The doors wanted to be sucked in, hard to open and the greenhouse sides were being sucked in :-) Oups, need some make up air. :-)
Opened up one of the front opening and put a louvered grill in it. Folded the plastic flap inside, it blocks the air flow until the fan kicked in which then opened it up. Fans are now happy.

I will add another vent to the right side in the Spring.
For now I have sufficient air flow with only one or two exhaust fan running.
In the colder temps I will put in a block of rigid insulation inside openings to seal them.

I had originally planned to installed 4 fans, two up front and two in the back.
Two in the back are plenty, 940 CFMs each exhausting a 10X20X8 feet greenhouse.
I can really sucked it in with everything closed up :-)

Doors closed, fans off. I put in a small weighted strawberry
to ensure it closed up

With fans running it open nicely.
Will make it prettier in the Spring, but for now, its OK

Compared louvers opening with door opened or closed,
NO more differences, they are happy

The fans are in line with the front openings.
My goal is to automate as much as I can temperature and ventilation control.
This is what I deployed to do that:

I bought two 940 CFMs exhaust fan with two Thermospeed controller.
Frankly overkill, I can run easily both fans on one, but I can also use those controllers on any fans.
Max capacity of controller is 200 watts, fans draw 20 watts max

The controller in question.
I can control both the temperature it will kick in and the fan speed.

I also used a pedestal fan inside
I will remove one of the fan controller and run both exhaust fans on the same one
Next was to figured out how the temperatures are being controlled. At first I used a remote thermometer and hygrometer. It works fine, but I have to reset the min max every day to find out how it did for the day.

Works fine, but I have to keep an eye on it, run to the greenhouse to open it up or close it
So found this little gem. A WIFI and Bluetooth thermometer. Essentially a data logger. Works like a charm and let me see the results of my efforts.


you can see the heater cycling on/off

To date. It can store up to 2 years of data
HEATING
I am not about to heat the greenhouse all winter, but certainly in the fall and Spring.
Now, there is no need to heat the whole greenhouse 10X20, plants only need to have to keep their feet warm so to speak. About 10C is all they need to be happy.
So we installed the portable greenhouses inside. They are 6X6X6, we have two, we put them on top of each other. A greenhouse inside a green house, inside a greenhouse. Much easier to control a smaller area.
We are currently using potted plants inside which we brought in before TS Fiona passed thru . They are doing fine, some are even blooming. If left outside they would be composting by now, we had repeated frost warnings.


The area I am heating a 6X6 greenhouse inside greenhouse
What I bought to heat it. A 1.5Kw greenhouse heater and a thermostat control for it.
There is a mechanical thermostat on the fan, but I prefer having better, repeatable control.

Most of the controller I saw petered out at 10 A, this one will handle 15A
Works great, happy with it. Except I'll be damn if I can switch its display to C, so I'm stuck in F for now. May have to ask the grandkids to figured it out :-)
Something else I am conscious is the fact that I have a dedicated 15 A circuit feeding the greenhouse via a 12 gauge extension cord, was worrying that I may tax out with the heater running. So I had to find out. Bought a power meter to see how much my various electrical devices are using. My ultimate goal is to go off line and use solar power. So need to know how much I'm using.

Testing one, two
That small green box in the RH corner is for another project, a dedicated transfer switch
for my water pump when using my generator.
I tested everything I am using and relieved that I can keep things under safe conditions.

It amazingly can control the temperature within a few decimal Fahrenheit.
0.2F to be exact. Awesome.
Then I tried the small ceramic heater she has been using in the past.

It is an oscillating heater.
Work also effortlessly

Its control panel. It was also hook up to my digital thermostat.

The plants are happy and they stay amazingly warmer than my set temperature
That was in day time so it read higher of course.

Me keeping an eye on the plants at nite.
I'm wearing a neck collar cause, temperature control is a pain in the neck :-)

the plants inside are happy.
The coldest outside so far has been minus 5C, easily keep it at 10C inside
But I am not sure it would be efficient in the harshest colds to come this winter. So I plan to use a portable propane heater to do the job.

Mr Heater Little buddy. Runs on a 1 pound cylinder, bought the accessory hose
to hook up to a 20 pounds cylinder. It has two settings 4,000 BTUs and 9,000 BTUs.
I whish I could control it via a thermostat, but I'm sure it would do the job in the coldest days.
Again not heating all winter but I want to see if possible in the coldest days.
It is the most popular heater on the market, due in part to its safety features, including a low oxygen sensor that shut it off when it detect low oxygen, since all burning heaters produce CO2 which is heavier than air and displaced it.
Interestingly, that heater is deemed safe to use inside your house because of oxygen sensor. BUT, only in the US except one state (Mass) and Canada. Bottom line if using inside open a window for fresh air and you are good to go. Because of its low oxygen sensor it does not work reliably above 7,0000 feet. I checked NS the highest elevation is 2,500 ft. Good to go :-)
I will used it inside house, with open window during power failures this winter.
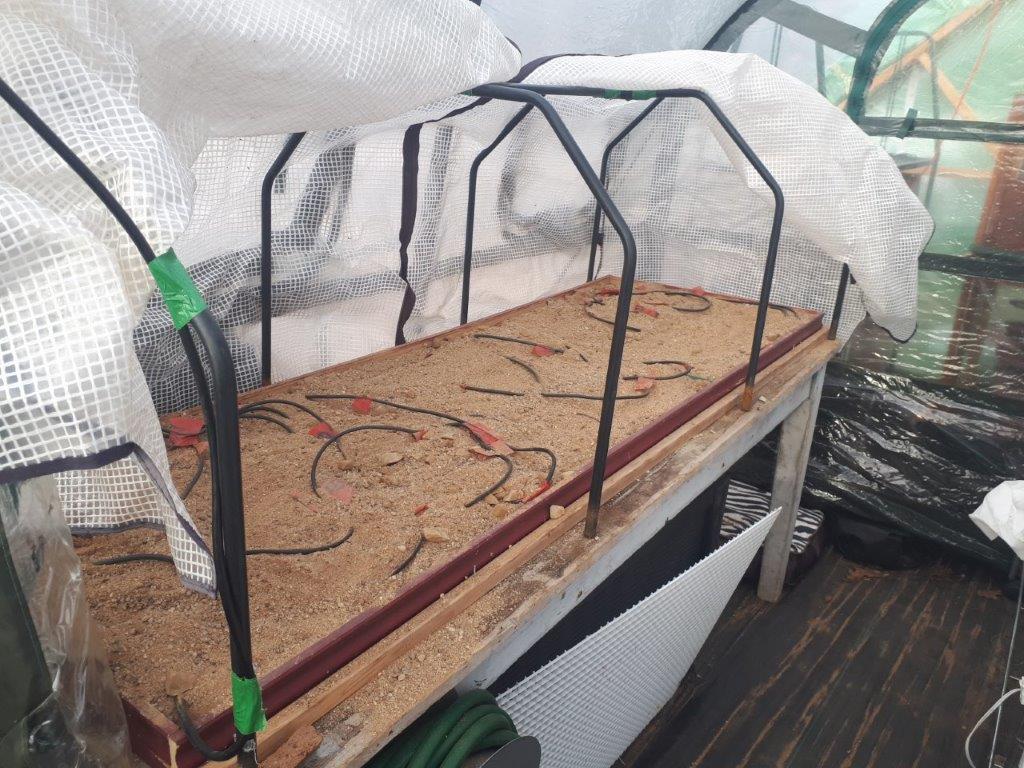
My first attempts last year.
Tried to arrange the cable in an orderly fashion avoiding cross over.
It all went to shit when trying to bury it under sand.
It worked but the multiples cross over created hotspots.
I used the frame and greenhouse cover of my Veg Trug

I also set up lights but they were not easily adjustable in height.
Back to drawing board for Version 2.0

Yes, WIFI because... :-)
2 mats and a dual temperature controller

Gathering the parts needed to assemble and test in basement
before deploying inside greenhouse.
Awaiting Jean to fill the trays with soil and plant some seeds. May as well.
For general illumination at night, using a string of 5 LEDs controlled by a remote by the door.

Remote control by the front door

The lights inside at nite. Plenty bright to check on things
On the outside there are solar lights and spotlights' to illuminate the doors. The one above front door is currently removed to install some sort of gutter above door.

Bought a pack of 6 two feet T5 LEDs full spectrum.
I choose 2 feet because that is the length to fit over the individual bed warmer

Used 2 to replace the regular neon tube that was over
her inside plants (well some of them anyway :-)
Had to add a wooden board, the two connected together was a bit flimsy hanging up


Works like a charm and are easily adjustable with the use of rope hangers
WATER SUPPLY
Greenhouse house plants which need water, so need a source nearby or better yet inside.
In the Spring I deploy numerous 5/8 inch hoses around the yard to set up watering spots around the numerous and ever expanding garden plots and flower beds.

Jean telling me about her plans.
To infinity and beyond seems to be her limits :-)
I keep telling her, I need space to run lawn tractor around....
In near future (??) it is hope that her expansionism will be curtailed and finalized so I can then deploy more permanent solution. Underground irrigation and water spots. Meanwhile I buy new hoses every year to keep up :-)

Her first greenhouse had a sink installed with running water. I modified the feed and drain to it to expand to the new greenhouse.


Currently the water feeds are cut off and hoses put away. We put in a 55 gal drum, normally our rain barrel, inside greenhouse to supply water and act as a heat sink (Thermal mass)

Typical water feed point. I used three.
And unless checking washers, asking for a leak.

I had to move the original drain line for her sink, it was going under new greenhouse.
Made a connection to both greenhouse and ran pipe down to a dry well (rocks)
tested, drains very well in my sandy soil. It also discharge by the orchards to water them.

Water feed still goes to the sink first then to new greenhouse

Sneaking the water line and flex drain pipe in prevision for a future sink.

Buried water and drain lines. cut off standing inspection pipe to fit under cover.

I have access in case of troubles, but I don't expect any

Her temporary water feed inside greenhouse.
Drain flex hose is plugged with a wooden dowel.
On this site future sink and water valves on the wall

Set on cement blocks to raise it for putting water cans under spout.
Netting to avoid mosquitoes breeding.
Talking of thermal mass, we were thinking of putting more 45 gal drums inside full of water, but let see how they handle the freezing temps first. Not worry about cracking, that blue barrel has been frozen every year since ?? and doing just fine. Thinking I may put a warming belt around it, thermostat controlled of course and WIFI :-)
Next year is the year I hope I can finalize our watering needs around the yard and start running automated irrigation systems. We also have to set up automated drip system inside greenhouse.
And that is where we stand with our greenhouses projects.
TO COME:
More automation, don't want to have to go open and close the door each days.
Finalized inside layout, make and install sink.
Add another vent up front and make better flaps inside along with Styrofoam blocks for sealing the openings in winter.
Changes to electrical entry and transfer switch to hook up generator or Solar power
Built a potting shed behind greenhouses.
Rebuilt first greenhouse (Depot Level Inspection and Repair (DLIR) :-)
And more importantly, I am using my experiments to come up with a complete greenhouse package that I can deploy in schools.
YES, in schools. There are lots of pedagogy opportunity with such a system
My plan is to shows kids how easy it is to grow vegetable. If they get involved and watch them grow they will be more inclined to eat them. Better food, better students. Once turned on, the hope is they will go home and ask their parents to grow food. Have you seen the prices of food lately?? Yeah, grow your own!

Greenhouse package will includes a set of seeds packs. TBD
Pic from LV site, OSC seeds
Problems are numerous to deploy such a system. When dealing with kids in school lots of regulations kicks in to protect them. For food security reasons, greenhouse must be on school property and monitored (Limited access).
Our teachers are pretty well overwhelm as it is, don't want to add to their burden.
Volunteers I bring in must undergo a criminal background checks and etc.
But perhaps the biggest challenge is who is going to look after it? That is where automation and WIFI access to monitor and control comes in. Will still have a need to monitor in person but not as much.
Mentioned the word WIFI and you get the kids attention, bonus :-)
NOT quite ready to deploy yet, still have some things to worked out. Have to present and involved local service clubs, local businesses and other players to make it happens.
But I have a dream and shall make it happen. Just imagine...
Bob, who have to work on his presentation.
Nice to hear you are going well.
ReplyDeleteHi Sylvain. Thanks. Yes it has been a while. Between greenhouse, niece wedding, our anniversary, my mom passing away, time flew....been busy
ReplyDeleteBob, the beaver
Good to see some news, I was worrying about you Bob! I did too progress on my greenhouse, just have to finish the door and I am done. I will post some pictures on my blog. Next spring will be time to add power and lights and look at automation. For automation you can easily do a lot of things using relays that can act on things like light, temperature, wind etc. My first automation will be watering as at this point watering the garden plus the greenhouse takes me 2h per day.
ReplyDeleteHappy gardening!
Hi Lionel.
ReplyDeleteYes, been a while. Before you start trying to automate anything you need to learn how the greenhouse react to temperatures change. Highly recommend that little Thermometer/hydrometer data logger. About CDN $40 (amazon) I am really learning a lot with it , I can even tell when she goes in, temp goes up 0.2F :-) I can easily control temp at nite, day time on full sun still a challenge, but learning.
Today got my concept plan go ahead, now comes business plan.
Comming up in future, more greenhouses in Valley :-)
Bob, on a mission to feed people
I hope your local wildlife appreciate all the fresh food you are planning for them.
ReplyDeletethere is a video by Biogreen USA showing how to change from °F to °C and vice versa.
ReplyDeleteThe manual for the 230V version on Biogreen Germany doesn't speak about this possibility. As if it worked only in °C. Maybe it is simply not mentioned because people in Europe have no interest in °F.
Thanks Sylvain. Yes, that is what I tried, even tried with sticking my tongue out on one side, didn't work. Could be defective?? Work impressively as a greenhouse thermostat, well engineer and built.
ReplyDeleteBob, who had to got up early this AM, lost power in greenhouse. All good :-)
Ha ha Steve, yes, that could feed a few white tail deers, black bears, coyotes, raccoons and the omnipresent squirrels to name a few 🤓
ReplyDeleteExciting news! 🌿🏡 Greenhouse No 2 is ready! Kudos to the team for another milestone. Looking forward to the green wonders it'll bring.
ReplyDeleteFor social media marketing in delhi Visit:- https://www.artattackk.com/
Thanks for sharing! Anyone searching for Woodworking Suppliers Near Me should check out Log Home Shoppe. Their selection of wood products and rustic home materials has been extremely helpful for our projects.
ReplyDelete