You can use a regular handsaw, with some of the various types of mitre boxes.

Original Star Mitre box design

This Millers-Falls No 200 similar to the Stanley No 115 shown previously,
can accommodate a Handsaw OR a Backsaw

This style of MB is still being made today, and yes, they still
accommodate both Handsaws and Backsaws.
Empire Level Co.
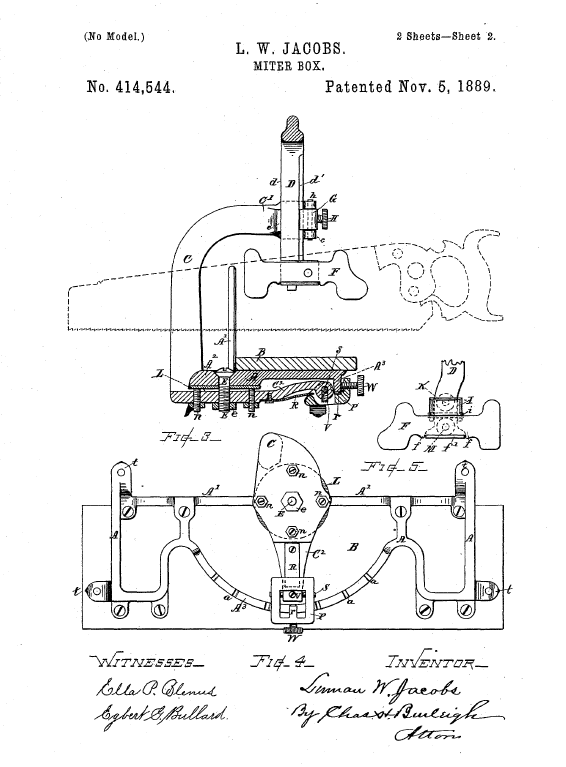
Original patent drawing for what became the Stanley No 150 Mitre box.
As you can see, it can easily accommodate a wide range of saws,
handsaws and backsaws.

A Badaxe 20 in back saw in a Stanley No 150, a sweet combination

My Stanley No 60 MB also has provision to use a handsaw in a pinch...
The two holes on the guide parts are to put in a nail or cutter pin to prevent the saw to ride up too high and destroy its set.

A fulls size 26 in handsaw fits, but I cannot insert the rear nail in the hole...
Unless I move up the guides, the saw is currently resting on the bed.


A small 17 in Panel saw fit, but as you can see
it severely diminish my stroke length... May be 2 inches...
Other are designed around a frame saw, such as the NOBEX and numerous clones, which makes it nearly impossible to use the frame saw outside the miter box. If you could, you would surely bent it because it relies on the mitre box guides for extra rigidity.

NOBEX Professional

One of the many Asian's clones.
That one look sturdy (?)
And if the blue one kinda remind you of a metal hacksaw, yes, they also made similar MBs equiped with metal blade for cutting metal, long before the motorized hacksaws.
But for best results we want the saw plate to be as stout as can be in order to achieved better accuracy. That would eliminate the handsaws and leave the backsaws and the framesaws as our best candidates, since both design put the saw plate under tension. One last thing about these types of cross cut saws, they are only as good as the blade you put in. Thankfully you can buy good quality blades and even some with Japanese style cut teeth.
Of these two, we will concentrate on the backsaws, since this is what the common "good boxes" sometimes came with (a backsaw). Sometimes not and even if it did originally, it could have been long ago separated from its box, so...
How can we tell which ones fit what boxes?
Critical dimensions of the saws VS box capacity
Today's motorized laser guided mitre boxes suffer the same restriction as the model of yesterday... Space!
The more capacity (maximum board width that can be accommodate), the longer the saw stroke and the space required, and similarly the guide bars would be taking lots of space on a sliding motorized miter box.
For practical reasons miter boxes are traditionally sized to the work at hand. A few scrap boards and the carpenter could make one to cut the coves and the crown mouldings in the house. The box dimensions being fashioned to best hold the pieces at the correct orientation. These boxes were often destroyed after job completion or whenever they wear out.
Similarly the Langdons and Stanley Mitre boxes were made in a variety of sizes which came with a corresponding varieties of mitre saw's size.
But again we are getting ahead of ourselves...

From T to B;
26 in, 24 in (clipped heel) and a 16 in
Probably because of their rather long sizes, they never came with a brass back bar, always folded metal bar. Weight would probably be an issue with brass bar.
Typically Mitre box saws are from 22 in to 30 in, although some smaller MBs can easily accommodate 20, and 18, even 16 in back saws.
The larger ones, 24 in and above should never be used outside a mitre box. The spline is not strong enough, you can easily bend such a saw, please don't!
The length of the saw plate determine the maximum capacity that the mitre box can accommodate. Remember that the longer the saw the more clearance required behind it for the full stroke of the saw. Yes, I did say the full stroke of the saw... within the confines of the guides. It will cut faster with less wear and more evenly wear along the teeth. We want that! What we don't want is to pull the saw out of its guide!
The other measurement that would determine the max thickness is the depth between the saw tooth line and the bottom of the back bar (or back spline).

A typical Mitre box saw. Disston Canada, made for Craftsman.
26 in long X 4 in deep, 11 TPI Crosscut.
These two dimensions E.G a 26X4 in backsaw, are the two critical ones we need to know in order to answer the question: Will this back saw work with miter box model XYZ.
Next we need to look at other dimensions, the guide system for the saw (Guide, post, sliding plates etc.) How much of the saw plate length does it requires?

On my Stanley No 60, the distance from the rear fence
to the front of the post is 7 in. and the bed is roughly 4-1/2 in.
The stated capacity of this model is 4-1/2 in (Coincidences? :-)
SO WHY DO WE NEED SUCH A LONG SAW?

Critical dimensions of Stanley MB 60
with a 24X4 backsaw.
That amount to 13 in already and we haven't moved the saw yet!
That leave us about 11 in at the other end, of which we need to leave about 2 in out when the saw is pulled to the maximum out and still engaging the rear post.
That leave us with about a 9 in stroke with a 24 in saw plate!!
Now you may be thinking, 9 in is overkill, my max capacity is 7 in!
YES, but 9 in is the maximum stroke, few of us will do that... So we put in some "fudge factor"
We want to have the saws teeth to traverse to whole width of the wood piece being cut in order to clear the saw dust. If you try to nibble away a 4-1/2 in wide board with only a 2 in stroke, you are indeed nibbling!! The saw dust not being cleared away will cause overheating and could distort the saw plate... You been warned!
Then what is the maximum capacity of the miter box?
That would often be determined by the width of the bed and the maximum spacing of the post, guides etc. Stated capacity will often leave "some room" out to be able to judge where the saw engage squarely at the board edge.
Why would you care? Because you can tell if you are cutting true or drifting...

For example, the largest MB Stanley made, model No 460
comes with a 30X6 saw and its max capacities are 11 in at 90 degrees.
Less of course at 45 degrees.
The capacity at 90 degrees listed in the above pic, are the maximum allowable between the rear fence and the front post.
The stated capacity of this No 60 box (nominal) is 4-1/2 in, the dimension of the bed from the rear fence. And the maximum capacity is 7 in. (from rear fence to front post)
This Mitre box is a mid size model, the larger ones will handle max up to 11 in.
with a saw plate of 30 in. A big monster for sure...
Does it allow you to park the saw at a elevated position?
This is to enable you to slide the piece under without having to hold up the saw.

Stanley No 60 showing both trip lever that hold up the saw.
A very secured mechanism. Not quite high enough to clear the beer can :-)

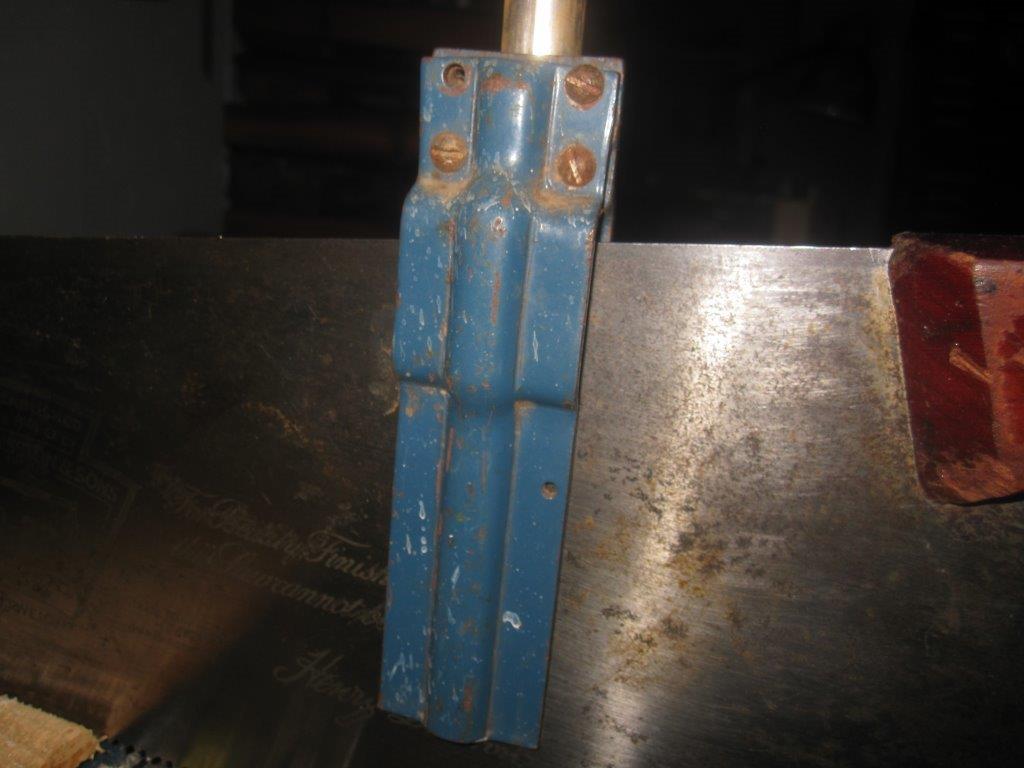
Please note that many Stanley Mitre Box requires a special horse shoe clamp and screw to be attached on top of the back bar of the saw (circled in red).
This part is often Missing In Action. It is required on the saw to trip the catch lever to release the saw. There is apparently a second source for this part. Besides Stanley who long ago stop making it.
Careful not all designs hold the saw securely!!

These two pics from my HEMPE made's CRAFTSMAN
miter box No 881-36301. Later models have a modified, more secure, catch mechanism

Front post

Rear post. Those brackets do not inspire much confidence.
If I bend them in further, they becomes hard to push out to engage.
The distance between the saw's teeth line (saw elevated into the "park" position), and the bed is the max capacity for depth of cut.

This MB No 60 with a 24X4 saw has a clearance of 4-1/2 inch.
So if you are tempted to put in a smaller saw in a bid to get more cutting depth, (say replace a 5 in saw by a 4 or 3 in saw) note that you may not be able the adjust the post depth stops to compensated. There is a finite range of adjustments within a given mechanism. For best results, you are better off using the recommended saw size.
E.X.: a Stanley No 358 mitre box is designed for a 28 in X 5 in saw
Most of that adjustments range is to compensated for the loss of depth after sharpening. Some of the better ones also let you adjust to a fix depth of cut to do lap miter joint, dados and etc. Not a thru cut, but a stopped cut.
Again, for best results stick to the saw that the miter box was designed for.
Sometimes the instructions will call for a range of saws that the box will take
E.G. A typical box would says handle saws from 18 to 20 in
You will also noticed that these saws always have a close tote (the saw handle)
As any other saws, it is designed for a three (3) fingers grip only, NOT four (4).
Although some of the handles are big enough to jam in all four fingers in there, you loose lots of control if you try to do so, NOT to mention the saw does not feel right in your hand and you could hurt your wrist with repeated operations.

Disston made Stanley's Mitre box saw.
Showing clipped heel.
How to best fit the saw handle to your hands?
See my earlier post on handsaw handles The same things applies for a comfortable fit in the web of your hands. You will also notice a slight changes of the hang angle of the handle thru the years and the various manufacturers (mostly Disston, Simmons and Atkins).
Don't ignore that angle, but do take it in consideration when setting up your Mitre box at the appropriate height for you. If you have to cock your wrist too much, you will surely feel it soon...
Remember that a properly used, well designed tool should not tired you or injured you in use. If it does, you are not using it right and or with the right posture. If you have to bend slightly, bend your legs instead of your back.
How much pressure to bear on it?
Imagine you are cutting a fresh loaf of bread, you would not want to squeeze it flat while cutting, maintain a neutral hand, you are only "there" to push and pull the saw. Let the saw own weight do its thing.
And in case you wondered?? Yes, it is very fashionable to use a miter box to cut your bread at a diner party! But watch out, red wine stain :-)

MITRE BOX INSTRUCTIONS
Improvements in Mitre Box, May 1873
A good resource for Millers-Falls / Langdon mitre boxes Adj, repairs etc.
Here are some commonly found MB's instruction sheets, converted into images. As usual click' em to big' em...
Can we host PDFs on this blogger thingy??
Between these models you should find enough information to help you set your MBs as the similar features are adjusted in a similar fashion.


Millers-Falls Catalog No 42, 1938


Millers-Falls catalog No 49, Oct 1949


Stanley's Models Nos 240, 242, 244, 246
346, 358 and 460


Stanley Models 240, 242, 244, 246, 346, 358, 460


Stanley Models No 2244, 2246, 2358


Stanley No 60 Mitre box


Stanley No 150
Next part we will clean up the miter box, adjust it then have a closer look at the saw that came with it, as we clean, and prepare the saw to fit that mitre box.
Bob, yearning for some shop time.
Jeez. You could write a book.
ReplyDeleteHi Bob,
ReplyDeleteonce again an interesting read. Where do you get all this information from? I'm impressed.
I've got one of the blue ones. Not the nicest thing in the world but working. But you are right there are some good blades available and that will change the functionality a lot.
Regarding PDF and Blogger. If you are a Blogger user you have got a Google account. Upload the PDF to Google Drive. Share the document from there and set the privacy setting for this document on public. Copy the created link and insert a link (with the copied address) into your Blog text. And you are done. Now you have got a link within your post which points to your PDF.
If you need some more assistance then drop me a line.
Stefan, with more clue about IT than woodworking.
LOL Paul, I still got a few chapters in the works :-)
ReplyDeleteHi Bob,
ReplyDeleteguess my comments got lost. Don't want to flood you with unnecessary posts.
But I can answer your PDF question. Just drop me a note.
Cheers,
Stefan
Hi all: some great stuff here. I am fairly new to using some of these hand tools. I recently cleaned up a Millers Falls 74C miter box, and I love using it for general use, keeps the noise and dust down. It is one of the red and gray units. I also have an older MF no 75 box, with a little rust, and alot of gunk. It has the thumb lever for locking the swinging assembly. I am trying to figure out how to disassemble the gib from the assembly in order to remove it. I looked through some of the pdf's here, but can't see how this is done. Are there any assembly instructions? What am I missing? thanks
ReplyDeletePaul M
HI Paul
ReplyDeleteIf I'm getting this right, it is the No 75 you have trouble with?
By gib are you talking about how to remove the swing arm from the platform??
If you want send me some pics via my email contact on this site
wwbobinns@gmail.com
and ill try to help you
Cheers
Bob
thanks Bob, I will get some pics of the 75 to you. By the way, Gerhard referred you, I was reviewing his site yesterday.
ReplyDelete
ReplyDeleteI'm not quite sure where to begin with this, so I'll just say this is a really good article. I've enjoyed reading it and pondering the many points you make.
Montanez
Could you post a larger image or pdf of the file stanleymitreinstr.jpg or anything else about the Stanley #2358? I've hardly found anything about it. I'm particularly interested in the difference between the 2358A and B. And when people refer to the 358, is that a different model from the #2358? You really could write a book on this!
ReplyDeleteHi WorksWoodSlowly
ReplyDeleteSorry for late reply, just noticed your question.
The pics you see are at a reduced size (compressed) in order to be hosted on line on Blogger servers.
Dont know if you know but, clicking on my pics brings up the full (compressed) size of them. What you see is the biggest it will render. I will have to do some research in order to answers your other questione Re differences, back soon.
Bob
Hello Robert,
ReplyDeleteI recently purchased a near-mint No. 60 MB mitre box with saw at a yard sale. However it is missing one depth stop and the spring on one of the posts. I've searched high and low but have not been able to find the parts I need. Would you have any ideas or suggestions as to where I might look?
Regards,
John