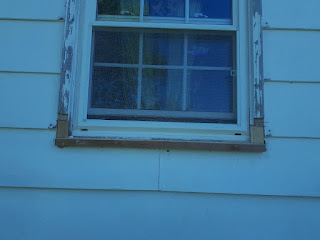
And got my window finished. Well almost...
Been racing against Larry but today is when he is passing south of us and we will get rained out for a while.
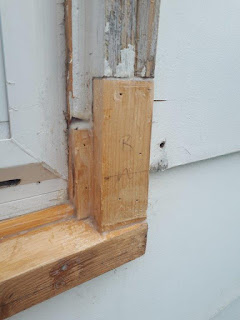
Tuesday and Wednesday were the only two sunny day of the week. So Wed morning I finished installing the new sill plate and rebuilding the lower parts of the sash. Everything is now weather tite with epoxy. Remain to sand and prime the sash. Thursday, not enough time to burn off the dew before the rain start. Will have to wait after Larry, she is getting quickly overcast...
Turned out, Thursday was a bust, all the rain went mostly around us, but we stayed dry, just a bit of intermittent sprinkle, about 1mm of rain.
In hindsight, I whish I had primed my window Thursday, because it looks like its gonna be a few more days before the sun returns
At least my epoxy is dry and I proceeded with scraping and sanding.
Calling my window sash done for now, she is epoxy weather tight.
How it went, mostly pictorial:
Previously, I had manufactured, 2 new sill plates and the other missing bit.
Made and installed missing piece of groove on the right
Once cured and a slight trim making sure everything lines up.
Sill was installed and first bottom layer on right
Epoxy glued and attached with 5 deck screws (trim head)
Original was held by caulk and nails
Making sure not to attach sill to house, just the sash.
.
Then it was time to address the large cavities I found around the frame.
Cavities around the window sash and house opening
foamed with low expansion foam
Once cured and trimmed off,
Starting to rebuild lower sashes portions.
It is a lot easier to build it back up with rectangular pieces
than to try carve the whole profile and making it match.
First bottom layer installed on the left, second on right.
Everything I add is epoxied in place and pinned
with 18 ga air nailer, while epoxy cured
For the top and final layer, had to cut the bottom with a matching angle of the sill plate.
Turns out that was an unnecessary exercise with my bevel angle gauge.
A few swipes of the block plane was easier to eyeballed it
Finally had to give in and sharpen the chisel I had been abusing errr. using for a few days.
Many chips in the edge.
The price one pay when digging out rot in search of solid wood...
Nails and others assorted fasteners bits
Much faster than by hands, which means,
I have no longer any excuse for putting it off so long :-)
Did not got them all out completely, small scratches left,
but sure work better :-)
Working on my Maritimer's Low Tide Bench MLTB
Try saying that with a mouthful of coffee :-)
Yes, it is the lower steps to my front entrance.
Three layers of wood epoxied on that corner.
Yes, my top piece rotated out a bit. Did not catch that earlier.
If it interfere with the aluminum cladding, I'll just trimmed it squarer
Only two layers on this side.
On both sides there is about $20 of epoxy used.
All rot removed, solid wood reinforced with epoxy
The longest was the waiting in between layers to dry, at least 5 hours, before I could start trimming for next layer on top.
In the end, I chickened out and did not dared priming the frame Thurs, expecting rains from Hurricane Larry, but, nope, no rain yet really....
But I did scraped and sanded the frame ready for its priming coat.
Final touch will be caulking around frame, then ready for its cladding
No reasons to go nutso, the whole window frame will be cladded in Aluminum.
I just wanted to remove the dead and rotten wood before they cladded it.
Meanwhile we emptied the pool yesterday and readied the yard for high winds
Next year, I will pay more attention to where the empty valve is located.
Will be rotated close to 180 degrees next year.
Dug a small trench to helped it along.
.
It does not look too good for me to prime my window and start on the last one.
The colorful half circle in BRH corner is Hurricane Larry coming up
What I often used to juggle my work priorities ahead.
Including finding spots to escape on a few mini stay-cations :-)
But the good news is...
That one does not need a whole new sill.
Just repairs to the corners. The weakest link...
But I do have a spare sill plate I made earlier if I need it.
The one I just finished fixing had to many rot spots, made a new one.
Guessing both frames are identical?
They are still original to the house, 1976.
Windows itself was replaced earlier by previous owner with
an older style window insert, about 20 years ago.
Friday morning Sept 10 2021 0840
Bob, Sending prayers to my friends in Newfoundland, and my fellow Rotarians in St Pierre et Miquelon
they are predicted to be hit hard by Hurricane Larry. Stay safe :-(


I got lucky with my sills. They were weathered and cracked but I didn't find any rot.My sills would have been nightmare to replace and I don't even want to think having to do that.
ReplyDeleteIts really not too difficult to remove/replace and as long as you have a good section to get your profile, good to go. That one was too far gone, way to many patches required. Replacing it was better. Next one only damaged, rot in both corners. 2 patches to shape for the sloping sill and one or two blocks on each sides to rebuilt trim. In progress
ReplyDeleteBob