This week we have the visit of our son Levi and family. With our daughter coming over with her two kids, we had a total of 2 kids (Son and daughter), 5 grandkids and 3 dogs. Yes, the house is alive with laughter :-)
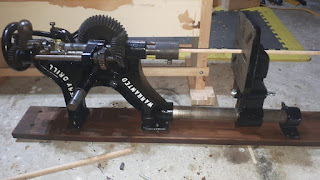
While he is here, I enlisted him to help me with my Post drill project. Been getting ready...almost... for a while. But low on my various priorities lists and definitively need some muscle to help.
The biggest hold up being the potato pretzel shape the back board took on. Started to plane it by hand, but it is a dense hardwood and needs a lot removed to remove twist so need power.
Before they showed up, I made a planning sled and hot glued shims and board somewhat level and not rocking. Ran thru planer until there was no twist showing on my winding sticks, then remove from sled and ran the other side to take twist on back side. Of course that was a lot to take off if I was to make the board perfectly flat and twist free on both side. In addition the post is not without twist also.
I stained the board to blend the planed area with the rest, a tad prematurely, cause I spend about 2 days hand planing the post and the board to match, flat and in same plane.
Finally came to the obvious conclusion that the board sit flatter better on its show side.
So decided to mount the board with old back facing up. So...plane a quick chamfer on all sides and... Stained areas
Then I realized there was some insect damages on that side of the board, so I dug it out. That damages was not visible from the surface before being planed. Filled with JB Weld wood epoxy, then once dry, stained board one last time :-)
Then It was figuring out how best to approach this monstrosity to hang it up.
Once board is fasten to the beam, I no longer have access to the bolts or nuts behind it. These must lay flat with the board not to interfere with the fitting on the post.
After many trips to the hardware store, cause I keep changing my plans on how to best secured drill on post after board is up. I finally had to... Ugh.. go with metric fasteners. The only frigging bolts of the right size and threads all the way to secured it. Of course I do not have any Metric sockets whatsoever, only a basic set of Metric wrenches, I had to but a metric 13 mm socket that fit a 3/8 drive ratchet.
The bolts are ran from the back inside a shallow round mortise from Forstner bit with a washer and on show side, I tighten jamming nut (thinner nuts) until they bite in the wood and recessed. Not going anywhere. Followed by some testing on the ground, making sure all 4 bolts lined up with the drill. A bit of tweaking and we were successful and confident it should work, so re-stained what was the back which is now the front.
Next day after stain was dry, figured out how it will be possible to attach the solid post and table under the drill. Quickly apparent that pre-mounting the studs up like we did for the drill is not going to work.
So instead recycled one previous attempts, using different bolts (SAE) and T-Nuts under the board so we could simply screw it in from the front.
Checked alignment to make sure everything will line up correctly with some play I will need for final alignment once up.
Once everything was tested to my satisfaction, time to screw in the board.
That went pretty good. Only needed two washers spacers at the top corner and everything lined up pretty good, flat and level.
Then it was finally time to hooked up the drill to the post.
Following pics from my grandson Bentley.
And then install the missing bits, flywheel, column and table, crank handle.
And finally a test drilling. Success!..
Need some lubrication, all the gears are scraped and cleaned of old dirty lube. work as is but will be a lot smoother once properly lubed.
Some mechanical alignment and maybe some timing adjustment and should be all cleared for going back to work.
But for now, it is off my floor and hanging on its post. I am very happy.
Thank you Levi and Bentley for all your help, could not had done it by myself


