Wednesday, January 5, 2022

Some progress, more waiting...

Today I was resolute in my drive to get that damn arbor nut off, on her small table saw.

Looking online was useless.  Yes, found out part numbers and saw pictures of the wrench Yadi Yada but nowhere does anyone ever mentioned what bloody size it is. Size is still a mystery 

Model 36-540C Type 2

First thing, regroup and see what I got here

7/8 (14/16) is too small, by a smidge

My next size up is 1 inch (16/16), too wide

I have a small set of Metric wrench (by necessity) my biggest are 20 and 22 mm

22 mm is a bit small

So it is either 23mm or 15/16.  Are there such sizes wrench?

Went out and found a 15/16 open end wrench, there were no 23 mm, next size up was 24mm

My assortment of test wrenches.
Dad would be annoyed at me.
You are supposed to be able to just look at it know what size it is.
He knew all his SAE sizes by look. That has never worked for me...
The shiniest, 15/16 is my new one.

Back home 15/16 fit loosely but enough to be able to finally back off the nut.

The arbor is facing the opposite direction as my Unisaw
That is because it is a left tilting saw.

So what size can it be? 23mm??  Is there another size in SAE?

Turns out that YES on both count

There is a 29/32 inch wrench, which is 0.906 inch in decimal.
23 mm is also 0.906 inch in decimal.
I learn something every day...

Oh, and I found  out that I already had a 15/16 in wrench, so I'll just leave one with the saw :-)

I will probably have more luck finding a 23mm wrench than a 29/32 inch one??

I'll keep an eye out for it in my travels.

BTW the problem with the tablesaw arbor nut is that it is often overtighten by Gorillas which strip the nut. I rarely see damages threads on the arbor itself, Pheww.

By its design, reverse threads, as soon as the blade first spin, it tighten itself more.

If you already went Gung Ho on it, no matter, it will tighten even more and be a real ^%$%# fun to back off.  Please don't do that or I'll smack you behind the head.  Probie (Gibbs on NCIS :-)

Thankfully on her tablesaw, it was not overtighten and came out as it should.  Blade installed was a replacement blade.  Whomever put that blade on, did it correctly.

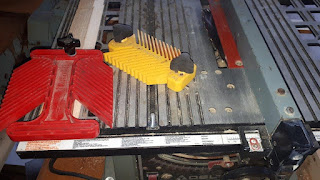
Put on my sanding disk on the tablesaw.  I was going to dust it first, but then I thought Nah, centrifugal forces will do that fast enough :-)

Sanding disk installed.
Because of its rigidity, it's a thick piece of steel, and being flat, 
it also makes a great reference surface to align the saw.
No teeth in the way, no taper in the blade, it's flat.
I only put paper on one side.


I wanted to used it to trim the sides of my completed holders.

Work like a charm, in no time did I made scorching marks, Oups.

Today is not too cold, actually above Zero C for a change, about 4C.

So decided it may be my best time to spray some finish on my pieces.  Simply for protection, in a bid to keep them cleaner looking longer :-)  I sprayed a Satin Polyurethane in the garage in my sophisticated, portable spray booth.  Ventilation is provided by very leaky doors, scheduled to be replaced, next year.

3 of my new holders done
Drilling accessories, stubby screwdrivers and hammer holders

After at least one hour of drying I moved them downstairs, much more warmer, will dry faster.

I removed a few holders that were on the walls and removed their previous attachments devices

Older holders that were modified last for using on pegboards.
They were originally screwed to the wall in a previous shop.
I will recycled them for French cleats but will not be gluing and screwing, just screws.
Keeping them, yet reversible.  Just because

That is how deep the hooks were driven inside the hardwood.
I predrilled but it was still a tight fit.  Hence the importance of drilling in between  the tools

 
My pile of recycled holders.
Except for the mallet holder in the back (now drying)
 the remainders all need a backing board before I install the cleat 
. Why?  Because they are too narrow, need the back board to support on the cleats

As I am making the required alterations for using them on cleats I also pay attention to their content and the ability to be able to remove it from the wall and putting it down on the bench.  To be self supporting.  Not all of them need that, but some would be more practical if they were.

My first attempt is the drilling accessories holder.  Is a tad long and narrow. It is gaining girth (width) by the backing board and has a top cleat. I made my side so the whole assembly sit flat with enough clearances under for the stems of the tooling.  Seems stable.  Will soon know once loaded and put to use. Wondering if I should do likewise for a small set of chisels and marking gauges??

I will be experimenting for a little while before I settle down to something that works for me.  Why I want the flexibility of French Cleats.  And I enjoy making various holders for my tools.

So I now have 4 holders drying and 6 in progress.

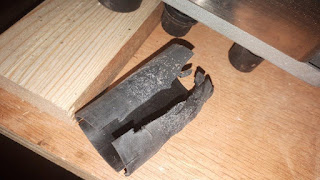
Meanwhile, looking up replacement parts for my Porter Cable Model 371K small 14 in belt sander, found out that part is discontinued and no longer available.  Isn't that special! (pronounced a la Church Lady SNL) 

Just like I thought, the rubber sleeve comes with the roller

Said roller assembly is apparently no longer manufactured.
Way to go Porter Cable, you really stand behind your products...NOT! Grrrr...


Funny, my old Craftsman 3X21 belt sander had a solid rubber wheel, this much newer one had only a thin rubber sleeve over a machined aluminum roller.  It sure did not last very long before cracking.  The older rubber wheel did not suffer such catastrophic damages.  Something to look for next time, if ever, I replace it.


If anyone has such a driver wheel assembly to part with, I'm listening...

Not too impressed with that small sander.  The belts were always a problem to source locally, had to go to the city to find them (Busy Bee), they finally trickled down in the valley but limited supply and hit and miss.  Now? Nada! And harder to find anywhere.  Yes, Busy Bee still have them but selection is not what it used to be.  I guess it never became much of a popular model and was never cloned en masse for the people, by the people machines :-)

So just how long are manufacturer required to provide repairs parts?  The answers varies from countries and items.  Car about 10 years others 7 years, some none at all, you are lucky if you can get parts

https://www.policyalternatives.ca/publications/monitor/when-will-canadians-have-right-repair

Down the road, I will replace the garage doors and insulate the garage, maybe eventually add some heat/cooling source... if I'm still around by then.  But for now, I am going to move the portable power tools inside the house.  I either get stiff plastic power cords or very limp rubber power cords which crack quickly in the cold.  And everything in between. Yes, it is cold at time around here.

Welcomes to Canada, comes for the scenery, stay because your car wont start :-)

Montreal early 70s
That is a parking ticket plus towing for snow removal ;-)

Bob, annoyed at Porter Cable


Tuesday, January 4, 2022

Sanders epilogue

 Today, I had a Dr appointment early in the AM (Note to my medical team; Instead of telling me it's normal at your age, why don't you say, It's normally seen in teenagers. It would make me feel better 😁)

Since I was out, decided to try a few more hardware stores around for my velcro sanding pad.  First stop I found the correct one for my type of sandpaper, SIA, but its a round pad for 5 in ROS.  No square ones, they haven't seen one in years.  I know, I know, normally sold to teenagers 🙄

The helpful clerk did found me a 1/4 sheet sander in the backroom and we try laying it over the square pad to see the coverage.  Not bad, corners are bare and will quickly get destroyed, but damn, I'm happy take my money.

And take my money they did.  Ouch, not cheap
Cdn $17.01 for a 5 in round piece of special Velcro with a PSA backing.
But oohh I can make that work and my chance of finding square replacement's are pretty slim to none..


It's a tad cold the last two days, it's been below zero C inside my garage so I retreated inside the house with my two sanders, donor and receptor.

The power cord on my B&D 1/4 sheet sander is very flexible being rubber, but it is cracking badly in numerous places. Canadian winter are brutal on rubber. Electrical cabling inside is not damaged, yet, but it is a hazard waiting to happen.

Cracking like this everywhere

Wires are intact, but not for much longer

The Dewalt ROS, is toasted unless I get the right tooling to disassembled it.  Not happening. Its electrical cord is about the same length, at least 15 years younger (Good shape for a teenager 😁)

Top Dewalt
Bottom B&D

Strange fasteners, but they added a slot,
 and a slot screwdriver does the job.

 Both housing looks pretty much the same. although they are at least 15 years apart

Sure enough, you can swap both cover 

So i'll swap power cords and trash one.

Hum, was expecting two terminals I could disconnect??

See where the white wire goes?

You simply pull that pin out.
So there is so... Was not expecting that 

Got power cord replaced , tested Ground Check Serviceable, good to go almost as is... 

Still have to do something about its pad.

The pad may look bad, but it really isn't that much.


Not as damaged as it appears in the pics.  With a bit of cleaning  could be used with the original paper clips. But I'm lazy and just spent good money on a round pad, so.... more cleaning, peel and stick.

Since I was not expecting that type of terminals, I decided to cut a piece of the old cable with the terminals attached.  Better chances of staying together and not get lost, in long term storage along with the power switch and cable clamp/screws.  In anticipation of next repair... if I'm still around.

In the end, beside the power cord, I decided to keep the switch, 
the cable clamp and screws and a piece of the older cable.

What is left of the Dewalt I will donate to the Wood hobby shop, we go thru a lot of these and this one came from there.  Last time we bought a new batch, we sold the old ones (like this one) to our members

If nothing else it got a new sanding pad, of which we go thru a few on the shop sanders 

Now ready to go.

But by then, this teenager needed a nap :-)

And by the time I got up, its been dusting snow all day, there is a new coating of white snow everywhere.  At this time of the year we normally plan our trip to the Caribbean.  It does not look like this year, yet again :-(

So we pretend that the white snow are in fact white sand beaches and we are drinking Margaritas.

Said illusion was broken when I took the dogs out.  Damn that beach is cold :-)

Bob, sipping his margaritas 


Monday, January 3, 2022

Sanding woes...

I have 3 electric portable sanders that I  have not used for a while.  I don't like sanding.

A Black & Decker Professional 1/4 sheet sander, my first one and quite the story behind :-)

A Dewalt 5 inch Random Orbit Sander and a small Porter Cable 14 in belt sander, for which, finding belts is a problem that seems to be getting worse.  I bought it to replaced my old bulky Craftsman 3X21 belt sander.

My first two choices

As I went to start sanding my cleats parts, I did not wanted to use my belt sander, too aggressive, I'll used the 1/4 sheet palm sander.  Years ago I modified it by sticking a PS adhesive hook & loop pad, instead of using the clips in order to used my then new favorite sandpaper, SIA.  Yes, that blocked off the holes in the pad, but who care, still works, just no dust collection thru it. 

That poor pad has been thru a lot and is now so worn 
that paper barely stick as it start getting used.

Managed to sand one cleat before calling it quit.  No problems, let see if I can revive the Dewalt.

Last time I used it, years ago, I dropped it on the cement floor and it went dead, go figured :-)

I checked to make sure nothing was mechanically jammed, IE I can move the pad.  Plug it in and it worked, cool. Put a disk on and start sanding.  After a few minutes it started throwing off the paper and the platen was sticking out on the side Huh??

What is wrong with that picture??

Wow, only one screw left to hold on the platen to the mechanism.  Where did they go?? They had to go around the fan and into the small dust collection bag, but do not see damages or hit on the impeller??

Of course, the stupid thing is using Metric fasteners.
The odds of me finding replacement at home is...
Nope, I checked


It also used another fun European fastener for these small metric bastard screw,
a Posidrive, NOT a Phillips. Luckily I have the right tool.
The missing screws did left behind evidences of their departure

I am much limited in my Metric abilities to size the fastener,
but definitively metric and guessing M4

This is where I stopped last nite and did managed to get some of my sanding done, Jean also came with a small detail sander, a B&D sanding mouse.

Cute little sander, with three gel pads where your hand fits, hummm

Turns out, they pretty well had too, it really vibrate your hands off, had to take a few breaks, my hands were getting numbed


Day two, I resolved to fix my sanders.

What do you think the odds are of finding the right metric fastener in a Metric country like Canada?  Pretty small actually, all the fasteners are still Imperial with the added confusion of American big box stores (Home Depot, Lowes) Bringing in unsuspectedly Square drive fasteners in a predominantly Robertson country Grrrr... End of Mini rant, we now return to sanding.


 Could not locate sanding pad replacements, in my usual stores, where I bought my last one, years ago...

In the very limited assortment of Metric fasteners, found a small bag of four M4 7mm fasteners, Stainless steel, but too long for about $5, then later found similar screws but not stainless and right length, only $0.15.  Only small thing is that the head is a hex nut, not Posidrive.

Back home, tried the screws in their holes, work great, except... the two missing screws did some damages to the threads, not much purchase for them.  

Screws fit correctly... in one holes only.  
The other two don't have much threads left to grab.

The screw fit inside hole, but no room left for a socket around it.

Hum, I did bought some thread lock in case, but not enough threads, need to re tap the holes, which means removing offset bearing first.

Would you know it, it is retained by one fastener, a splined hex key...^%$# Metric of course, which I don't have...

Fine I'll used the belt sander

Put a belt on, turn it on... it quickly threw out the belt on the side before I could say What the....

Tracking cannot be that way off??  Surprise, the rear driving roller is falling apart.  Its rubber sleeve actually...


The driving roller, rubber sleeve is cracked and falling apart.
Rubber do not like the cold.

Could I find a replacement part?? Will check later...

I have one last trick up my sleeve.  Now that my French door has been installed, I can see the tablesaw out feed table, and get to my blade's drawer.  I have a metal 10 in sanding disk to put on my tablesaw.

Woah, it's been over a year I have been able to see that drawer, 
looks like some critters moved in

Have sanding disk and replacement paper disk,
all set...

The fun continues.  The wrench I used on my Unisaw arbor does not fit the nut on the small bench top saw.  Close but no cigar for my 7/8 wrench.  Don't tell me i'ts %$#@ metric??

The 7/8 wrench from my Unisaw does not quite fit the arbor of her saw.
My wrench is a tad too small, but close.  Metric??

She has no idea where the wrench went, but I did remember I still have my wrenches for my old Craftsman Radial Arm Saw.  

A pair of them. One too big, the other too small, sigh...

Did I mentioned I hate sanding? 

So the plan is now, to used the 1/4 sheet sanders as it was meant to be used, using the paper clips, remove the power cord on the Dewalt before scraping it.  Replace the cracking power cord on the 1/4 in sander with it and see if I can get replacement parts from Porter Cable.

Finally, I will replaced most of them by a stationary disk and belt sander. 

That would teach them to behave :-)

Old adapter pad peeled off, some damages,
 but I don't think it would affect much.
We shall see

I quit at this point, having failed to obtain flight clearances from the tower across the street to give a few flying lessons to some deserving objects.  Rats! :-)

And the story behind my B&D palm sander?

Back in the early 90s, I went to Keflavik, a large NATO ASW base, with a CP 140 Aurora.

It was a few months before Christmas, so everyone was looking forward to go shopping duty free in the large US Navy PX.  Thing is, we were getting in late, and many on board were worry we wont make it before closing time.  Our Aircraft Captain told us, not to worry, he will get us down in time.

Ever see planes coming to land and making a battle break maneuver first?  Routine with Fighters aircraft, although practiced with transport and patrol planes, not done too often with them, stressing for the airframe :-)

Going on a detachment, we have the full compliment of flying crew plus a small detachment of technician's plus spares on board, but not enough seats for every one.  So we simply strap ourselves to the floor at designated stations.  perfectly OK.  I was strapped to the floor by the window on the wing side, great view of the outdoors :-)  I did not had my headset plugged in so I missed the notification from pilot to crew, hang on, I will be doing a battle break.

Had no clue of what was about to unfold, saw the horizon turned 90 degrees in a tight turn, lined up with the runway, straighten up and short tactical landing.  Awesome, except, having no clue, I honestly thought we were going to crash, not something I was used to, but then after it went back horizontal and landed I felt better.  Later the pilot apologized to me, they should had checked on me.  Its OK, it was fun ( yeah right).  Anyway, we did landed in time and made it to the PX, and that is where I bought it for a good price and quite the experience behind it. 

Then there was that time in 1978 when I went to Bagotville with an Argus (ASW patrol plane) from Greenwood to be a target bomber for the CF101 Voodoo (interceptors). Our Aircraft Captain said, hang on I used to fly them Voodoo, I know their tactics.  Holy s....:-)

Funny thing, years later, I ran into that pilot, he is a Rotarian in my club :-)

Bob, sipping a cold one, reminiscing and wondering if I was to start a bun fire in the snow, if my sanders would burn???


Saturday, January 1, 2022

French cleats

 I have been making a few holders for various tools, time to hang them up on the walls.

But how?  There are various ways to go about it.  In the past 16 years or so, I have been using perf board with custom wooden holders. But this time I want something I can easily remove the holders yet be very strong.  Hence French cleats.

Nothing new, been using them to hang all my tills on the walls, but this time I will be using a row of evenly spaced cleats, in a bid to maximized wall spaces and give me enough adjustability.

After some experimentation, settled on a 2 inch spacing as such.

Each wall cleats would be 2 inches wide, spaced 2 inches apart. 
the top most part is simply squared, not cut at an angle like the cleats. 
 That is to provide both support and lockability for the fixtures.


Of courses all these cleats parts required a 45 degrees rip cut, definitively NOT something I would entertained doing by hand.  Easy job for a table saw, but my Unisaw remains power less, need to bring in 220V in garage.  Normally I would just make a run to the hobby shop and ran them thru, but, in this Omicron wave, travels are restricted, so stay home and come up with a plan D.

The other, little thing was, where is my wood coming from to make these, do I have any suitable?  Yes and No, but nothing more than a few quick passes in the planer would suffice, to make some out of some rough strapping's boards.  Of course in my tight garage that required some re shuffling of equipment sharing footprint inside.  All of which required the garage door to be open, so needed some good weather.

Equipment shuffled, ready for the weather

All that to say, that today, it went up to 11C inside my garage with the door opened most of the day.  I got her done.


Completed with planer, re shuffled equipment.
Snow blower and emergency generator must remain accessible by door.
Yes, I got a new blower this year, well 2021 :-)


Here is a mostly pictorial record of how it went.

This is the space under the Boring till.
I want to reorganize it better and recycled those holders

This is part of the space under the window.
The scraper holder, bench cookies and my daily work board 
will also migrate to French Cleats.  
The boring bits till will be redone later

All these holders will be recycled to French cleats.
There are all currently set up for peg board.

Earlier this month, I made a quick holder for my hammers, 
modeled loosely on the one I used for my mallets.
I cut the parts while doing a supervisor shift at the wood shop.

The parts are not assembled yet

Back at home I glued and screwed the parts together.
I only used two of my three support brackets.


Now for the wall cleats .
 I want my finished cleats to be 2 inches wide, I also want to protect the fragile knife edge by cutting it back about 1/8 of an inch.
So I am ripping them at 45 degrees at 2-1/8 inch wide, then cut back to 2 inch by cutting off a part of the lip.

Since I am currently unable to used the Unisaw, 
I used the small bench top saw that came with Jean ;-)
That wide cleat I used to check my angle was a left over from hanging my tills previously

Ran into issues with my feather boards.
The T bolt on the red one were not wide enough to capture the table saw miter gauge slot.
My yellow magnetic one did not work, table is cast aluminum, not iron. 

Had to resort to my old standby's, wooden ones with a clamp

My initial production.  I rejected two because of blown out knots and made new ones.
They were all cut at 2-1/8 inches wide, both wall and fixtures ones.
I later recut the fixtures one to 1-7/8 inches and the wall ones at 2 inches.
ending up with a flat at the end of the thin lip.

Armed with a few pieces and a some cardboard,
 mock up how the fixture will land on my proposed
spacing layout of 2 inches.
That set up give me a 4 inch adjustment from rows to rows.
Also used this mock up to figured out minimum width 
of back board required to secured narrow holders.


I got help from Rudy with this project.
You give me a treat and I will not take off with one of your parts :-)
 
And that is where I stand now.  I have confirmed my settings and am almost ready to install them, but first sanding and...

Bob, who is keeping busy at home