Friday, April 13, 2018

Finishing the small stand

In between family diners for Easter and etc, managed to get some work done on the small stand.

Starting to ease the edges in , blending the repairs

The previously re-glued tabletop with PVA glue was re-enforced
at the critical junctures with epoxy in the gaps 

Veneer piece that was ripped from bottom,
re-attached then sanded flat


The stand was sanded, some more areas cracked filled then primed. After yet another round of filler and sanding, two coats were done.
This is in prevision of Paul further painting the stand later.


Finally after a good soaking with water spritzed on one side and spending some quality time under weight, to help flatten the veneer top, it was time to re-attached it to the table top.

The curvature was greatly reduced, but it still needed lots of clamp under maple batten to make sure it was fully adhered everywhere.


After dry, and a quick sanding it was its turn for primer

Also spend some times cleaning up two recent acquisitions; A. Monty wooden planes from Roxton Pond Qc.
If that location rings a bell, it was because from 1907 until closure in 1984, it was Stanley Canada tools works location. If you have ever came across Stanley Canada tools, this is where they came from...


Both plane bodies were given a good scrub with a worn blue scrubby
with Murphy oil soap, until rinsing the scrubby stop getting dirty water out.
Once dried overnight they both received a coat of finish restorer
like I used on the BBM. Later they will get a coats of rubbed in wax 

Both the wooden beds and wedges were cleaned up and one of the iron assembly soaked in Evaporust overnight. The other iron has been previously wire wheel brush, does not need de-rusting.

I dunno if you noticed, but the attached cap iron is wider than the blade itself.
This means that the blade assembly is not original.
The correct width being that of the cap iron itself

 And since I killed my heat gun during works on the BBM, I used the kitchen oven to dry it.
Set oven for 200 F, put the pieces in before it reached that temp, then after 5 or so min, turn off oven, leaving the pieces in.. When I removed the blade after about one hour or so, it was still warm, but could be easily handled with bare hands.

In case you were wondering, Jean is away for the weekend,
so I was able to used the kitchen stove :-)
And yes Honey, no smell, no mess. Promise!


I am not hardening nor tempering the blade, simply drying off the water which was used to rinsed off the chemical and rust, grunge etc. Failing to do so will result in flash rust before long.

The cleanup blade assy. out of the oven, besides the other one
which was previously wire brushed. Still need a sanding/polishing/sharpening

Here you can really see the width differences.
The cap iron is 2-1/4 in wide while the iron itself is only 2 in 

So obviously a made up blade assy. Hard to tell while looking at it in the plane body, the blade was solidly wedged in there. Will obviously need another blade assy. Not to despair, I just happened to have a few tapered irons here and there :-)

A further post will explain the relationship of Monty and other plane makers of Roxton pond and how it all became Stanley... Hint it was in a bid to go around trade wars (tariff) and opened up the British Commonwealth market. (Canada, Australia, New Zealand, Britain and other colonies)

Bob, still scratching his butt about cracking open my Buck Rogers push drill No 100. I know how it  is supposed to come apart, but one of my example refused to be opened up... I don't want to damaged it...

Tuesday, April 3, 2018

Picking away at the Honey Do list...

Yesterday, we went to Halifax, for our monthly African Violets club meeting.
1St Halifax African Violets Society, it was Heather last AVs club, I stayed on as their secretary.

Went we go, we often used the occasion to do a Lee Valley and Costco run, cause you never know what you are gonna find :-)

Today Jean went to visit family members, I stayed on to work on my to do list.
 First on my list was to put in the new kitchen fatigue mat by the sink.


Pretty good, sit flat, rounded edges do not catch your foot.
Comfortable, for Cdn $19.99 its a steal at Costco.
I will be buying more on my next trip for the shop

That LED magnifier lamp is from Lee Valley. Bought it for my sharpening bench
but apparently, Jean like it too, so I may need to pick up another 

Next, on my pile was the outside lamps for the back deck and the pet carrier


These two lanterns were Cdn $39.99 each at Costco. Good solid construction,
LED and light sensor to prevent activation in daytime.

These are the ones, I salvaged years ago

The new one is more substantial, seeded glass.
May need reinforcement on the wall to secured them, it's heavier.
I did put in LED bulbs in the older ones

And the mounting bolts, put the top of the lantern above the upper siding board.
Not gonna cut into it to fit, will mount a wooden platform under to raised it

About 5 years ago, I stripped and cleaned these two outside lamps, then sprayed them black.
The other one fared better, but I did not removed nor stop all the oxidation going on, and the paint failed. Yes aluminum does not rust, but it surely oxidized, leaving a powdery white substance, paint wont stick to powder. 


Ok, so I cannot proceed on this one, need to figured out how I am going to handle that back board for the new lamps. Got some ideas, will figured it out later, moving on...

Meanwhile and in between many other jobs, I have been plugging away at the resurrection of a small table for Jean's sister. The poor thing was in rough shape, falling apart, delaminating (probably hide glue) but thankfully, the loose parts were still with it.


Took apart the top to re-glued the two missing pieces, the top veneer was peeling off, so I took it out.


The bottom one was still pretty well attached, so I left it on
and glued it back as the two outer pieces went on

Obviously Canadian made, it is using good old "real" Robertson screws


The under surface, with the stand removed

Improvised clamping for the first piece going back on..

Using the beam on the floor as a make shift clamping arrangement,
using nails to glued the last piece on. Weight on top helps keep it flat

The only causality when I removed the top veneer.

Glued the rip piece back on, then later misted with water both faces and
put under the beam with maple batten to flatten the piece

The piece that was popped out, was re-glued using tape as a clamping device

When I did the first one, noticed the next one was also about to separate,
so pop it out and re-glued.in similar fashion.


Looking at it closer, I can see that the whole piece was made up of laminations, and they are all coming apart. Massive glue fails, no doubt because it was outside or in a barn for a while...


I am not going to take the whole thing apart in order to re-glue it all... Instead I will put in Krazy glue in the small cracks and epoxy in the wider ones. It is after all a last ditch effort to salvaged it. Future plant stands no doubt... These glued ups took part over the last week or so. Currently awaiting the epoxy to dry. Once all re-glued, I will give it a sanding and a coat of primer, she will paint it later.


 Next up to bat is the Thermometer/Hygrometer to be installed on the small greenhouses covers

Come with a template and a special drill bit, cool.

Strange looking bit, beefy cutting edges

OK, I should have everything to make a mess, err I meant work
Yes we had a few people over for Easter :-)

Template stuck in place, piercing a hole with a drilling awl

On both covers, I back up the drill with a piece of wood

The holes are not too bad, better in the softer plastic ones
Thinking a Forstner bit would had done a cleaner job, but heh

Checked on both, fit great.

Hum, better clean up before she comes back, heh Rudy?


And talking of Rudy, tried his new carrier...not so sure about the fit, but it was the one for his size...

Medium dogs, 10-20 pounds. Rudy is 15 wet or dry

OK Dad, I'm exhausted from all this walking around, lets go for a snack...

Meanwhile I still trying to figured out how to unstuck a frozen Buck Rogers No 100 push drill for a reader. I know how it comes apart, but his is stuck. Probably caused by that stupid greenish grease they were using at the time, it often caused gears to freeze in braces mechanisms and etc.

Trying to figured out if some chemical may work wonder??

Bob, taking Rudy out for a walk :-)

Sunday, April 1, 2018

Possibly the ultimate marking gauge...ever !!

Smack into the category: Why didn't I thought of that one first... Comes this clever marking gauge from the folks at Lee Valley

Ken, you need one of these
Pretty ingenious if you ask me :-)

And it seems that some one else is marketing my electric hammer invention out there.
Available at this fine hardware store...

Happy Easter Week-End every one

Rudy helping me checking out a new piece to hang in my shop

Sunday, March 18, 2018

What is coming up next...

I have a few irons in the fire right now, hence not many posts lately.
We just finished March Break, so we had the grand peanuts over a few times and did stuff with them.

Will she get the snow ball or not...
Heh, she started it... :-)

The few times that I have been able to get a gander at my blog stats, I noticed some comments left on my post about the Buck Rogers Push drill.  Someone has a broken one (or jammed) and is having trouble taking it apart.

So I finally rounded one of mine (I have two) and figured,
I'll simply take it apart and take pictures...

 Well sports fans it is apparently not that easy...
I know it can be done, since I took it apart once and shown a pic of it a parade dress..

Pic from earlier post, 2015

 I am going to have to fetch the other one , maybe that was the one I took apart? If so, should be easier. Then I'll figured out a way to crack open the other one without damages.
So in order to answers the few questions he had, I'll take them apart and answer him in a upcoming post. One of a few drafts on the go...

Saturday, on St-Patrick's day, I worked a full shift at the Wood shop on the Wing.
We had a bit of blowing snow but still nothing much. Since my shift was from 1000 to 1600 I brought a few things along to worked on.

.
Rudy wondering where am I going without him...

Wow, look at these signs of Spring...
The Air Cadet's gliders launches are coming out of storage,
and you can see blowing snow from the snow removal in progress on the active runways.
Must be Spring...!!


The first thing I did was to take apart my beam Boring Machine to figured out why the frame is so crooked. And yes, I measured both sides they are exactly the same length.

Stripped apart to check on the frame

I did noticed earlier how these bored holes did not appeared to be flat,
some are obviously on a slant.

Perhaps some of the fibers got compressed after rotting and etc??  So figured I will drilled them flat on the drill press with a Fortsner bit. I only drill deep enough to ensure I had a flat surface all around.


With the pieces loose, I can make it lay flat.
So I'm hoping to get it flat tight by planning only the sides ??

When I was drilling I made sure the piece was as flat as possible on the drill press table. But there is obviously some rocking on the base, it is not flat. I hate to plane off the surfaces to fix it, so Ill try to take off the two bolts that hold the bottom pieces together. They are just mortised and tenon, loose, no glue.

Dome bolt head at one end

Square nut at the other.
Wont fit a modern Hex socket, and then there is the small space around it...

Removed the nut on one of then, see the lose fit around the bolt shaft?


Not anymore on the other end.
It is hard enough to remove the recessed square nut at the end of the dome bolt, 
but even with it removed, the bolt shaft has swelled from rust and wont move.

If I try to force it down, the wood is threatening to split around it, I will not force it...yet. 
Not without some re-enforcement, after some more rust loosening effort.

With one bolt slacked off, there is enough play to see its construction.
Cross piece M&T to side pieces and platform in between held by a rabbeted edge in a groove 


Whatever I do, I must make that surface lay flat, or at the very least coplanar where the uprights (2) bolted on.  Having a closer look at the mortise surface on top where the uprights goes, the one that was crooked, has definitively made a depression on the shoulder. May have to shim it a smidgen to stay straight. All that to say, my BBM is back in pieces... for a while

I then turned my attention to the Boring Till holders, brought my prototype holders, my blank hardwood pieces and a copy of my post that shown how I made my holders. Its been so long, some of my tools selections have changed, need to ensured I got it right before drilling.

That is when I noticed that my templates, which I had to recut to fit my till, were a bit shorter than my blanks..??? Huh??

So decided against drilling them, will have to cross cut to size first. Meanwhile I left the till up on the wall in my shop.

Had to make room on the glue table anyway :-)
I like these new Bessey pipe clamps we got with the built-in feet. Smart

Since I brought a bunch of tools to check on my holder fit, figured may as well take them apart then clean & oil them.


Everything was going fine until I got to my Scottish brace, Mathieson. There is too much play, almost a 1/4 in between the head and the shoulder on the frame. Easy fix, open cover, tighten or add shims to fix, replace cover...

Of course, I did not had any of the special spanner required (with two small pins).
What always works for me is to insert two small finishing nail that fit snugly in the holes, then using the pliers clamped across both, gently turn CCW. I pre-ably soaked the threads with WD40, but if avail would had used liquid wrench.

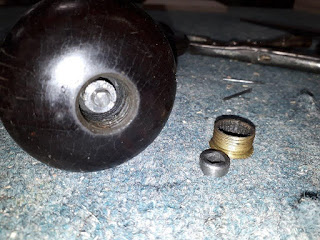
Brass plug cover removed. The threaded female parts are on the wood,
hence traditionally a hard wood, mostly rosewood etc.

Hum, this one got me temporarily stumped...
The metal ring on top was loose, the one left is round and does not appeared to be threaded on.

So How do I remove or adjust it???
A simple interference fit? If so I'll have to tap it down.

I dunno, this is a Mathieson, should be a good one, what kind of devices were they using to hold the head on, loose enough to turn freely? And be adjustable for the inevitable wear.  The previous ones I seen, used some sort of threads post.

If any of my reader has any idea's please chime in, appreciated

With these and in between helping the members that shows up (7) I managed to cover my shift and stay busy. I liked it that way, time goes faster...

In retrospect, I whish I had brought along my Boring till, which I left hanging on its French cleats in my shop. I could had trimmed my holder pieces to length and get on with it.
Oh, well, there is always tomorrow...

Sunday took a drive to mother in law, visit with her and Rudy's girlfriend Diva.
Rudy loves it there, between him and Diva they pester Mom for treats, they work as a team :-)

Here are the two love bird caught kissing on the couch, at Mom :-)

So coming up next would be the post on the oak 3 tiers plant light stand I'm fixing or the How to take apart the Buck Rogers No 100 push drill, whichever come first.

Then there are the post that still need to go up in my shop, and clean up then attach to it the Post drill, etc, etc...
Oh and almost forgot, I should really put this poor boring till to bed...

I also have to "help" built two small tables for a hallway, for Jean's sister, and Jean is starting to accumulate furniture pieces request, so I should be busy.

A few lectures/demos at the wood hobby shop, and, and
OH, yes my annual RCAF mess dinner on March 28th (RCAF birthday is April 1st 1924)

Yes time can fly pretty fast on retirement :-)

Bob, who is also a gentleman farmer starting vegetable from seed in his basement. Should be another good growing season.