Sunday, September 20, 2015

Tuning and using shell bits part 1, the nose and the sides

Now we get to the fun part. Tuning and using the bits in a brace.

The shell bit...

And its variance, are simply sharpened at the cutting lip. Now as with any drill bit, if we touch the outside diameter, we effectively reduced its nominal size. So we will do most of our work on the nose, both faces, and mostly the insides of the side's flutes, IF required.

Think about sharpening a turner or carver gouge. We only do the tip...
Yes, we will eventually have to touch up the inside & outside edges to refine them.
Because...Sharp is the meeting of two flat surface with zero thickness.
As soon as I say flat surface, someone always question: But what about the gouge, they are not flat but curved?

Good question, simple answer: At every point in the curve are two flat surfaces meeting. Take a flat sheet of paper, imagine one edge is at the zero thickness, now curve it. Every point on it are still sharp, because every meeting point at that edge are......still flat. We are talking of course at a very small level, the size and distribution of the atoms of iron carbide surrounded by nickel, carbon, manganese etc.
You cannot go flatter (hence sharper) than that... Hint, that's why Stainless steel can never be brought to the same sharpness levels as High Carbon Steel (HCS).

Back up to our more manageable level.
IF we want to touch up the sides; We would prefer the whole surface of the shell edges to be in the same plane. Because it is easier to maintain that way.  Do a light sanding as required. And I mean light sanding! I would rather tolerate less flat than to remove too much material.

Here's the little secret to sharpening any drill bits.
You need to understand how they cut, so you can quickly troubleshoot a bit, to know if it is salvageable or if it is now worn out past its usefulness.
Once you know that, you can quickly see where you need to touch up to restore it.

Secret No 2: LESS IS MORE. Only take out as little as you need to make it cut with file, etc. You can quickly ruin a bit if you take out too much, you been warned!

The various shells family bits (Nose, Spoon, etc) have the major difference
at the nose. Make sure you do not mess up the end when flattening the sides.

Because of their construction, they have possibly two cutting edges.
The nose edges are what is doing the actual cutting of the hole.
The two long parallel edges on the side, are not really cutting.
You read right!

The nose edge is cutting, but look how rounded the long side edges are.

See the shape of the sides on the bit?

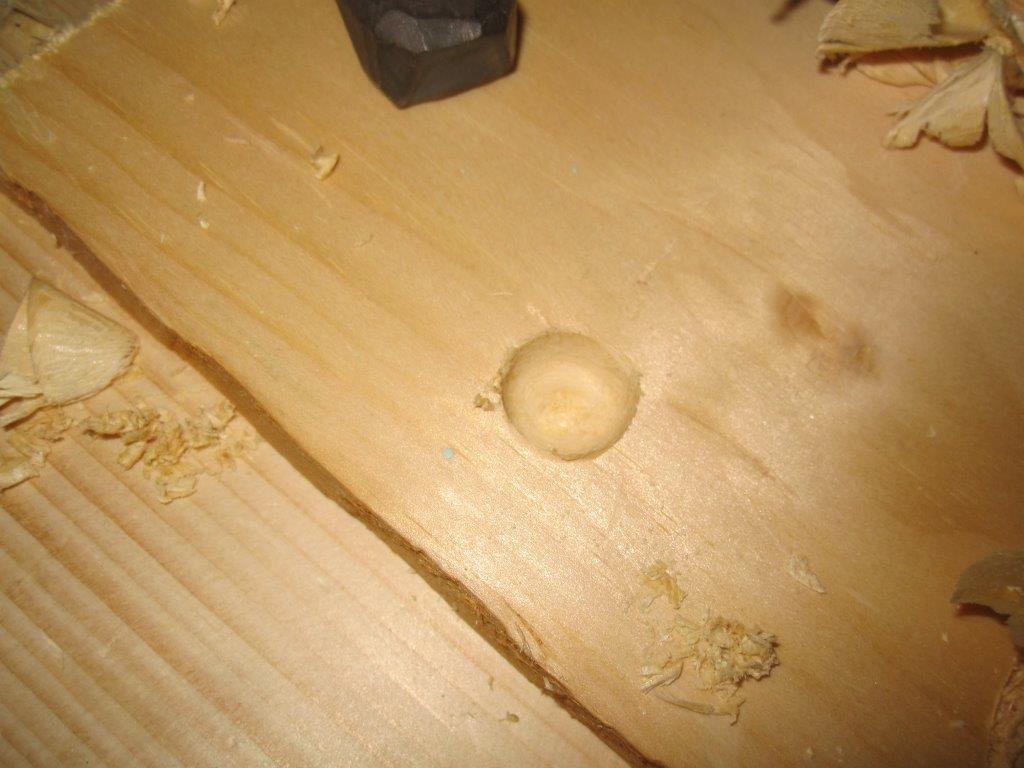
Leave a nice hole. If I try to go much deeper, 
the sides would now enter in play, no?

Lets make a through hole to find out...

It just requires light, constant down pressure to keep cutting.
Next thing you know, you just start to poke on the other side.
I could sense when the bottom changed density and stopped before blowing thru.

Hole on L is with my big nose bit, hole on R is from Center bit.
Both on backside.

We are through... The sides did not contributed
 to anything as far as cutting. It was all nose action, by a nose :-)

And BTW I uses that saw bench also as a place to pound chisels into the work piece, or drilled through into a 3/4 in bench dog hole. That's why I wanted it super heavy stout. Made of 2X6 construction lumber, dovetailed in the corner and braced by glued and screwed skirts.  Thanks to my bench dogs holes and removable fence , I can hold all kind of material to work on comfortably while straddling my bench.

My saw bench is also a mortising bench and a drilling bench.
It uses the same holdfast and bench dogs as my main bench.


Again hole on L is that very rounded sides, nose bit.
And on R Center bit. The sides are smoother from the nose bit.

And here is the big secret of that nose bit, 
it is really a small tanged turning gouge.
Not carving gouge, because it it was, it's pretty thick and
 heavy for no good reason. Yet it drilled effortlessly right thru...

Just to illustrated that the nose action of the shell bit's family, can be duplicated with a simple gouge, without having two cutting edges along its side. Exactly like a turning or carving gouge.

So what about the sides? Well, as long as they do not become lower than half the diameter of the bit, they would be fine. What happen if you lower the diameter of the bit? It wobble in the hole, becomes harder for the bit to track true in the hole. And chances are the diameter of the nose would be reduced too, if so, everything is fine, you are just drilling smaller holes :-)

As a matter of fact, the outer edges of a good bit should be slightly proud of the bit's shaft.

A good nose bit. The bit overall has been brighten, the outside very lightly polished, the sides are clean, no burr, the nose only is sharpened.

Now, since they are riding on the outside edges of the hole created, they could cut or scrape, or... do nothing, just keep the bit in the hole.

When they cut, they can becomes too aggressive and tear out more than they shave when encountering end grain. When you drill a hole on the face of a board, you get two end's grain and two surfaces going with the grain, and a bit of both in between as you go around.

1- going against the grain
2- going with the grain    
3- going against the grain
4- going with the grain     

If the side edges are either dressed to cut or scrape, they should not be reversed and only turned in the direction of the cut to protect that edge.

If you put a thin sharp arris on the edge, it would quickly crumble and cause problems, jamming etc. Remember that when tackling the hollow taper bit.

A small negative relief angle on the trailing edge of the cutting edge is all that is required. We are after more of a scraping cut than cutting. Hence the cutting edge is rather stout. There are a lot of force exerted on the side walls of the bit while cutting.

Notice how quickly you could reduce the diameter of the cut.
Unless it is nicked or damaged, don't touch it.

Look at this modern tapering bit from Lee Valley. It uses a rose head pattern.
Notice how the edges are sharpened. More like a scrapping action than a cutting one. With just enough clearances behind the scraping edge


It work perfectly good in wood, but it would be fine in soft metal.

Imagine trying to touch up every scraping surfaces at the same angle on all of them, with only a file? Forget it, you will quickly muck it up.

HINT to sharpen at home, using a previously shaped hole in a piece of wood
(Made by the tool you want to touch up) Sprinkle some abrasive powder (Valve lapping compound work fine), turn the bit in a drill in and out a couple time, done. Look at the brighter edges, still all in same planes. Don't forget to do it always to the full length of the bit, not just a portion of the tip.

All that to say, that AT BEST; Your edges could be scraping, never cutting.
Just make sure that there are no nicks etc that could scratches the inside of the hole. Rounded edges are fine, just no scratches...
So unless you have good reasons to, leave the edges alone, concentrate on the nose. Which you could treat just like a turning gouge or a carving gouge.
Work on both sides (inside/outside) leave the edge stout to be long lasting.

In case you were wondering how to best roll an edge on the stone, there is actually a jig to help you with that operation, it's called the Oar sharpening jig

The only jig I know that handle easily curved edge like on a carving gouge.
I never used one, I sharpen all my gouges by hand.
But this would be great to re-established a proper constant bevel on a mangled tool due to careless sharpening.

Next part, chucking it in a brace, which ones, when?

Bob, spinning tales, with or against the grain?

Saturday, September 19, 2015

Lee Valley antique tool sale

That's right, today only, Saturday September 19th from 10 AM until closing or they run out, whichever comes first :-)

A friend of mine was in earlier and saw the poster, so he E Mailed me the picture :-)

We went together this morning, and arrived early as the store opened at 0900.
It did not took long before a crowd started amassing at the door of the sale room.

Besides planes of all descriptions, they roughly had 800 for sale starting at $10 ea, they had a large selection of braces starting at $5 and some handsaws.

Prices were marked in chalk on all planes

They had a large selection of moulding planes of all sort.

And braces too.

Sorry for the poor pic quality but you get the idea.

A a few bucket of handsaws.

You could even get to play with them.

All in all it was a fun shopping trip.

My loot back home.

I was a good boy, I could have easily over spend my tool budget, but I made list of specific tools I was after and stuck to my list. Now there is a first for everything isn't it ? :-)

They even thrown in a free shopping bag and two posters of tool porn, bonus!

So what did I got you ask...

3 match sets of Hollow & Round molding plane. $20 each, very reasonable...


They are stamped: No 2 (small size), No 6 (middle ones) and No 16 (larger ones)
They are Harlequin match set, meaning not from the same manufacturer.
They had similar complete half set for sale, but I was only after specific sizes, I do not need 2 or 3 of the same sizes thank you.

I could easily spent more time in there and buy a few more, but, as I said, I was a good boy, and stuck to my list :-)

Oh, and I while I was at the store, picked up a small pair of embroidery scissor for my wife for her sewing stuff. Yes, I'm a good boy :-)


Bob, with more tools to restore, research and sharpen.
Yes I got room in my plane tills :-)

Friday, September 18, 2015

Making holes and reaming

We talked previously about the shell(s) and hollow taper bits, but what do you do with them and how do you restore them in order to used them?

Well, first lets start with some history behind how making holes has evolved to better understand how we got there.
Making holes has a very long history, the Egyptians woodworkers knew and had tools to make them, and some tribes of humans long before used bow drills and pump drills. These drill types were also used to make fires, by friction...
These were evolved from the earliest tools that merely used sharp objects that were twisted back and forth with your hands.

North American tribes using both bow and pump drills to make fire.

Modern reproduction of Native's pump drills.
The stone act like a flywheel to keep momentum going.

It was very laborious work, so the idea was to make a small piercing hole then enlarged it successively to required size.
It was somewhat difficult to apply sufficient pressure to help the cutting action, various methods were employed, using a board on top, putting pressure using your chest or your mouth, even using an apprentice to apply pressure while you drilled.


All kinds of holes are required to fit various parts together to build something, wood joinery method we have long taken for granted, simply did not exist.
Neither did they had Singers sewing machines, so they had to pierce materials and wove in a thread like material (sinew, fibers etc)
Although I have read recently that some tribes were using fish glue to keep the seams of their garment together, instead of stitching.
Yes I still have sewing machines on the brain :-)
The piercing tool Awls, needles, are probably the first kind of tool man used to make holes.

For the longest time, no one ever heard of sizing drilling implements as we currently uses. That is mostly a by product of the industrial age.
The sizes of natural needles, bones and how well you could shape a piece of stone flint dictated how big or small of a hole you could make.

Using diagonal shaped bits of stone were the drilling implement of choices, the further you drilled, the wider the hole. Want a bigger hole? Use a bigger stone's flint, OR, ream the hole bigger.

Drilling in the Middle Age

Once man discovered how to work metals, he could make stronger, smaller bits and make neater holes faster, well relatively faster, as long as he was using reciprocating motion (pump and bow drills) since we are only cutting half the time. Continuous motion (brace) cut at least twice as fast but took surprisingly long to show up in tool evolution (never heard nor seen much braces before the 12th century)

We had intermittent rotary motion before, like hand operated augers, and tapering tools (reamers). These were mostly used for big holes, since the physical effort required demands more strength.

Roman auger bits, shell bit and twisted end


A 19th century "modern" auger, 2-1/4 in.

The business end of the auger above. 
A threaded center pin is used to help start the auger and to 
pulled it through the material. Notice the upturned lips?
Cook or Gedge pattern bit, 

 
Wheelwright using a hand reamer to enlarge 
the center hole for the bearing/axle

Even then, the first bits used in braces duplicated known forms of existing bits, hence shell bits and the next logical reamer design, tapered hollow bit. They worked very well were easy to make so they survived very long until supplemented by nominally graduated, woodworking bits. Think a set of 13 Jennings, Irwins etc.

Why thirteen? Because it cover a wide range from 1/4 (smallest practical twist bit design) to 1 inch by 16th of an inch.
So they are numbered No 4 (4/16=1/4 in) to 16 (16/6=1 in)

A No 5 would be 5/16 etc. This was a typical numbering system 
for various drill bits.

My collection of Irwin, missing No 13,14,15.
Numbers are most often found stamped on the tapered end.

 For holes greater than one inch, a different type of bits would be more efficient.  As the need for various size holes were required in various materials, a large variety of patterns and designs evolved. Today you can buy set of typical twist drill bits in 1/64 increments.

So back to reamers. They are required for various jobs besides enlarging holes.

To create a matching angle for the head of the fastener to sink it flush .

Old fashioned brace's rose head taper bits.
The last one on the right, and small one on top are different, 
not a rose head cutter. Notice that the angle cut is pretty standard.

The angle is roughly 45, which means it cut a 90 degrees cone.
Screws heads came traditionally in 82 and 90 degrees head taper.

To ream the inside of pipes or holes to deburr, or to facilitate fitting pipes together

These large brace reamers are used on pipes, not woodworking.

To match the tapered body of a screw better, to increase holding power of fasteners.

Modern screw tapering bits for pilot holes.
Drill a tapered hole for the screw body and a recessed (adjustable depth)
taper for the screw head

These are the first uses that come to my mind, but they are surely others I'm not aware of.
Some modern forms of reamers I used

A set of hand operated reamers.
I also used the bits in a powered drill.

An adjustable depth reamer. The taper body slides 
in and out  in the outer sleeve.

These rose head cutters work well in soft metal like iron and brass also, but careful not to overheat them (by going too fast in a powered drill).
You are NOT going to overheat them using a brace...

Now that we seen how making holes and varying its size by reaming, there is one more thing to mention. When the object is to big for the hole, you have two choices:
1- make the hole bigger, or
2- reduce the object size to fit the hole

How you reduce the end by tapering or simply turning its tenon smaller, has an effect on the resulting strength of the whole, both methods are used depending on the intended uses. Chair making uses both applications and also uses a combination of both.
The wedged round tenon in a tapered hole on the exit side, merely locking strongly the tenon in place.

Next will take a closer look at the brace and how to uses some of the bits such as the shell and tapering bits to cut both the hole and the tenons

Bob, making some holes in man history

Monday, September 14, 2015

Small modification on her parlour cabinet

While I was fixing the hinges on the drop leaf, I thought it would be a good time to address a small annoyance I noticed, while taking the machine head on and off her cabinet.

Conveniently there is an electrical outlet behind, just in case
 she runs out of pedal power :-)

Like I said previously, that vertical lift is spring loaded and you really have to hold it back on the way up, you don't want to let her spring up on her own..... Humm, would make a great squirrel catapult launcher (click on text) :-)

Most of these machines required some sort of base to operate in, be it a small tray to hold the bentwood case cover or set inside a cabinet held by two hinge pins.  That one is no different.  But the way it hold the machine in this cabinet is really different.  There are two standard size of old Singers, the full size machine (like this one) and the 3/4 size ( such as No 28, 128 and  99 )

Typical Singer small portable case, full size, with both hinged pins showing

Hinge mechanism from Singer is more compact and simpler.

Lo and behold this one can accommodate both! It simply use the hinge to pined the machine as usual and secure that on the lift tray with an appropriately sized adapter plate to fill the hole around the lift tray opening.  Very clever and standardize their cabinet construction.  It even has a metal drip tray in the bottom, so you don't splash sewing machine oil on your legs inside the cabinet, nice touch...

Removing the full size machine adapter plate.
Metal thing in the bottom is drip tray.
Plate need some work in the front, small thin piece is missing.

So the Missus can wear her finest and not worry about getting dirty while sewing.
Here's why according to a Singer's literature of the days:
Modified to reflect today' s reality :-)

I shit you not, the text on the left, is real vintage.
Modified to reflect today's reality :-)
As usual, like any of my pics, click on it to enlarge.

On Heather machine, the adapter tray is loose and if it shift, the machine won't be able to come out flush with the top. Investigating the problem, I realized that the hinges which normally hold the machine in the bottom case or cabinet are missing on both the tray and the machine.  There is also two holes under the hinges which lined up with the lift tray.  Found out that a piece of 5/16 in hardwood dowel fit perfectly and hold everything secure and in alignment. Problem solved!

Round hinge cavity and a thru hole in it, corresponding 
with a same size hole on the lift tray.

Piece of dowel fit just right.

Since these dowels are just friction fit, I can easily reverse my temporary repair once I figure out how they were originally secured and find a pair of those hinge. May be hard to find, but you never know...

Adapter tray now held securely in correct position.
I got the belt stuck between the lifting tray and adapter plate in this pic.
The metal drip pan is showing at the bottom, dark part on left of the bottom 
is the treadle showing, without the drip tray you could get splash on.

I then had a quick look at the bottom RH door, it's top hinge is loose.  Tighten the screws but there is still too much play. It's better, but not perfect.  That hinge will have to come out, be straighten and I may have to plug the screw holes and make new holes?  Other than that, only has a couple of spot that would requires veneer patches to finish its restoration then gently clean the whole cabinet.  We have no intentions of refinishing the cabinet and make it look like new, it is after all almost 110 years old.  Machine serial number tell me she was made in St-Jean, Quebec in 1906.

Bent and loose door hinge on top RHS.

That spot bear a previous repair but a piece is missing. 
I will remove the whole patch and put a new one in instead 
of adding a third patch.

We both have a love and respect of antiques (like each other :-), so preserving its character is important to us.
But it also have to be a working machine, which she would be after a good cleaning and lubrication.
These old gal are all cast iron and steel gears, heavy duty and last forever.

Handling that newer Kenmore machine around right now in the shop, I'm amazed at how light she is compared to all the old Singers I have lug around, big difference!  That Kenmore is aluminum cast. Newer machines, including crappy new Singers are plastic case and gears, probably very light after manhandling a cast iron behemoth ;-)

Bob, going down his list of sewing machine related jobs on my to do list.